How to Create a Systeme.io Sales Funnel is a big question for many new business owners. Imagine having a special path that guides your customers from just looking to actually buying your products!
That’s what a sales funnel does. Did you know that, on average, sales funnels convert about 2.35% of visitors into customers?
This blog post will show you, step-by-step, how to build your very own sales funnel using Systeme.io, a super easy tool that even grew to $20.1 million in revenue in 2024 because so many people love it.
You’ll learn how to attract new people, make them interested, and turn them into happy customers, all without needing to be a tech wizard!
Step 1: Create Your Systeme.io Account
To start building your sales funnel, you first need a Systeme.io account. Systeme.io is an all-in-one platform. It helps you create sales funnels, send emails, build websites, and more. It’s designed to be easy for beginners. You don’t need any special tech skills to use it. Creating an account is free. This means you can start without spending any money.
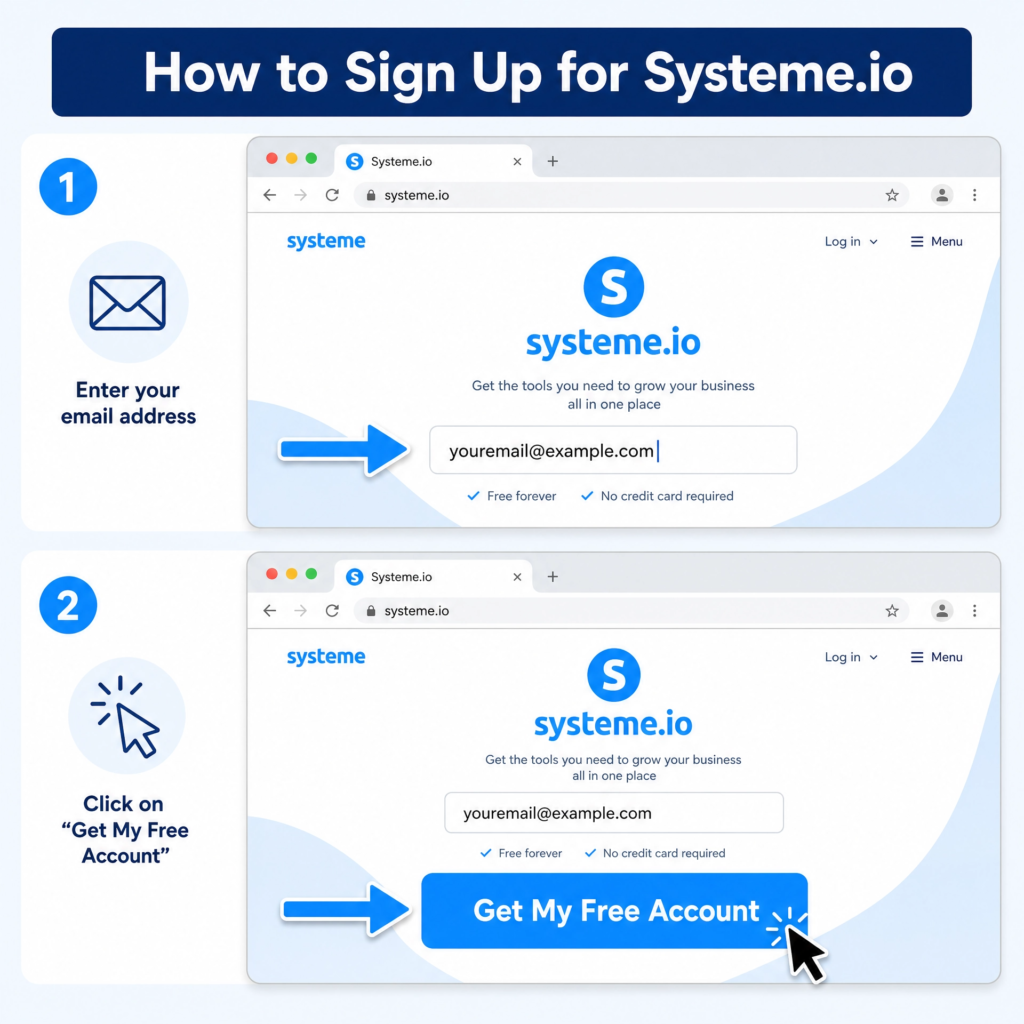
First, go to the Systeme.io website. You can find it by searching “Systeme.io” on Google. Or, you can type systeme.io directly into your web browser. Once you are on the homepage, look for a button that says “Get My Free Account” or “Start Free Now.” This button is usually big and easy to see. Click on it to begin the sign-up process.
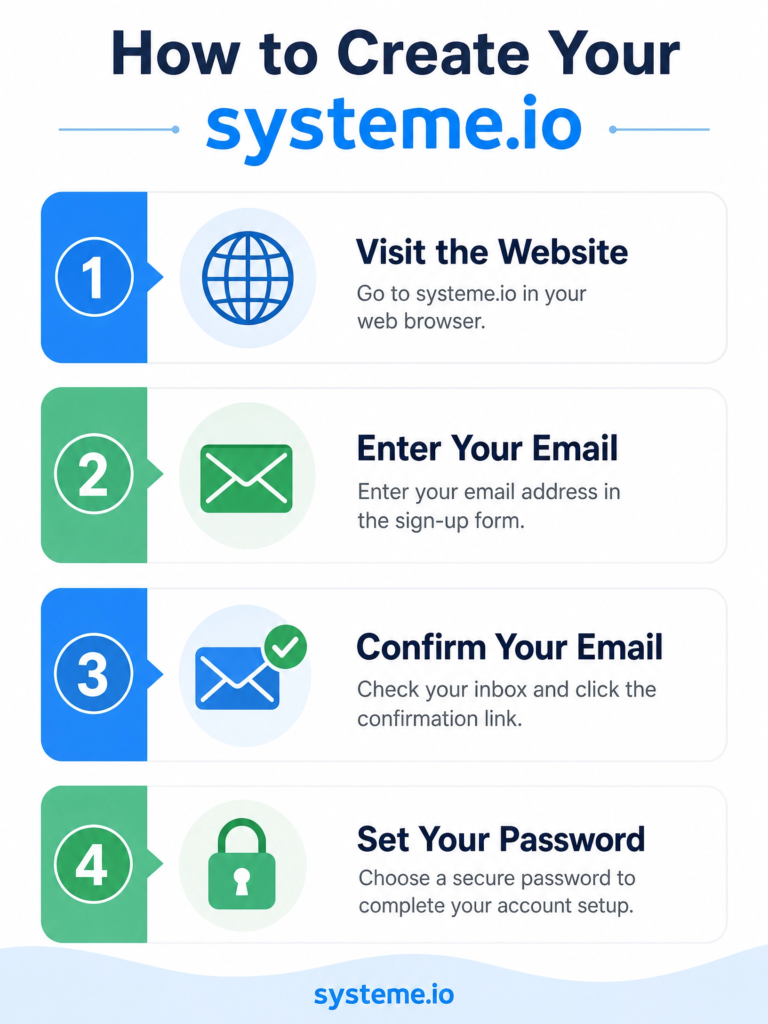
The next step is to enter your email address. You will see a box where you can type your email. Make sure to use an email address you check often. This is where Systeme.io will send important information. After typing your email, click the button to continue. It might say “Create My Free Account” or something similar.
Systeme.io will then send you a confirmation email. Go to your email inbox. Look for an email from Systeme.io. If you don’t see it, check your spam or junk folder. Open this email. Inside, there will be a link. This link is important. It helps to confirm your email address. Click on this link to activate your account.
After clicking the link, you will be taken to a page to set your password. Choose a strong password. A strong password uses a mix of capital letters, small letters, numbers, and symbols. Write it down somewhere safe. This password will protect your account. Once you set your password, you will be logged into your new Systeme.io dashboard.
Congratulations! You now have your own Systeme.io account. You are ready to start building your sales funnel.
Step 2: Create a New Sales Funnel
Now that you have your Systeme.io account, it’s time to create your first sales funnel. A sales funnel is like a journey for your customers. It guides them from being a visitor to becoming a buyer. Systeme.io makes this easy with pre-built templates. You don’t need to be a design expert to make a great funnel.
First, log in to your Systeme.io account. On your dashboard, look for the menu on the left side. You will see an option called “Funnels.” Click on it. This will take you to the Funnels page. Here, you will see any funnels you have already made. If this is your first time, it will be empty.
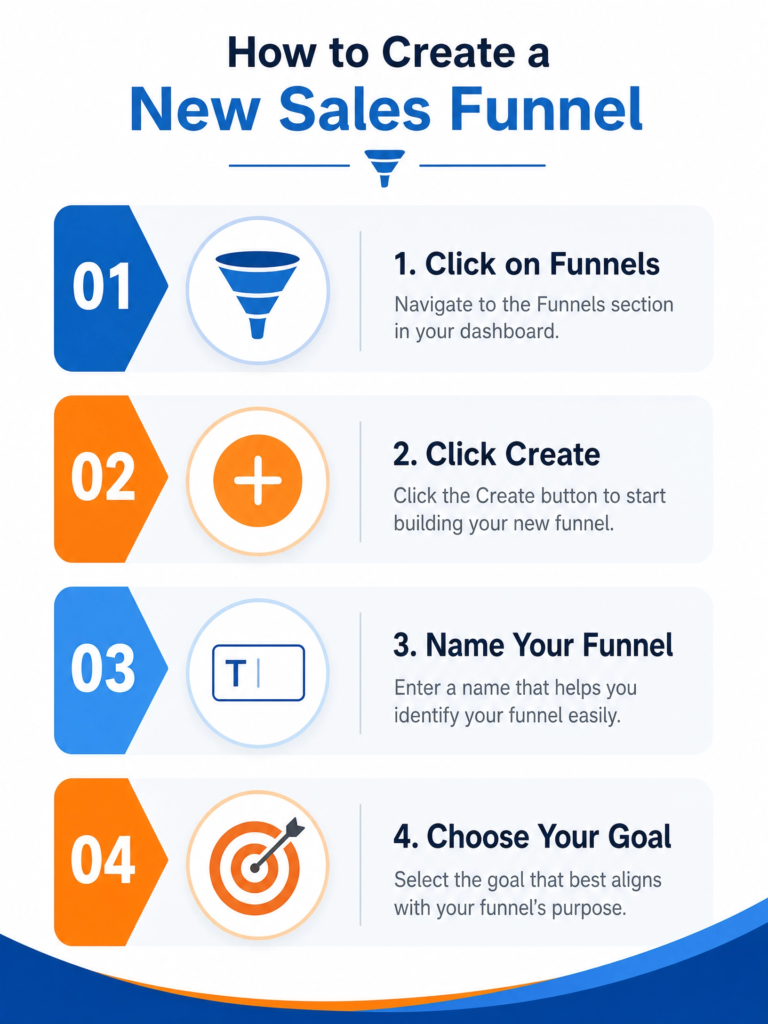
Next, find the “Create” button. It’s usually in the top right corner of the Funnels page. Click this button to start a new funnel. A pop-up window will appear. This window asks for some important details about your new funnel. You need to give your funnel a name. Choose a name that helps you remember what the funnel is for. For example, “Ebook Download Funnel” or “Product Launch Funnel.”
Then, you need to choose your funnel goal. Systeme.io offers different types of funnels. These include “Build an Audience” (for collecting emails), “Sell” (for selling products), “Custom” (for advanced users), and “Run an Evergreen Webinar.”
For most beginners, “Build an Audience” or “Sell” are the best choices. Pick the goal that matches what you want to achieve with this funnel. If you want to collect emails, choose “Build an Audience.” If you want to sell something, choose “Sell.”
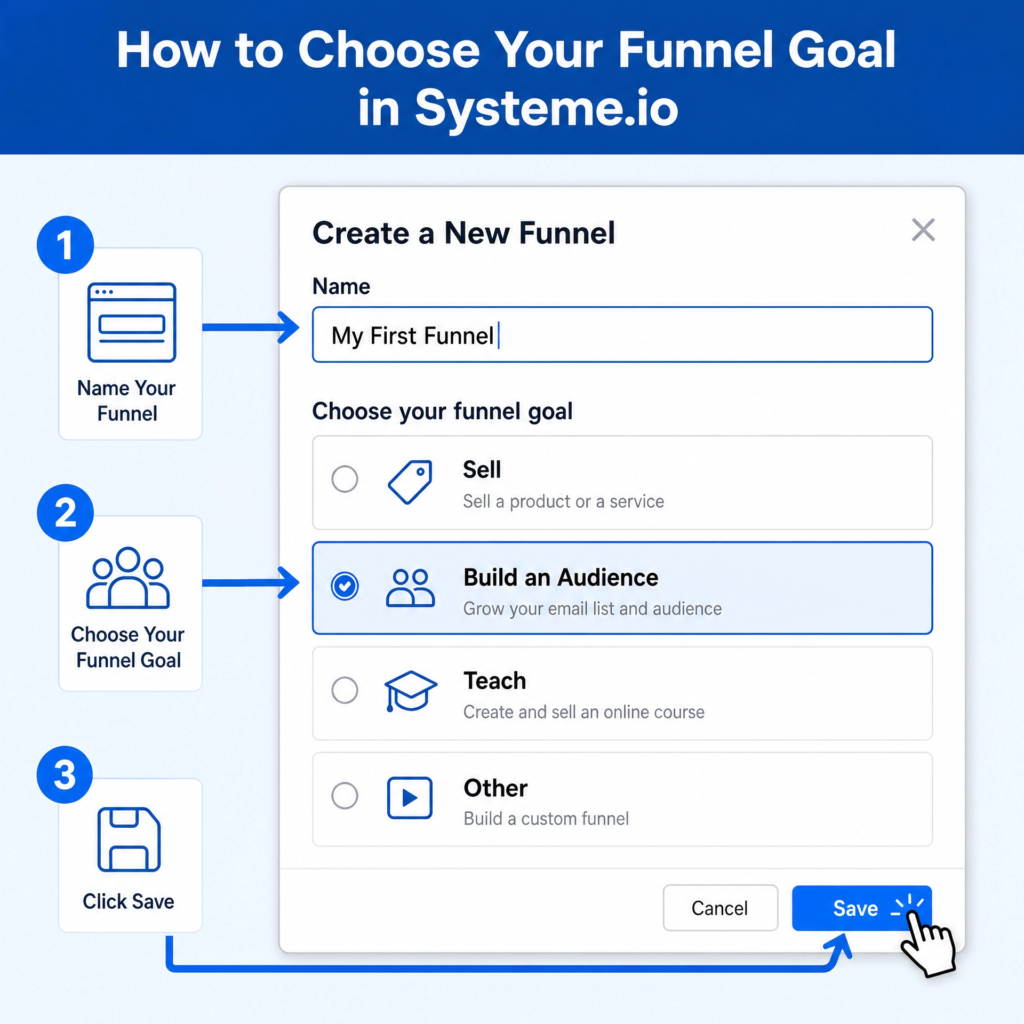
Finally, choose your currency if you selected a “Sell” funnel. This is important for pricing your products correctly. After filling in these details, click the “Save” button. Systeme.io will then create your new funnel. You will be taken to the funnel editor. Here, you can start adding pages to your funnel. You are now one step closer to building a powerful sales machine!
Step 3: Select a Funnel Template
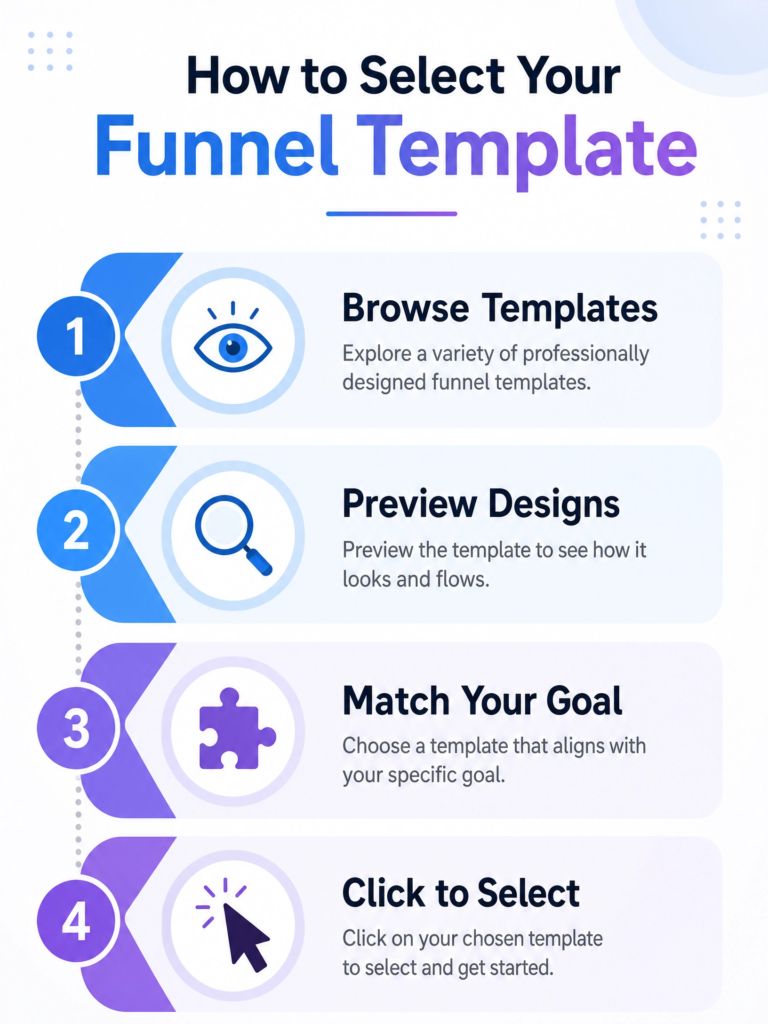
After you create your new sales funnel, Systeme.io will show you a list of templates. These templates are pre-designed pages. They help you build your funnel quickly. Think of them as ready-made blueprints for your website pages. You can choose a template that looks good and fits your goal. This saves you a lot of time and effort.
Systeme.io offers many different templates. They are designed for various purposes. For example, if you chose “Build an Audience” as your funnel goal, you will see templates for squeeze pages or landing pages. These pages are made to collect email addresses. If you choose “Sell,” you will see templates for sales pages, order forms, and thank you pages. Each template has a specific job in your sales funnel.
Take your time to browse through the available templates. Look at their designs. See if they match your brand or the product you are selling. You can click on a template to see a preview of it. This lets you see how the page will look to your visitors. Don’t worry too much about getting it perfect right now. You can always change things later.
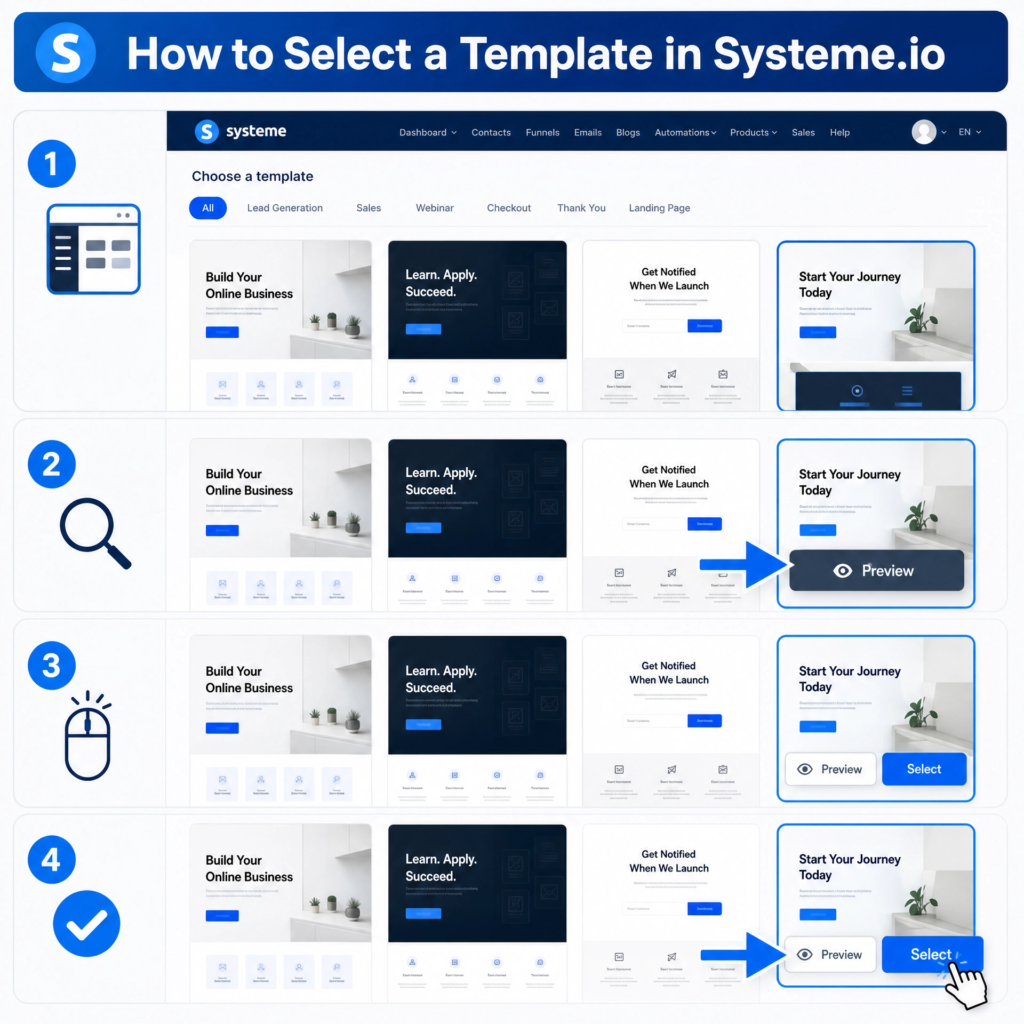
When you find a template you like, click on it to select it. Systeme.io will then add this template to your funnel. You will see it listed as a step in your funnel. You can add more steps later if you need them. For example, a typical sales funnel might have a squeeze page, a sales page, an order form, and a thank you page. Each of these would be a separate step, and you would choose a template for each one.
Choosing a template is a big step. It gives you a strong starting point. It means you don’t have to build everything from scratch. You can then customize the template to make it truly yours. You’ll change the text, images, and colors to fit your message. This makes your funnel unique and effective. Now you’re ready to make that template your own!
Step 4: Build Your Landing Page
Now that you’ve picked a template, it’s time to make your landing page shine! A landing page is the first page your visitors see. It’s where they land after clicking a link. Its main job is to get them to take one specific action. This could be signing up for your email list or buying a product. Systeme.io’s editor makes customizing your page very easy. You don’t need to know any code.
First, you’ll be in the Systeme.io page editor. This is a drag-and-drop editor. This means you can click on elements and move them around. You can also change their size and color. Look at the left sidebar. You’ll see different elements like text, images, buttons, and forms. You can drag these elements onto your page. Place them where you want them to be.

Start by changing the text. Click on any text box on your template. You can then type your own words. Write a clear and catchy headline. This tells visitors what your page is about. Then, write a short paragraph explaining the benefits. Why should they sign up or buy? Use simple language. Make it easy to read. Remember, short sentences are best for online content.
Next, add your images. Click on an image element. You can then upload your own pictures. Choose high-quality images that relate to your message. Images make your page look professional. They also help to explain your offer. Make sure your images load quickly. Slow images can make people leave your page.
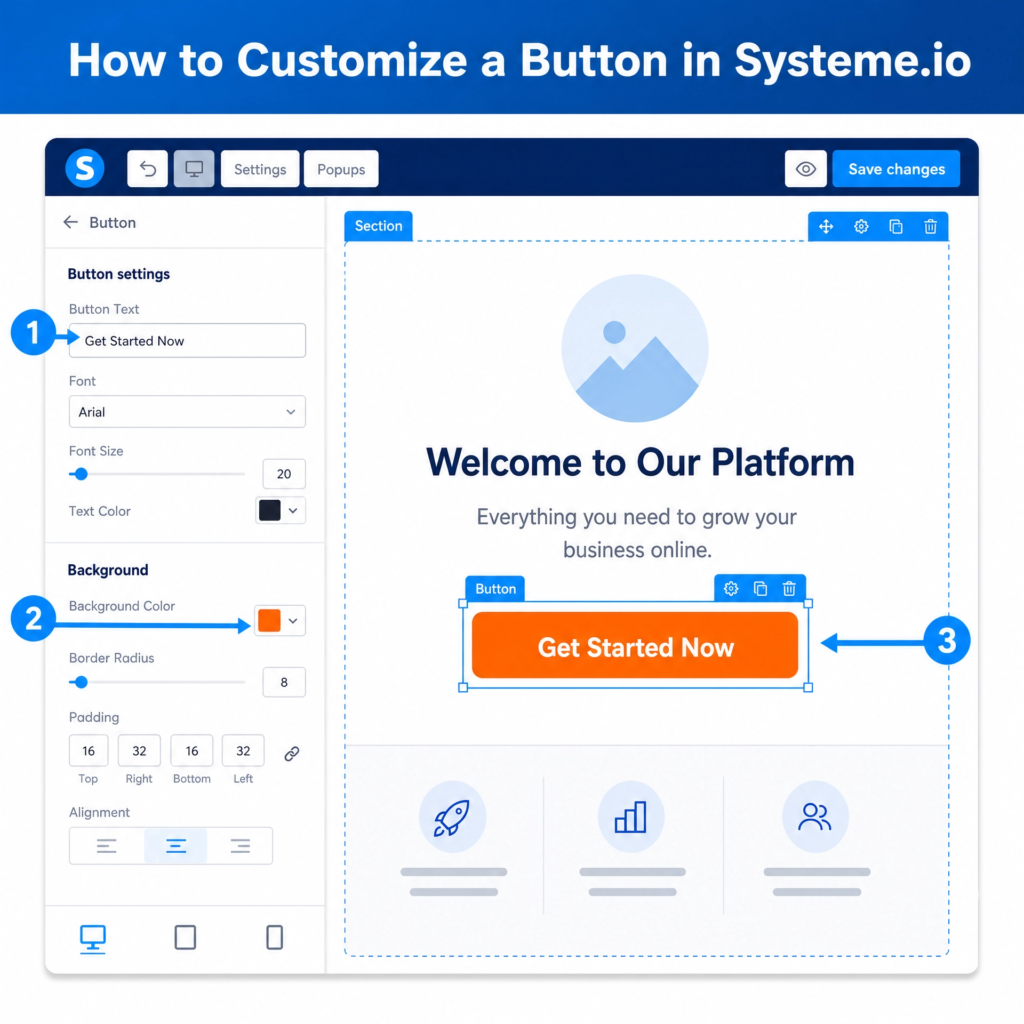
Finally, customize your call-to-action (CTA) button. This is the most important part of your page. It’s what tells visitors what to do next. Click on the button element. Change the text to something clear and action-oriented.
For example, “Get Your Free Ebook Now” or “Buy Now.” Make the button a bright color. This makes it stand out. Test your button to make sure it works. Your landing page is now ready to attract visitors and convert visitors!
Step 5: Create a Lead Magnet
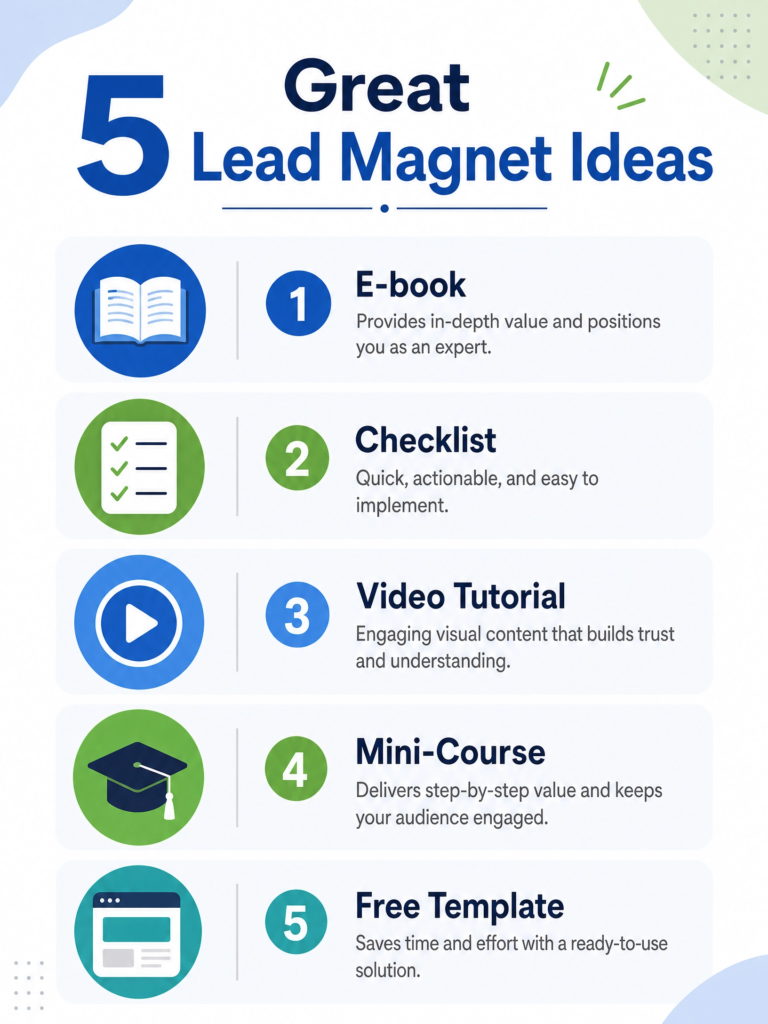
To get people to sign up for your email list, you need a lead magnet. A lead magnet is something valuable you offer for free. In exchange, visitors give you their email address. It could be an e-book, a checklist, a video tutorial, or a free mini-course. The key is that it solves a problem for your audience. It should be something they really want. A good lead magnet makes people happy to share their contact information.
First, think about your audience. What problems do they have? What information are they looking for? For example, if you teach people how to bake, a lead magnet could be “5 Easy Recipes for Beginner Bakers.” If you help small businesses, it could be “A Checklist for Starting Your Online Store.” Make sure your lead magnet is related to what you sell later. This way, you attract the right people.
Once you decide on your lead magnet, you need to create it. You can use simple tools for this. For an e-book or checklist, you can use Google Docs or Canva. For a video, you can record it with your phone or computer. The quality doesn’t have to be perfect. The value of the content is what matters most. Make it easy to understand and use.
After creating your lead magnet, you need to upload it. In Systeme.io, you can upload files directly. Go to the “Products/Sales” menu, then select “My Products.” Here, you can add your lead magnet as a digital product. Even though it’s free, treating it like a product helps Systeme.io manage its delivery. You will set the price to zero. This makes it free for your visitors.

Finally, link your lead magnet to your landing page. When someone signs up on your landing page, Systeme.io will automatically send them your lead magnet. This is called automation. It saves you time and makes sure your new subscribers get their free gift right away. A well-chosen and well-delivered lead magnet is a powerful tool. It helps you grow your email list and build trust with your audience.
Step 6: Set Up Email Marketing
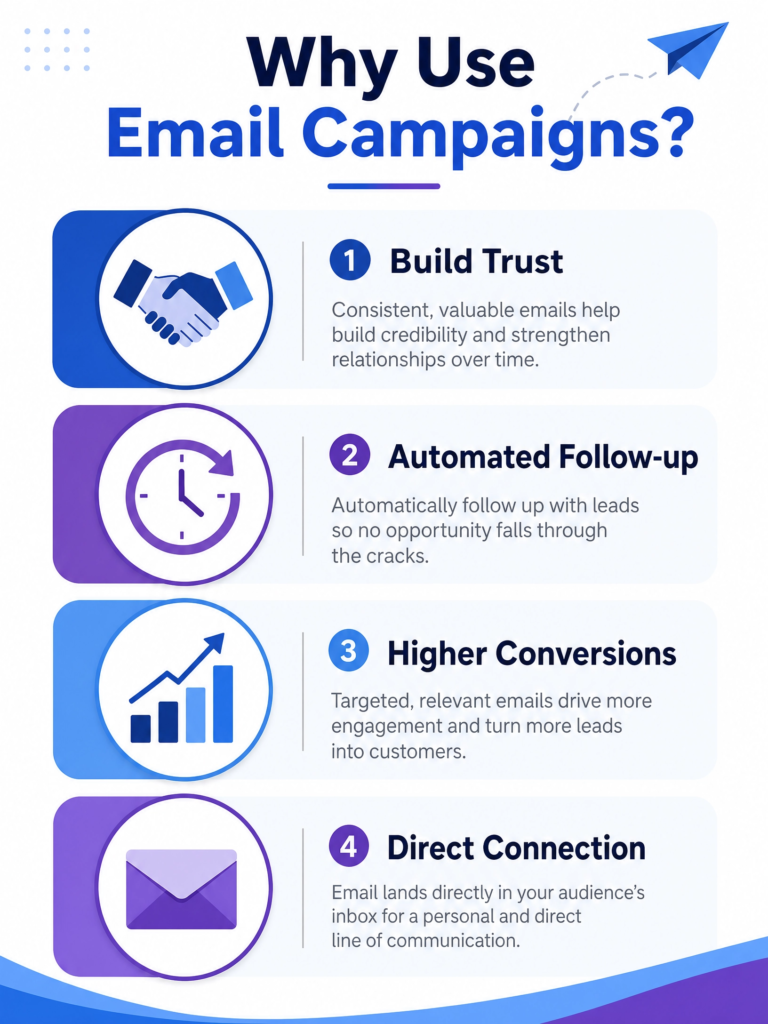
Email marketing is super important for your sales funnel. It helps you talk to people who gave you their email. You can send them helpful tips, new offers, or just say hello. Systeme.io has built-in email tools. This means you don’t need another service. You can send emails right from your account. This makes it easy to keep in touch with your audience.
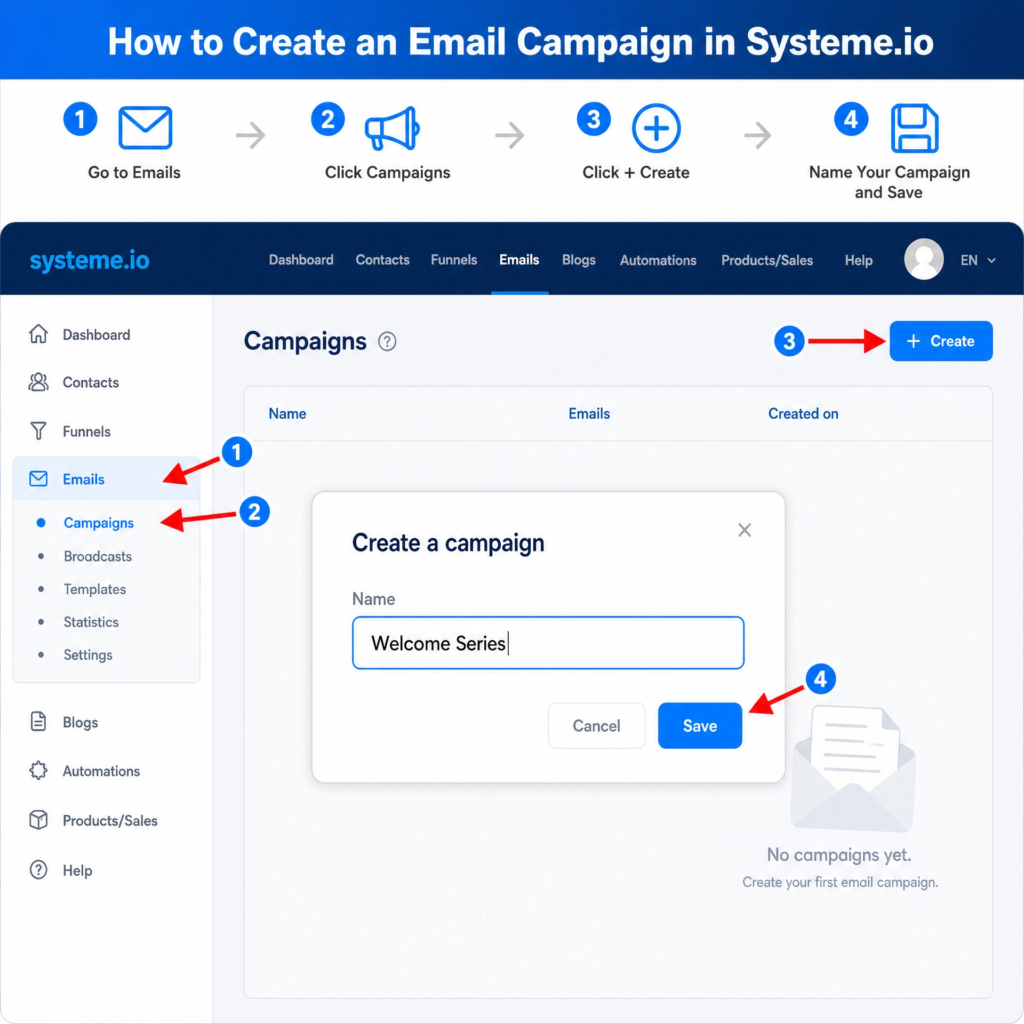
First, you need to create an email campaign. A campaign is a series of emails. These emails are sent automatically. For example, when someone downloads your free e-book, they can get a welcome email. Then, a few days later, they might get another email with more tips. This helps build trust. It also gets them ready for your paid products. To do this, go to the “Emails” menu in Systeme.io. Then click on “Campaigns.”
Next, click the “Create” button to start a new campaign. Give your campaign a clear name. For example, “Welcome Series” or “Product Launch Emails.” This helps you stay organized. After naming it, click “Save.” Now you have an empty campaign. It’s like an empty folder for your emails.
Now, you can add emails to your campaign. Click on the campaign you just made. You will see a button that says “Add an email.” Click it. This opens the email editor. Here, you will write your email. Give your email a good subject line. This makes people want to open it. Write your message. Keep it short and friendly. Remember to offer value in every email. You can also add links to your website or products.
After writing your email, you can set when it should be sent. For example, you can set the first email to send immediately after someone signs up. The next email can be sent one day later. This creates an automated sequence. It works even when you are sleeping!
Email marketing helps you build relationships. It turns new visitors into loyal customers. It’s a powerful way to grow your business.
Step 7: Create a Sales Page
After you’ve captured leads with your landing page and nurtured them with emails, it’s time for the sales page. This is where you present your main offer. It’s the page designed to convince visitors to buy your product or service.
A good sales page clearly explains what you’re selling, why it’s valuable, and how it will help your customer. Systeme.io makes it easy to build a professional sales page without needing any coding skills.
To start, go back to your funnel in Systeme.io. You’ll see the different steps of your funnel. Click on the step that says “Sales Page” or add a new step and choose “Sales Page” as its type. Then, select a template that looks good to you. Systeme.io offers many templates designed to sell. Pick one that matches your product and brand. You can always change it later.
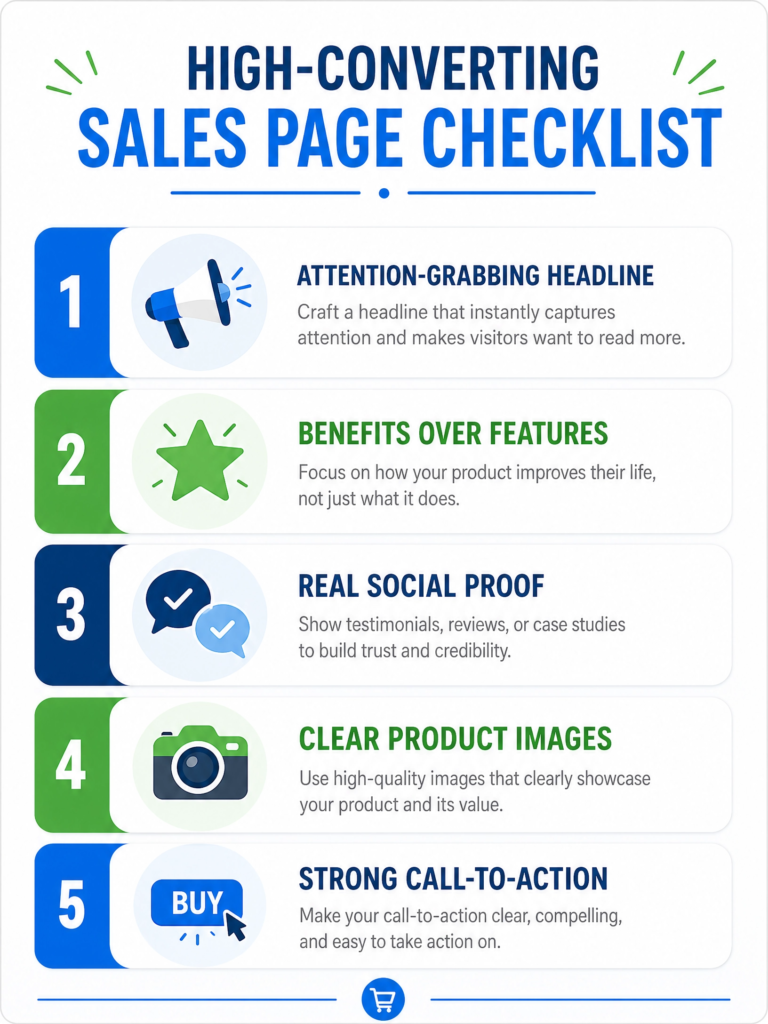
Once you’re in the editor, focus on key parts of a sales page. First, your headline needs to grab attention. It should state the biggest benefit of your product. For example, “Unlock Your Business Potential with Our All-in-One Marketing Tool.” Below that, add a sub-headline that gives more detail. Use clear and simple language.
Next, explain your product. Use bullet points to list features and benefits. Features are what your product is (e.g., “includes 10 email templates”). Benefits are what your product does for the customer (e.g., “saves you hours of writing time”). People buy benefits, not just features. Show them how their life will be better with your product.
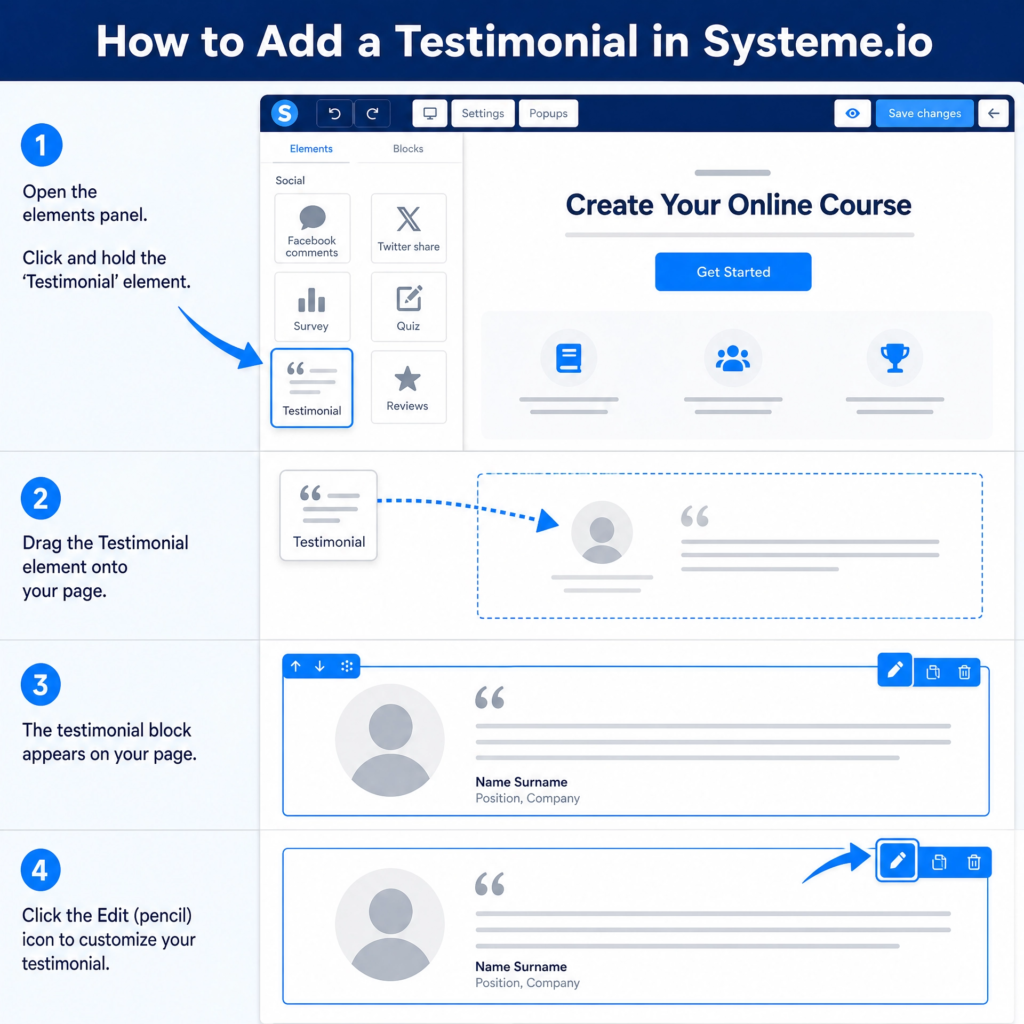
Include social proof. This means showing testimonials or reviews from happy customers. People trust what others say. You can add a section for “What Our Customers Say.” Just drag and drop a testimonial block onto your page. Make sure to use real quotes.
Finally, have a strong Call-to-Action (CTA) button. This button should tell people exactly what to do next, like “Buy Now” or “Enroll Today.” Make it stand out with a bright color. Place it in several spots on your page. This makes it easy for people to buy when they are ready. A well-designed sales page is your silent salesperson, working 24/7 to grow your business.
Step 8: Add a Checkout Page
After convincing your visitors on the sales page, the next crucial step is the checkout page. This is where your customers enter their payment details and complete their purchase.
A well-designed checkout page is simple, secure, and inspires confidence. If it’s too complicated or looks untrustworthy, people might leave without buying. Systeme.io makes it easy to create a smooth and secure checkout experience for your customers.
To add a checkout page, go back to your sales funnel in Systeme.io. You will see the different steps you’ve created. Click on the option to add a new step. Choose “Order Form” as the type of page. This is what Systeme.io calls its checkout page. Give it a clear name, like “Checkout” or “Complete Your Order.” Then, click “Save.” Now you have a new step in your funnel dedicated to processing payments.
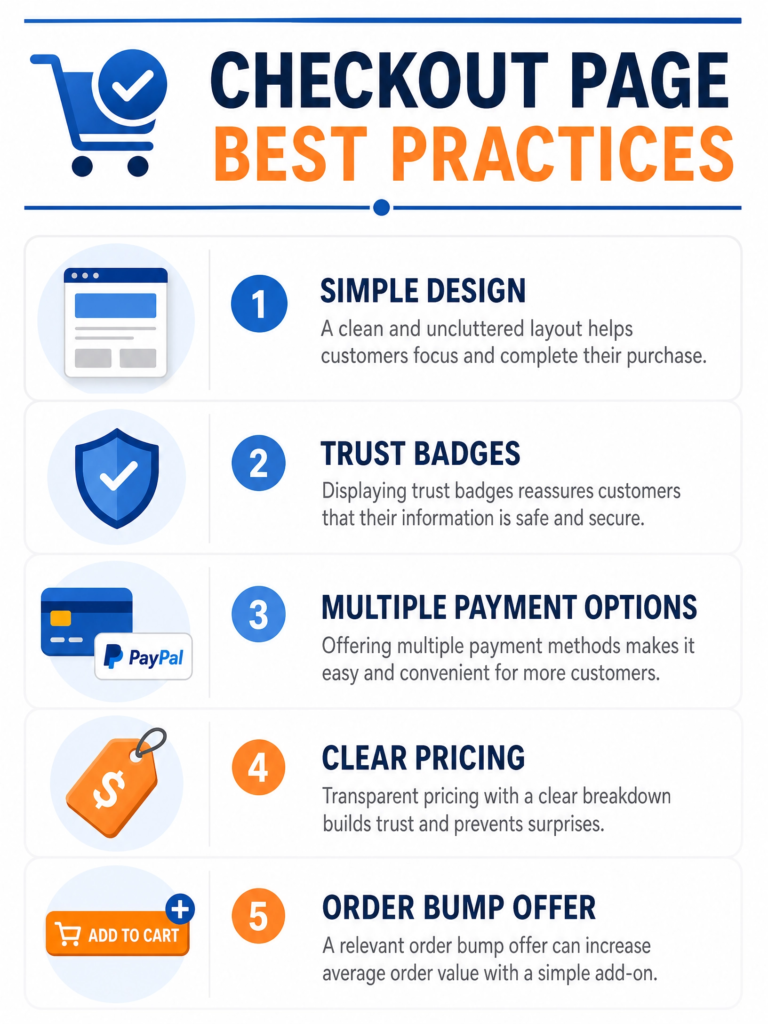
Once you’re in the editor for your order form, you’ll want to customize it. Systeme.io provides templates for checkout pages. These templates are designed to be easy to use and secure. You can change the colors, fonts, and add your logo to match your brand. Keep the design clean and simple. Too many distractions can confuse your customers.
Make sure all the important information is visible. This includes the product name, price, and any guarantees you offer. You can also add testimonials or trust badges (like secure payment icons) to increase confidence.
Systeme.io handles the payment processing securely. You just need to connect your payment gateway, like Stripe or PayPal, in your Systeme.io settings. This ensures that payments are handled safely.
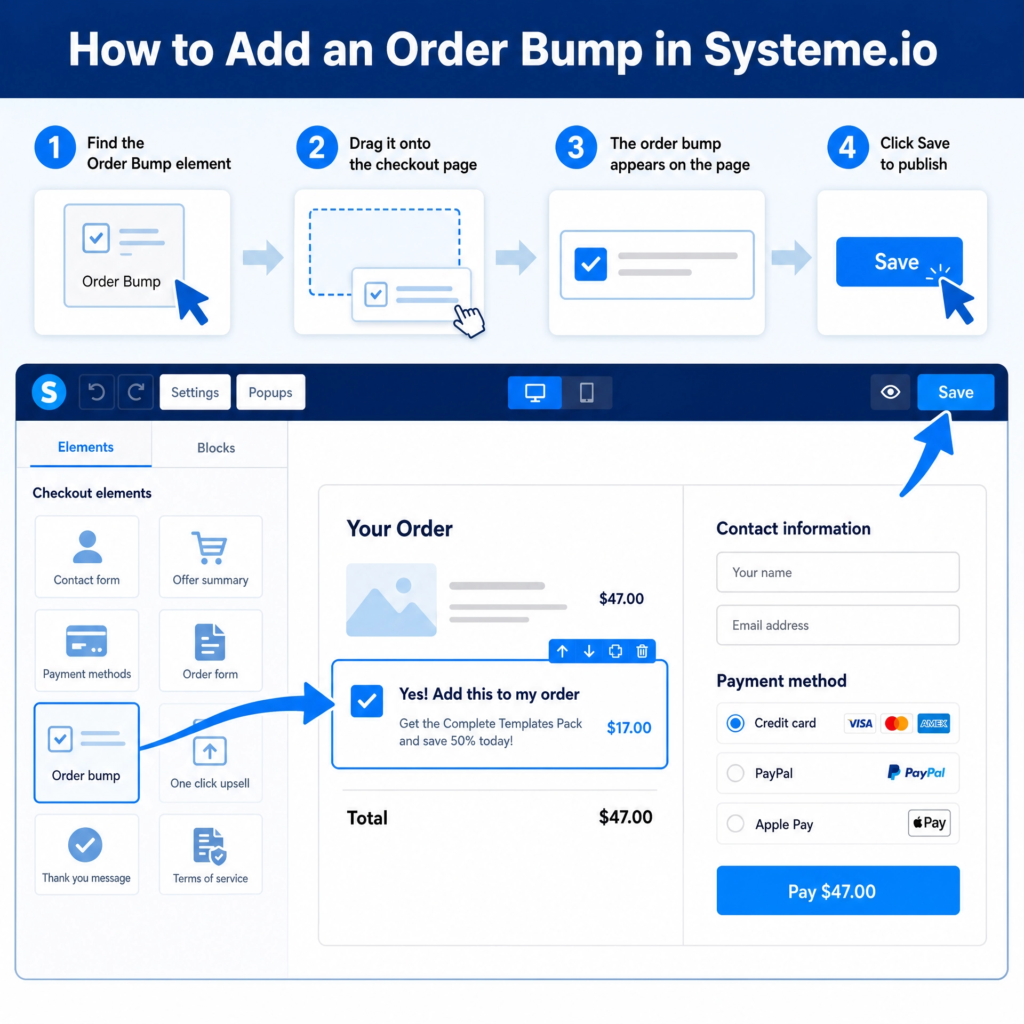
One important feature to consider is adding an order bump. An order bump is a small, extra offer that customers can add to their cart with just one click on the checkout page. For example, if they are buying an e-book, you might offer a matching workbook for a small extra price. This is a great way to increase the value of each sale without much effort.
Systeme.io allows you to easily add order bumps to your checkout page. A well-optimized checkout page is the final step to turning a visitor into a happy customer.
Step 9: Create Upsells and Downsells
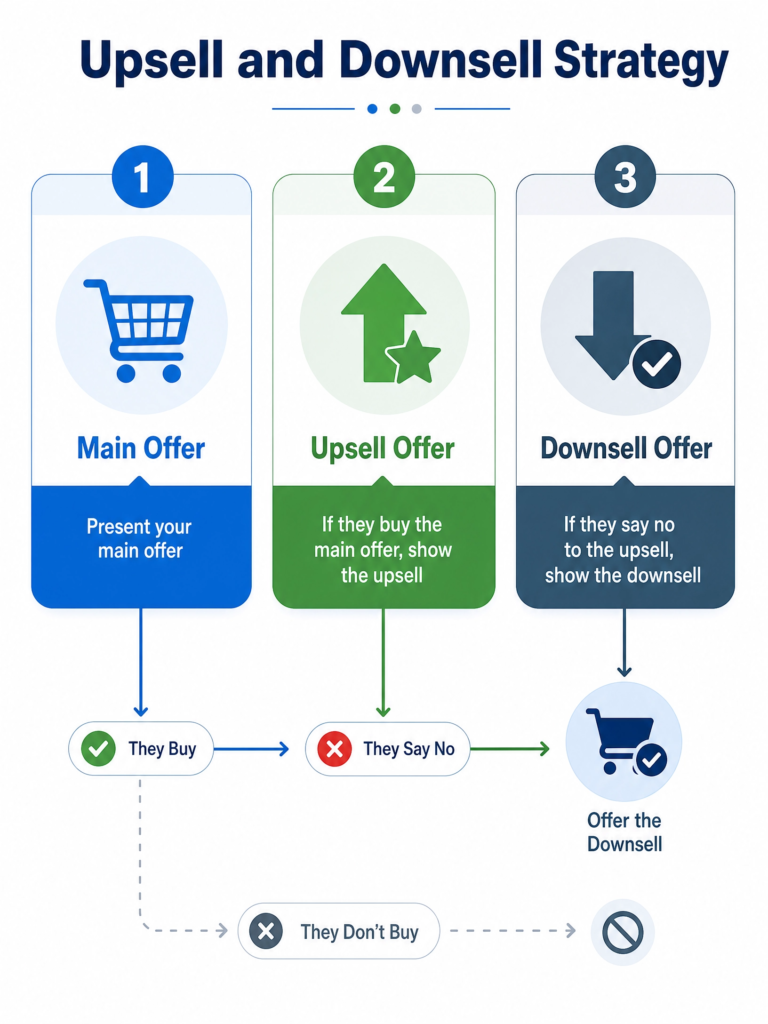
Once a customer decides to buy your main product, you have a special chance to offer them more. This is where upsells and downsells come in. An upsell is an offer for a more expensive or upgraded version of what they just bought.
A downsell is an offer for a cheaper or simpler version if they say no to the upsell. These strategies help you make more money from each customer. They also give your customers more value. Systeme.io makes it easy to add these extra offers to your sales funnel.
First, let’s talk about upsells. Imagine someone just bought your basic e-book. An upsell could be an offer for a premium version of the e-book. This premium version might include video tutorials or a private community.
The key is that the upsell should be related to the main product. It should also add more value. To add an upsell in Systeme.io, go to your funnel. Click on the checkout page step. Then, you’ll see an option to add an upsell page. Choose a template and customize it to show your premium offer.
If a customer says no to your upsell, don’t worry! This is where a downsell can help. A downsell is a lower-priced offer. It’s for people who weren’t ready for the upsell.
For example, if they said no to the premium e-book with videos, you could offer just the video tutorials separately at a lower price. This way, you still make a sale. And the customer still gets something valuable. To add a downsell, you’ll typically link it from the upsell page. If they decline the upsell, they are then shown the downsell offer.

When creating your upsell and downsell pages, keep them simple and clear. Highlight the benefits of the new offer. Use strong headlines and clear call-to-action buttons.
Remember, these offers are made right after the main purchase. Customers are already in a buying mood. This makes them more likely to say yes to another offer.
By adding upsells and downsells, you can greatly increase the average value of each customer. This means more money for your business without needing to find new customers. It’s a smart way to grow your income with your sales funnel.
Step 10: Automate Your Funnel
Building a sales funnel is a big step. But imagine if it could run almost by itself? That’s what automation does. Automation means setting up rules so that certain actions happen automatically. This saves you time and makes sure your customers get the right messages at the right time. Systeme.io has powerful automation features that let you put your funnel on autopilot.
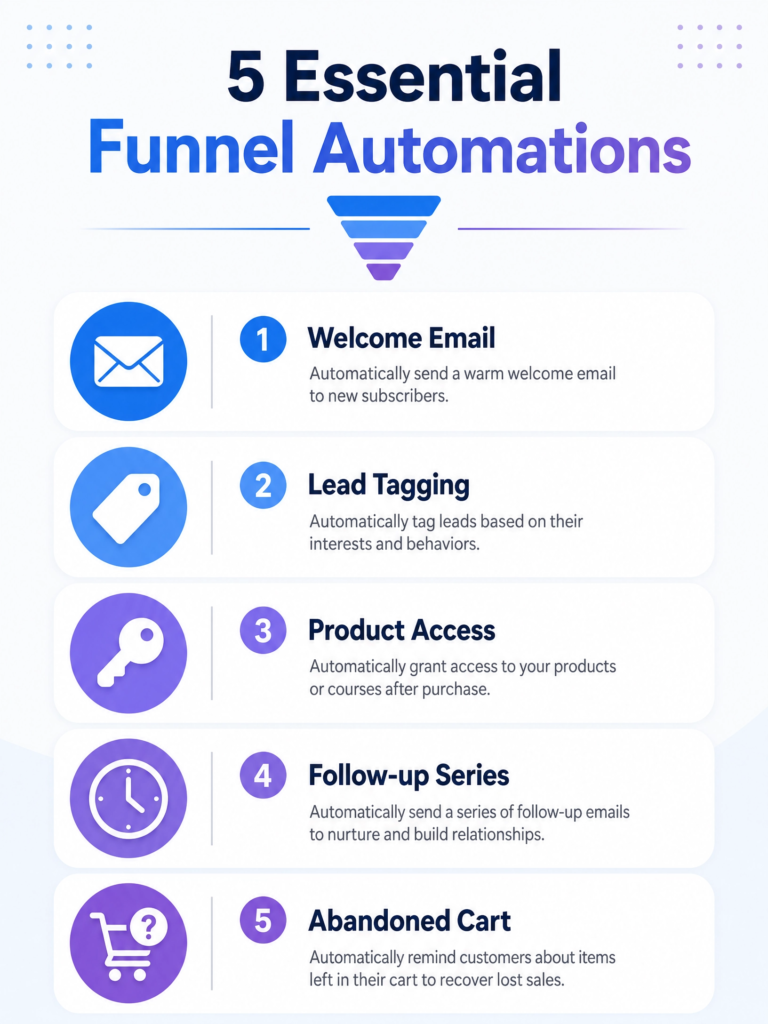
First, think about what you want to automate. A common automation is sending a welcome email when someone signs up for your lead magnet. Another is sending a series of emails after someone buys your product. These emails can thank them, offer support, or even suggest other products. Automation makes sure no one falls through the cracks. Every new lead or customer gets the attention they need, without you having to do it manually.
To set up automation in Systeme.io, you’ll use rules. Rules are simple “if this, then that” statements. For example, “IF a contact subscribes to a form (on your landing page), THEN add them to an email campaign (your welcome series).” Or, “IF a contact purchases a product (on your checkout page), THEN grant them access to a course (your digital product).” These rules connect different parts of your funnel.
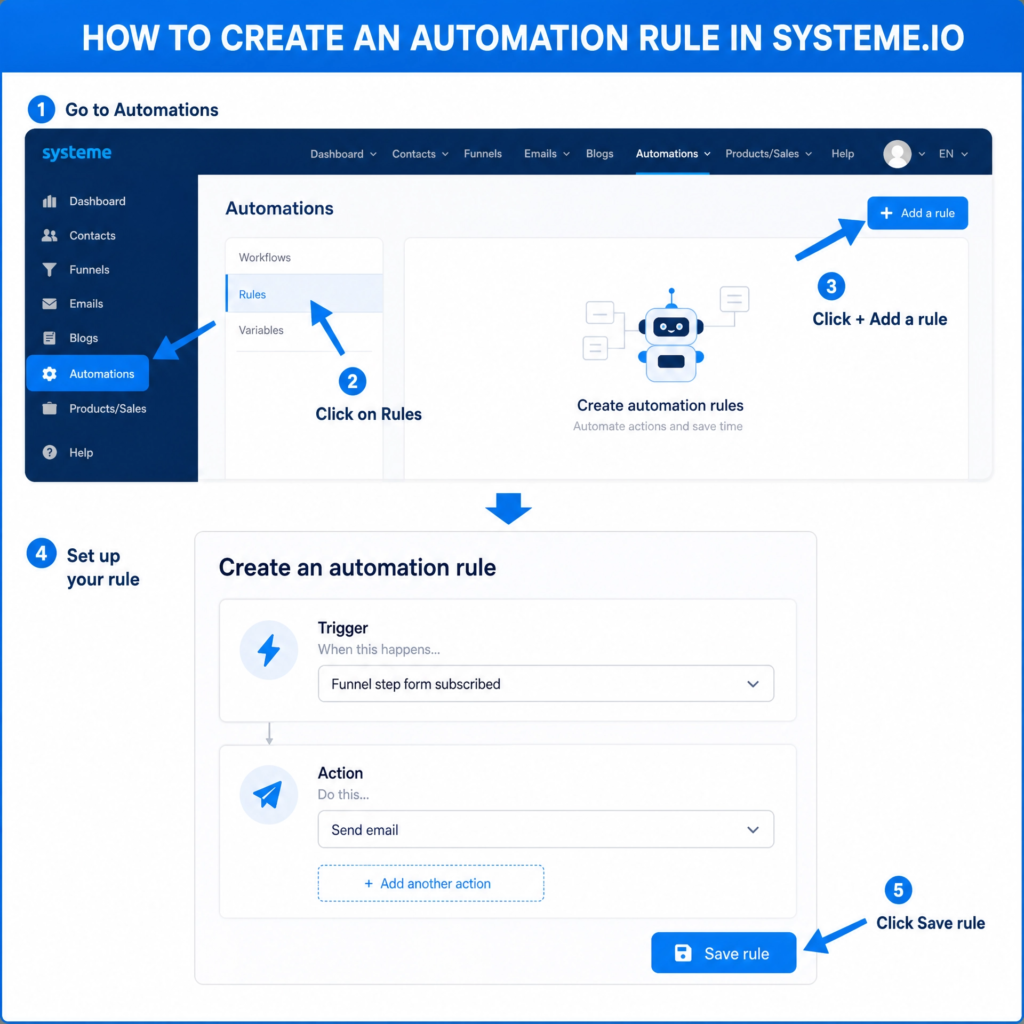
Go to the “Automations” tab in your Systeme.io dashboard. Then click on “Rules.” You’ll see a button to “Add a rule.” When you click it, you choose a “trigger” (the “if this” part) and an “action” (the “then that” part). Systeme.io offers many triggers, like someone signing up, buying a product, or clicking a link. It also offers many actions, like sending an email, adding a tag, or enrolling them in a course.
Setting up these rules might seem a bit tricky at first. But once they are in place, your funnel works for you 24/7. You can focus on other parts of your business. Or you can simply enjoy your free time. Automation is the secret sauce that makes a sales funnel truly powerful. It turns your funnel into a machine that generates leads and sales consistently.
Step 11: Test Your Funnel
You’ve worked hard to build your sales funnel. Now, before you share it with the world, it’s super important to test your funnel. Think of it like a dress rehearsal for a play. You want to make sure everything works perfectly. This step helps you find any small mistakes or broken links. Fixing these now saves you headaches later. A smooth funnel means happy customers and more sales.
Testing your funnel means going through it yourself, just like a customer would. Start from the very beginning. Visit your landing page. Fill out the form to get your lead magnet. Check if the lead magnet arrives in your email inbox. Then, go through the sales page. Click the buy button. See if the checkout page works. If you added upsells or downsells, test those too. Make sure every single step flows correctly. This includes all the pages, buttons, and emails.
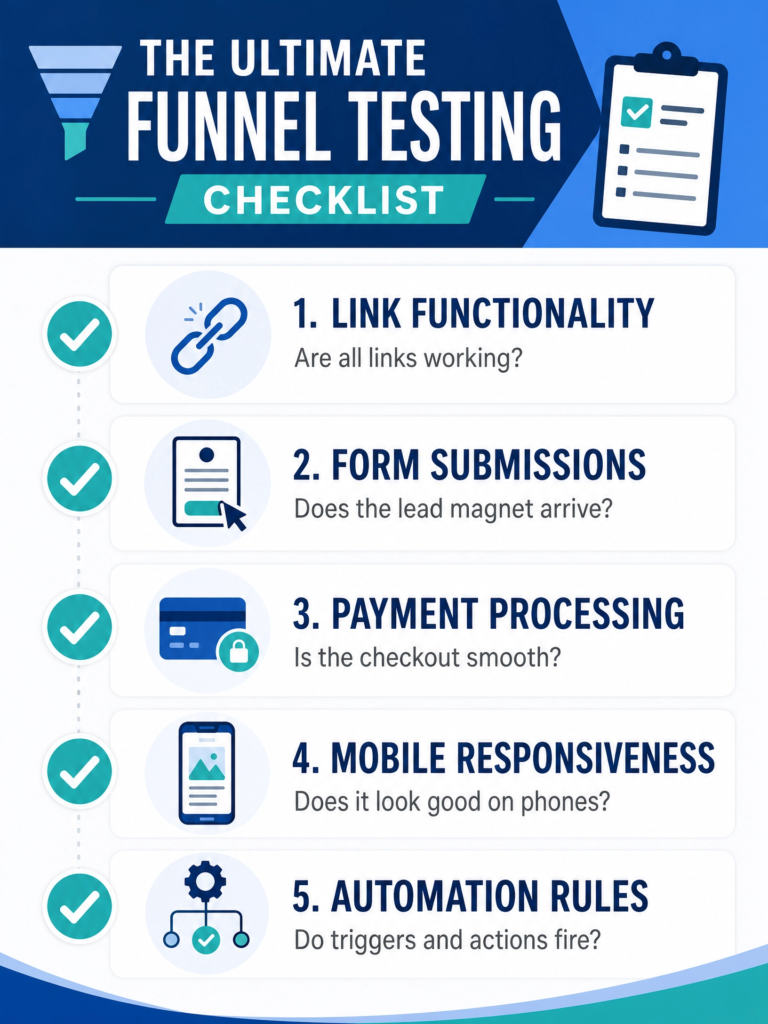
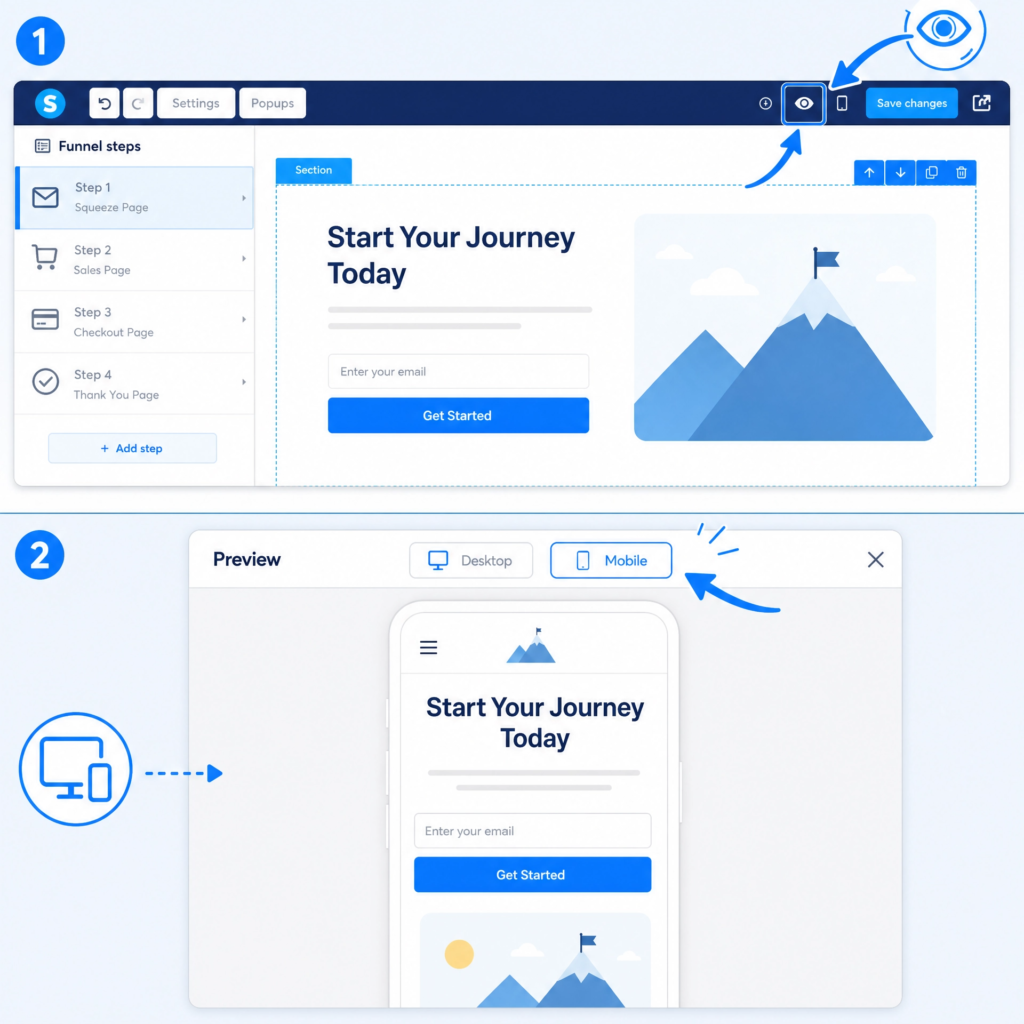
Pay close attention to the details. Are all the links working? Do they go to the right places? Is the text easy to read and free of typos? Do all the images load quickly? Does your funnel look good on different devices, like phones and tablets? Many people use their phones to browse. So, your funnel must look great on small screens too. Systeme.io has a preview option that lets you see how your pages look on different devices.
Another important part of testing is checking your automations. Remember those rules you set up? Make sure they are firing correctly. Did the welcome email send when you signed up for the lead magnet? Did you get access to the product after buying it? These automated actions are key to a smooth customer journey. If something isn’t working, go back to your automation rules and double-check your settings.
Finally, ask a friend or family member to test your funnel. Sometimes, a fresh pair of eyes can spot things you missed. They can give you honest feedback. This feedback is very valuable. It helps you make your funnel even better. Only when you are sure everything is perfect should you launch your funnel. A well-tested funnel builds trust with your audience and helps you achieve your business goals.
Step 12: Drive Traffic to Your Funnel
You’ve built an amazing sales funnel. But a funnel is only useful if people actually go through it! This is where driving traffic comes in. Traffic means visitors to your funnel. The more people who see your funnel, the more leads and sales you can get. There are many ways to bring people to your funnel, both free and paid. Choosing the right methods depends on your audience and your budget.
One of the best free ways to get traffic is through content marketing. This means creating helpful blog posts, videos, or social media content. These pieces of content should solve problems for your target audience. At the end of your content, you can invite people to your funnel.
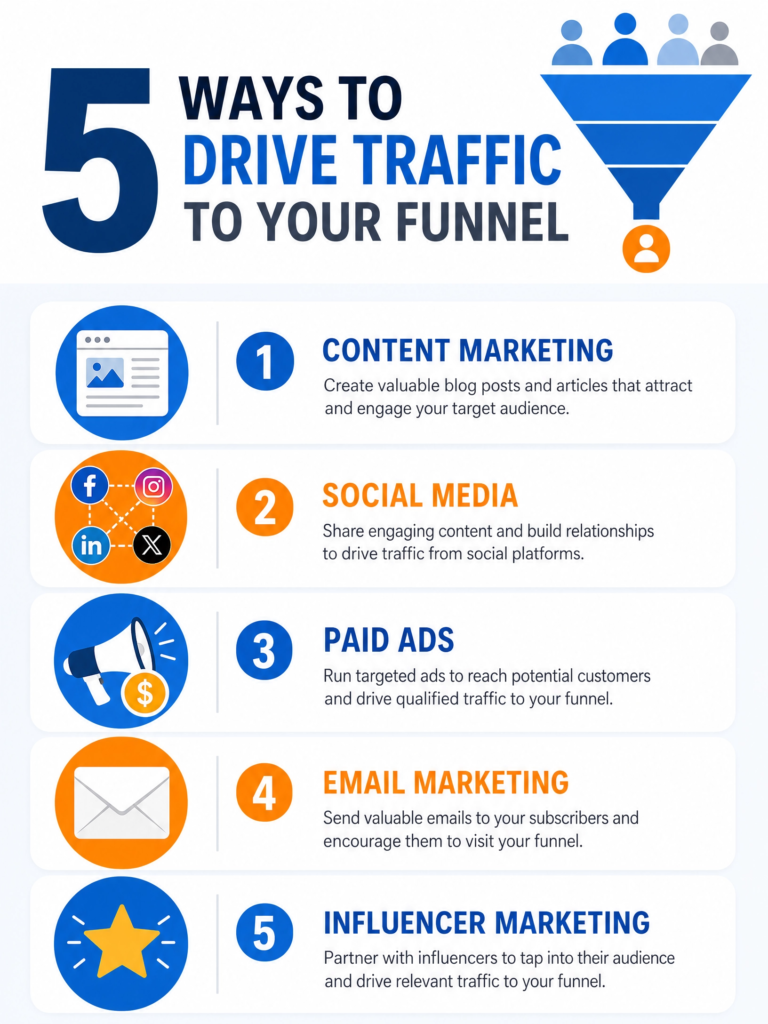
For example, if you write a blog post about “5 Tips for Better Sleep,” you can link to your lead magnet, which might be a free guide on “The Ultimate Sleep Routine.” This way, you attract people who are already interested in your topic.
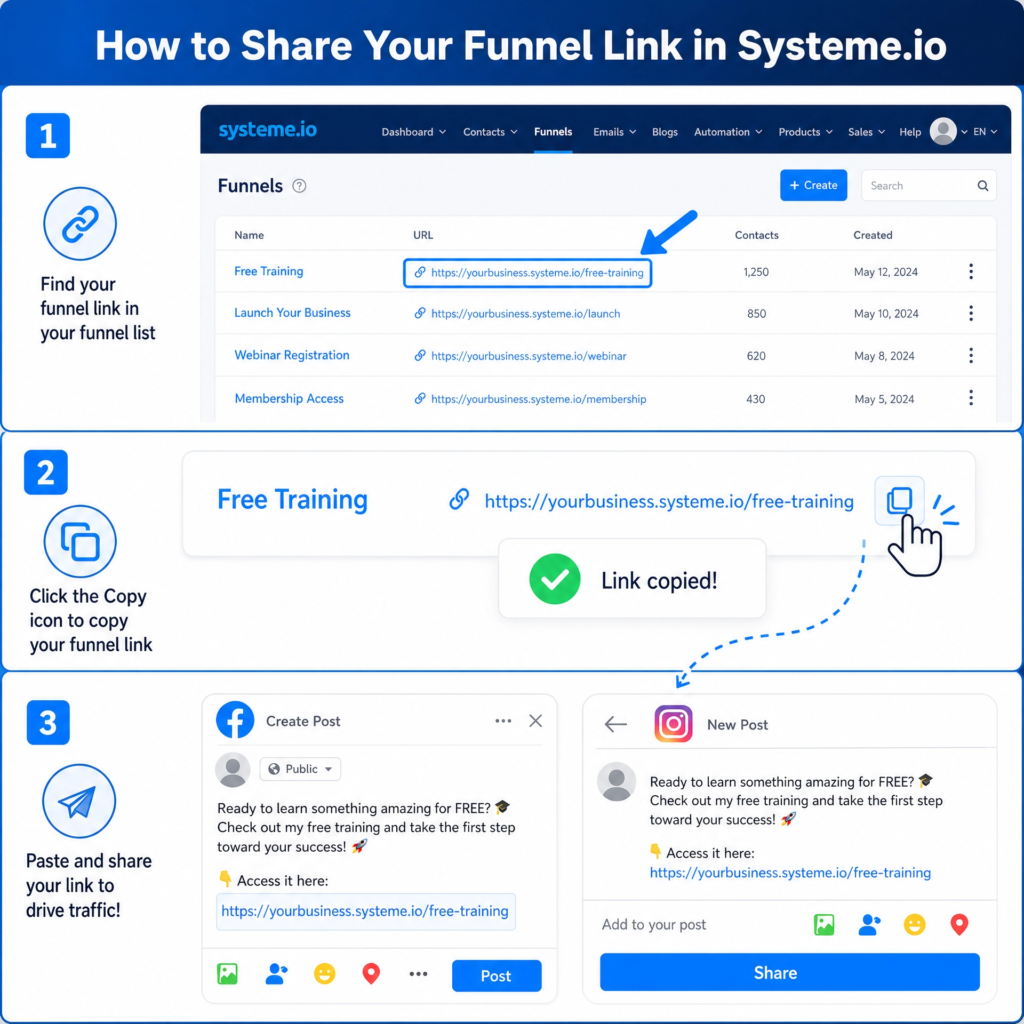
Social media is another powerful free traffic source. Share your content and your funnel links on platforms where your audience hangs out. You can post on Facebook, Instagram, LinkedIn, or TikTok. Engage with your followers. Answer their questions.
Build a community. When you offer value, people are more likely to check out your funnel. Remember to use clear calls to action in your social media posts.
For faster results, you can use paid advertising. Platforms like Facebook Ads and Google Ads let you show your funnel to a very specific group of people. You can target people based on their interests, age, location, and more. This means your ads are seen by people who are most likely to be interested in your offer. While paid ads cost money, they can bring a lot of traffic quickly. Start with a small budget and test different ads to see what works best.
Another effective strategy is email marketing (if you already have an email list). Send emails to your subscribers promoting your new lead magnet or product. They already know and trust you, so they are more likely to convert.
You can also explore influencer marketing. This involves partnering with people who have a large audience in your niche. They can promote your funnel to their followers. No matter which methods you choose, the goal is to get your funnel in front of as many relevant people as possible. Keep experimenting and tracking your results to find what works best for you.
Conclusion
Congratulations! You’ve reached the end of our guide on How to Create a Sales Funnel Using Systeme.io. You’ve learned how to set up your account, build a landing page, create a compelling lead magnet, set up email marketing, design a sales page, add a checkout page, and even implement upsells and downsells.
You also know the importance of testing your funnel and driving traffic to it. This journey might seem like a lot of steps, but each one brings you closer to automating your business and achieving your goals.
Remember, building a sales funnel is not a one-time task. It’s an ongoing process of learning, testing, and improving. The digital world changes fast, and so do your customers’ needs.
Always keep an eye on your funnel’s performance. Look at your conversion rates. See where people are dropping off. Use this information to make small tweaks and improvements. Even tiny changes can lead to big results over time. Systeme.io makes it easy to track your results and make these adjustments.
Don’t be afraid to experiment. Try different headlines on your landing page. Test new lead magnet ideas. Change the colors of your buttons. See what resonates best with your audience. The more you test, the more you’ll learn about what works for your specific business and customers. Systeme.io provides all the tools you need to do this without needing any complicated tech skills.
Your sales funnel is a powerful tool that works for you 24/7, even when you’re sleeping. It helps you attract new leads, nurture them, and turn them into loyal customers. It frees up your time so you can focus on other important parts of your business or enjoy more personal time. The best part is that Systeme.io makes this entire process accessible and affordable for everyone, especially beginners.
So, what are you waiting for? Take what you’ve learned today and start building your sales funnel with Systeme.io. The sooner you start, the sooner you’ll see the amazing results. Your business deserves to grow, and a well-built sales funnel is your path to success. Go ahead, launch your funnel, and watch your business thrive!