Many people spend a lot of time creating content, but they struggle to get enough views, reach, or results from it. This can feel frustrating because all that hard work seems wasted.
This is where content repurposing strategies can help by turning one piece of content into many different formats, saving time and increasing reach.
In this blog post, you will learn simple and effective ways to reuse your content, how to turn it into posts, videos, or graphics, and how to reach more people without creating everything from scratch again.
Turn Blog Posts into Social Media Post
Turning your blog posts into social media posts is one of the smartest ways to save time. You already did the hard work of researching and writing a long article.
Now, you can break it into smaller pieces. I call this “slicing the cake.” Instead of giving your audience the whole cake at once, you give them small, tasty bites.
This keeps people interested and drives them back to your website to read the full story. It’s a win-win for everyone!
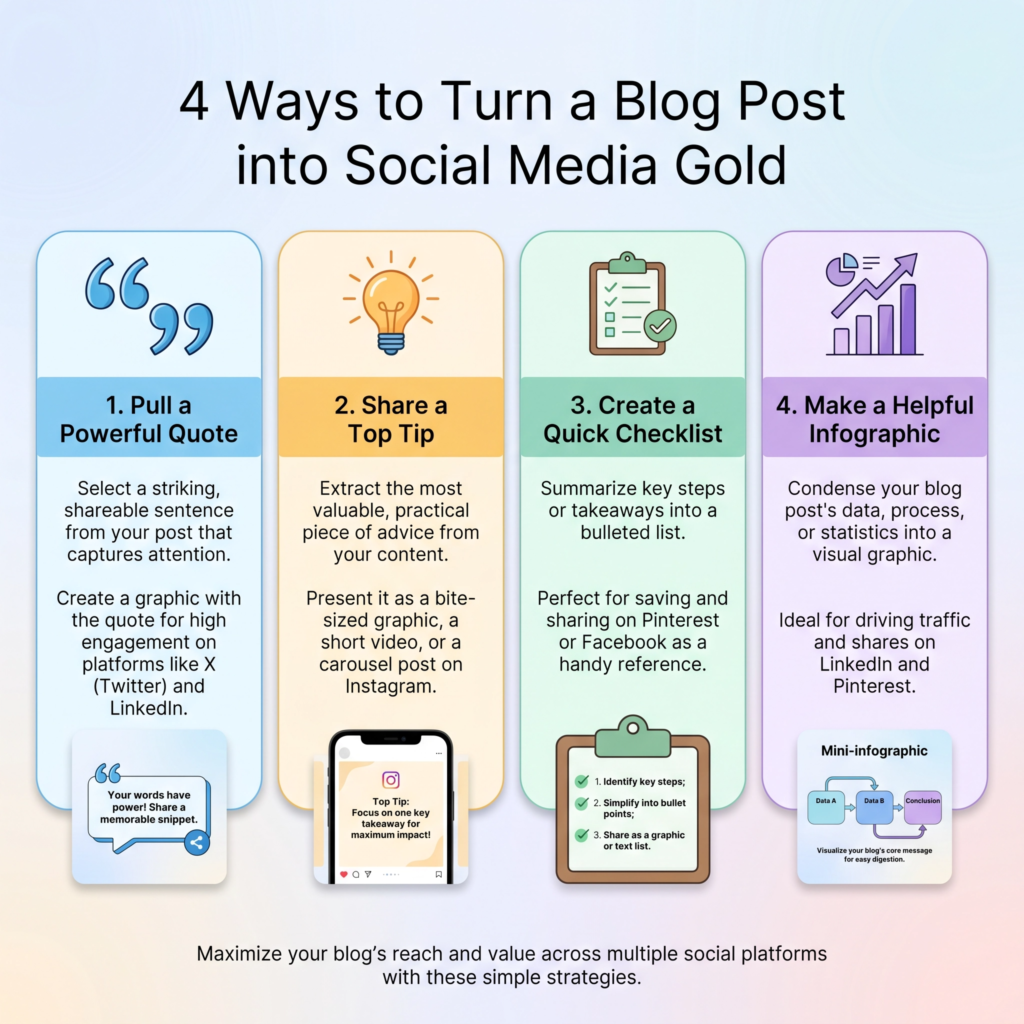
I start by looking for the “gold nuggets” in my blog post. These are the most important points, the best tips, or a really cool quote.
Each nugget can become its own social media post. For example, if your blog post has five tips, you already have five separate social media posts!
You can share one tip each day. I like to rewrite the tip to make it shorter and punchier for platforms like Instagram or Twitter.
Remember, social media is about quick wins and fast reading.
You can also turn your blog post into different types of content. A list of tips can become a beautiful carousel on Instagram.
A powerful quote can become a simple image post. If you have a lot of data, you can create a quick infographic.
I even like to record a short video of myself explaining one key point from the post. This adds a personal touch and helps people connect with you.
The goal is to use the same information but present it in a way that fits each social platform.
Don’t forget to include a “call to action” in your social posts. Tell people exactly what to do next. You can say, “Want to learn more? Read the full blog post at the link in my bio!”
This is how you turn social media followers into website visitors. It makes your blog work much harder for you.
You don’t need to create new content every single day. You just need to be smart about how you use what you already have. This is the secret to staying consistent without burning out.
Create Infographics from Key Points
Creating infographics from your blog’s key points is a fantastic way to reach more people. Some people love to read long articles, but many others prefer to see information visually.
An infographic takes your main ideas and turns them into a picture. I always tell my students that a good picture is worth a thousand words.
By making an infographic, you make your content much easier to share on sites like Pinterest or LinkedIn. It’s like giving your information a set of wings!
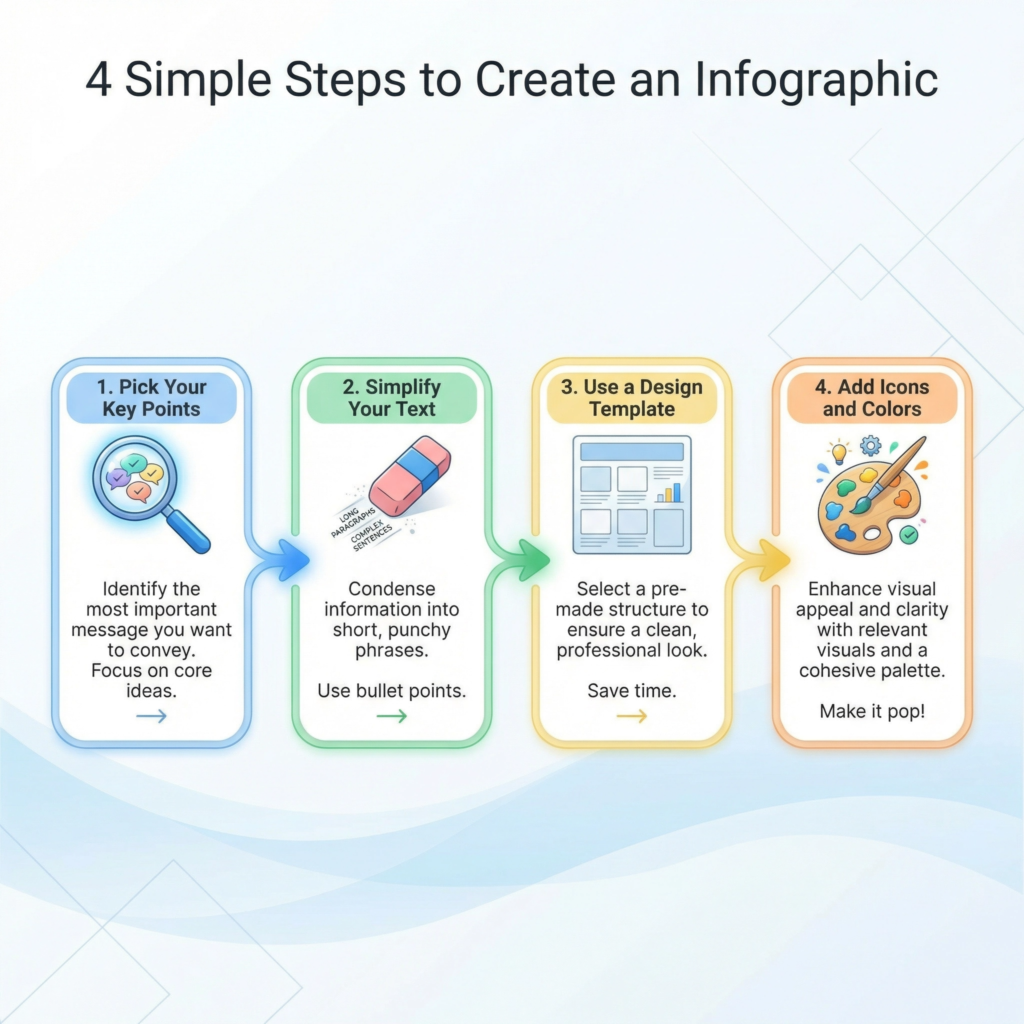
I start by going through my blog post and highlighting the most important data or steps. I look for things that can be listed or compared.
For example, if I wrote about “The 5 Steps to Better Sleep,” those five steps are perfect for an infographic. I don’t need to include every single word from the post. I just need the main headings and a very short description for each one.
The goal is to make the information “snackable.” People should be able to understand the main point in just a few seconds.
You don’t need to be a professional designer to create a great infographic. There are many free tools online that provide templates you can just fill in.
I like to use bright colors and clear icons to make the information pop. I also make sure the text is big enough to read on a phone.
Most people will see your infographic while scrolling on their mobile devices. If the text is too small, they will just keep scrolling. Keep it simple, clean, and focused on one main topic.
Once your infographic is finished, you can put it back into your original blog post. This gives your readers a nice summary and makes the page look more interesting. You can also share the infographic as a standalone post on social media.
I always include my website URL at the bottom of the image. That way, if people share it, everyone knows where the great information came from. It’s a powerful way to build your brand and show that you are an expert in your field.
Turn Blog Posts into YouTube Videos
Turning your blog posts into YouTube videos is a powerful way to find a whole new audience. Some people would much rather watch a video than read a long article.
By making a video, you are making your content accessible to them. I always tell my students that you don’t need to be a famous movie star to do this. You just need to share what you already know.
Your blog post is already a perfect script! It has a beginning, a middle, and an end. All you have to do is talk through it.
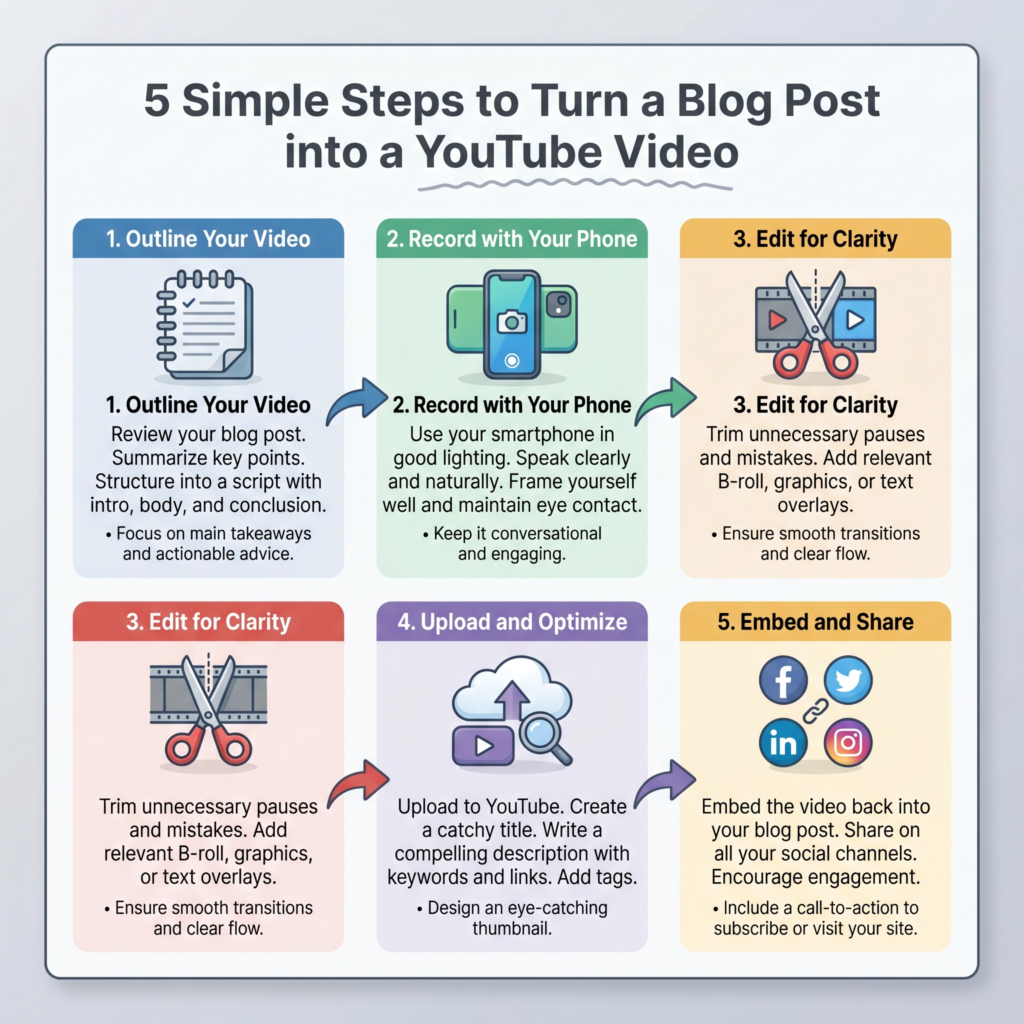
I start by using my blog post as an outline. I don’t read it word-for-word because that can sound a bit boring. Instead, I look at the main headings and talk about them in my own voice.
I like to imagine I am explaining the topic to a friend over coffee. This makes the video feel more natural and friendly. If your blog post has three main tips, each tip can be a section of your video.
You can even show your screen if you are teaching a technical skill. This is called a “screencast,” and it is very helpful for beginners.
You don’t need expensive equipment to start. Your smartphone has a great camera that is perfect for YouTube.
The most important thing is to have good lighting and clear sound. I recommend sitting near a window for natural light and using a simple plug-in microphone.
Once you record your video, you can use free editing software to cut out any mistakes. You can also add some text on the screen to highlight your main points. This helps people remember what you said.
Once your video is on YouTube, you can embed it back into your original blog post. This is great for your website because it keeps people on the page longer.
You can also share the video on social media or in your email newsletter. Don’t forget to put a link to your blog post in the video description. This way, people who want more details can find your full article.
Repurposing your blog into video is a smart way to show your expertise and build trust with your audience.
Turn Content into Podcasts
Turning your written content into podcasts is a brilliant way to reach people who are always on the go. Many people listen to audio while they are driving, exercising, or doing chores.
By creating a podcast, you are making your information available to them during their busiest times. I always tell my students that you don’t need a fancy radio station to start.
Your blog posts are already great scripts! You just need to read them aloud and add a bit of your own personality.
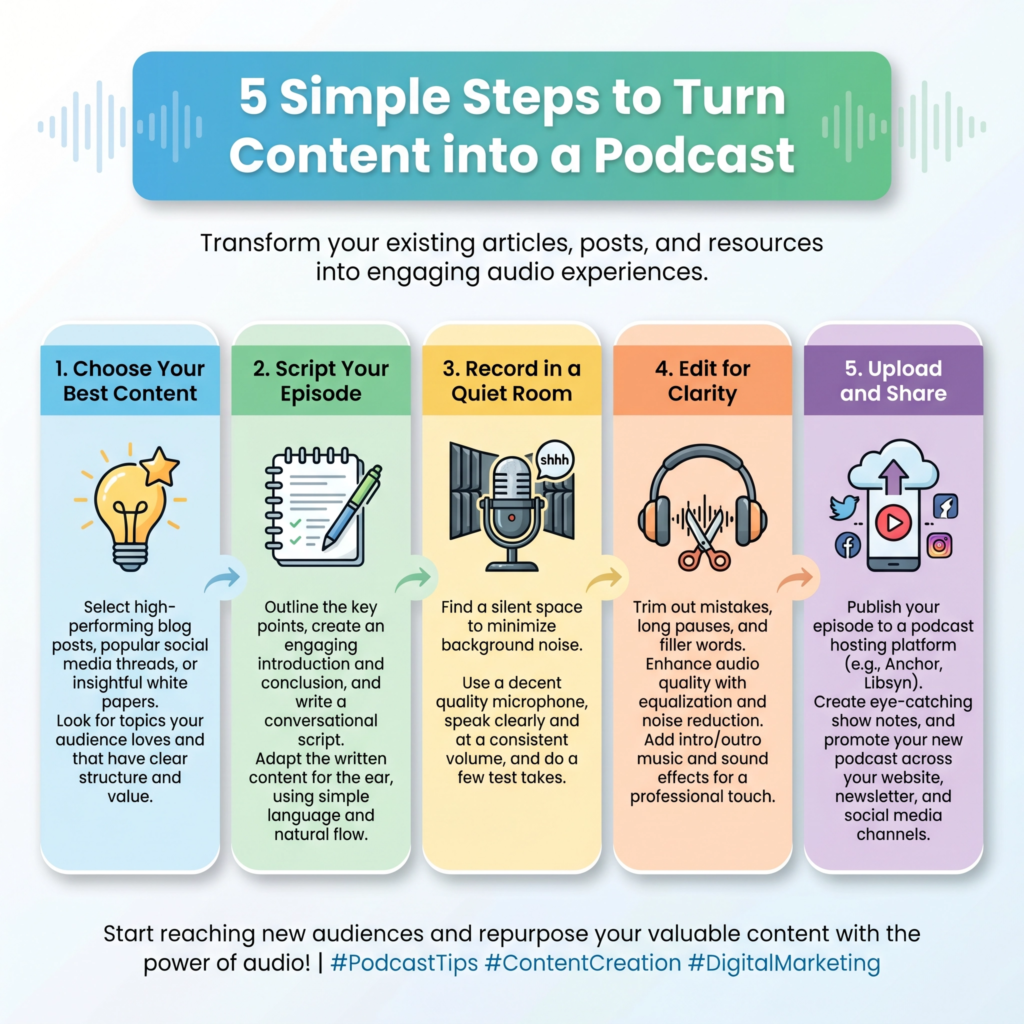
I start by choosing a blog post that has a lot of great tips or a strong story. I don’t just read it like a robot.
Instead, I use the post as a guide. I talk through the points as if I am having a conversation with a friend. This makes the podcast feel more personal and engaging.
If your blog post has a list of “7 Ways to Save Money,” each way can be a short segment in your podcast episode.
You can even add an introduction and a conclusion to make it feel like a real show.
You don’t need expensive gear to get a good sound. A simple USB microphone and a quiet room are all you really need to begin.
I recommend using free software to record and edit your audio. You can cut out any long pauses or mistakes to make it sound professional.
Adding a little bit of music at the start and end can also give your podcast a nice touch.
Once your audio is ready, you can upload it to a podcast hosting site. They will help you get your show onto platforms like Spotify and Apple Podcasts.
Once your podcast episode is live, you can put the audio player right back into your blog post. This gives your readers a choice: they can read the post or listen to the audio. This is great for keeping people on your website longer.
You can also share short clips of your podcast on social media to get people interested. Don’t forget to tell your listeners where they can find your full blog post for more details.
Repurposing your content into a podcast is a smart way to grow your brand and reach more ears!
Create Slide Decks or Presentations
Creating slide decks or presentations from your blog posts is a fantastic way to reach professional audiences.
Many people use sites like SlideShare or LinkedIn to find quick, visual information. A slide deck takes your long article and breaks it into a series of simple, easy-to-read slides.
I always tell my students that this is like turning your blog post into a visual story. It makes your content look very professional and is perfect for teaching others.
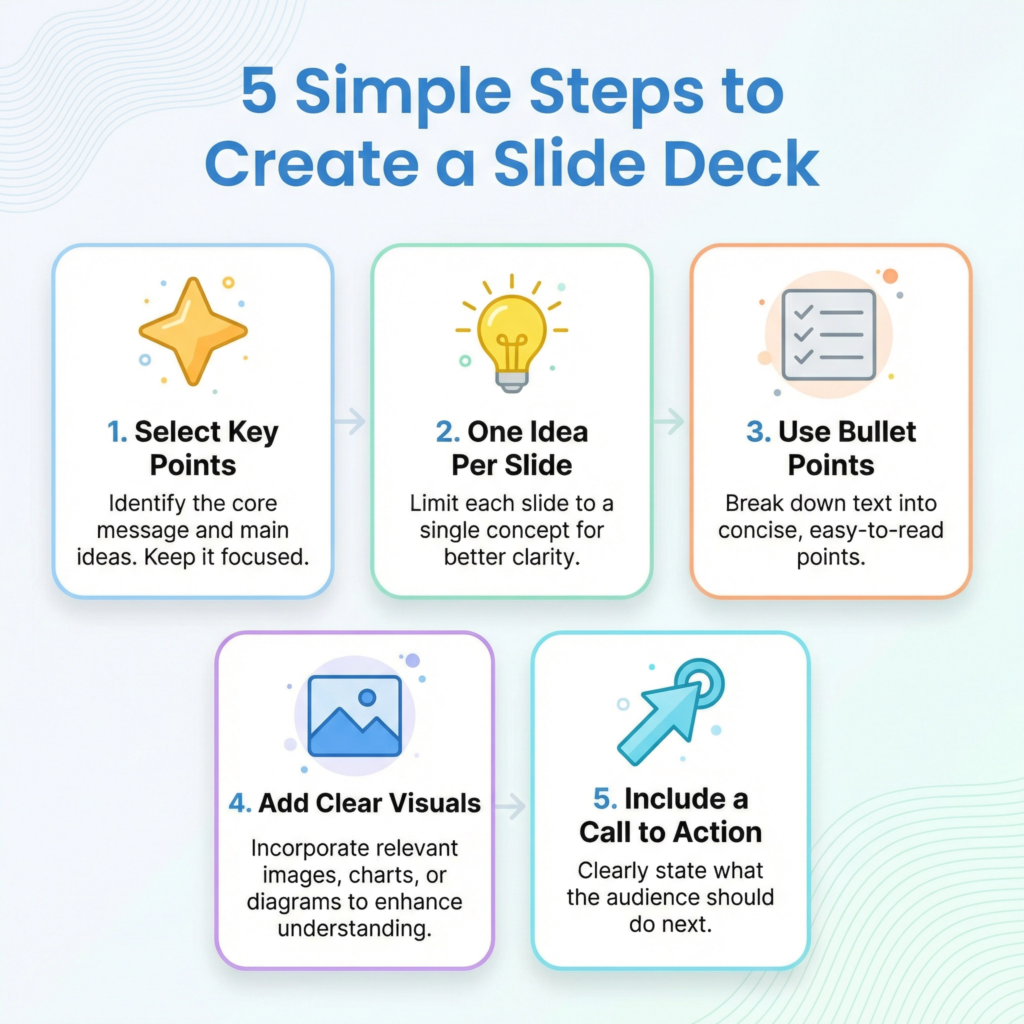
I start by looking at my blog post’s main headings. Each heading can become its own slide. For example, if your post is about “How to Grow Tomatoes,” your first slide would be the title.
Your next slides would be “Step 1: Choose the Right Soil,” “Step 2: Plant the Seeds,” and so on.
You don’t want to put too much text on one slide. Just one main idea and a few bullet points are enough. This keeps the reader focused and makes the information easy to digest.
You can use simple tools like Google Slides or PowerPoint to create your deck. I like to use a clean design with lots of white space.
Adding a nice image or a clear icon to each slide makes it much more engaging. I also make sure to use a big, bold font so it is easy to read on any screen.
Remember, your goal is to guide the reader through your main points quickly. At the end of your slide deck, always include a “Thank You” slide with a link back to your full blog post.
Once your slide deck is finished, you can upload it to LinkedIn as a “Document” post. This creates a carousel that people can click through. It is one of the best ways to get more views on that platform.
You can also use these slides if you ever need to give a live talk or a webinar. You have already done the research and organized the thoughts!
Repurposing your content into slides is a smart way to show you are an expert and share your knowledge in a new, visual way.
Combine Tips into Lead Magnets
Combining tips from your blog posts into a lead magnet is a brilliant way to grow your email list. A lead magnet is a free gift you give to people in exchange for their email address.
Instead of writing something brand new, you can look back at your existing content. I always tell my students that your blog is like a treasure chest full of valuable information.
You just need to gather the best pieces and put them together into one helpful package. This saves you a ton of time and provides massive value to your new subscribers.
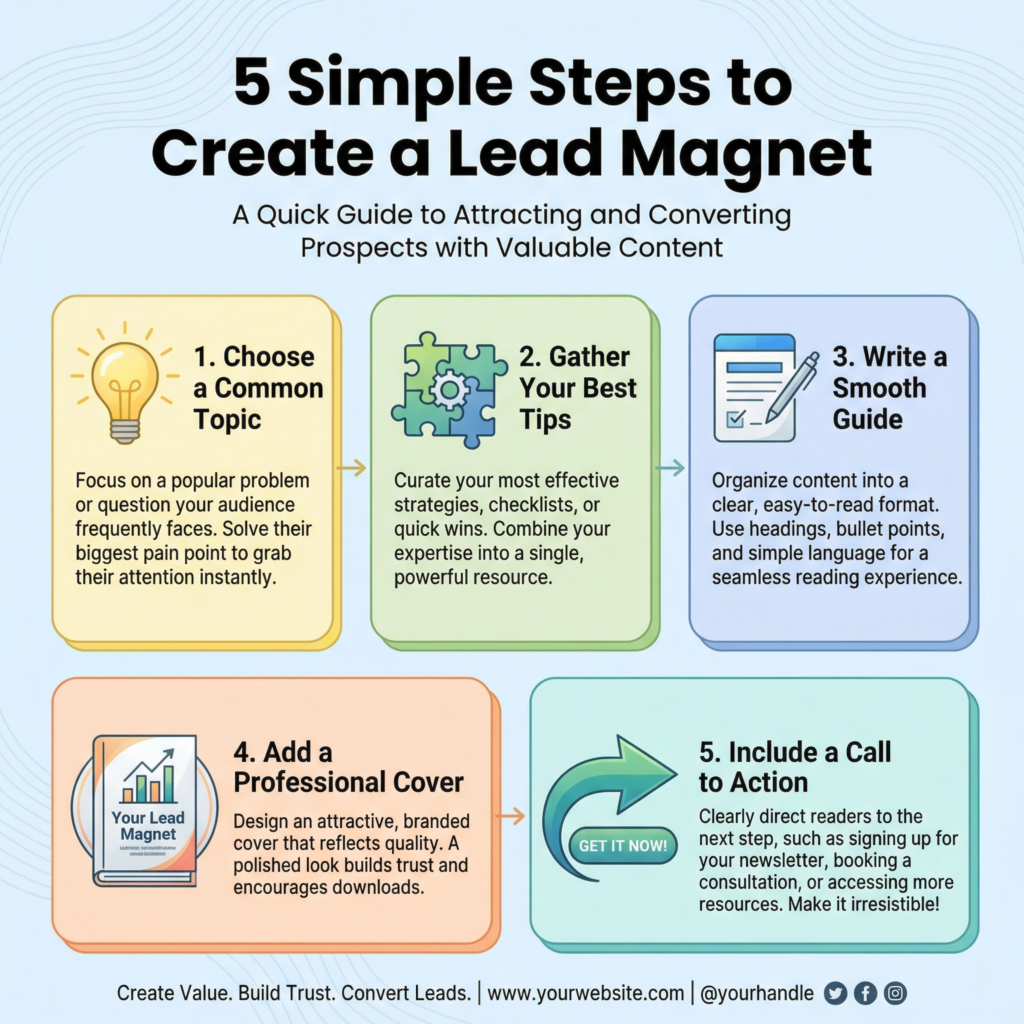
I start by picking a specific topic that I have written about many times. For example, if I have three blog posts about “Healthy Eating,” I can take the best tips from each one.
I combined them into a single PDF guide called “The Ultimate Healthy Eating Starter Kit.” I don’t just copy and paste the text. I rewrite the tips to make them flow together nicely.
I also added a nice cover page and a table of contents to make it feel like a real book. This turns your separate blog posts into a premium resource that people are excited to download.
You can use simple tools like Google Docs or Canva to create your lead magnet. I like to keep the design clean and easy to read.
Adding some checkboxes or a simple worksheet makes the guide even more useful. People love things they can actually use!
I also make sure to include my website link and social media handles at the end. This helps your new subscribers stay connected with you.
Remember, the goal is to show them that you are an expert and that you have even more great information to share.
Once your lead magnet is ready, you can create a simple landing page to give it away. You can also add a “pop-up” or a sign-up box to your blog posts.
I always tell people, “If you liked this post, you’ll love my free guide!” This is a very natural way to invite people to join your list.
Repurposing your content into a lead magnet is a smart way to turn casual readers into loyal fans. You are taking what you already have and making it work even harder for your business.
Cross-Promote on Multiple Channels
Cross-promoting on multiple channels is the secret to making your content reach as many people as possible.
Once you have repurposed your blog post into different formats, you need to share them everywhere!
I always tell my students that you shouldn’t just post once and forget about it. You want to create a “buzz” around your topic by showing up in different places at the same time. This makes your brand look bigger and helps you find new followers who might not have seen your original post.
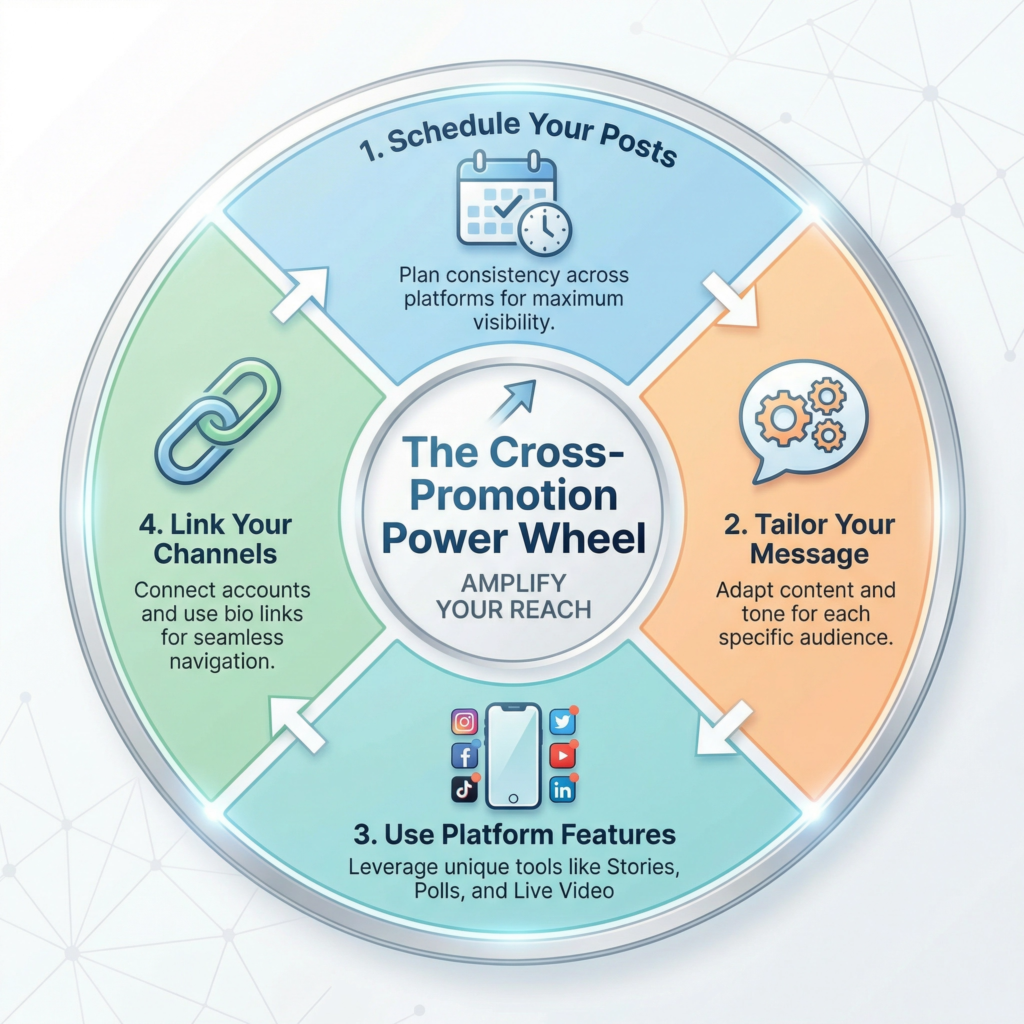
I start by making a simple schedule for my promotions. I don’t share everything on the same day. Instead, I spread it out over a week or two.
For example, on Monday, I might share the original blog post on Facebook. On Wednesday, I share a “gold nugget” tip on Instagram. On Friday, I might post the infographic on Pinterest.
This keeps the conversation going and gives people multiple chances to find your content. It’s like a friendly reminder that you have great information to share.
When I cross-promote, I always tailor the message for each platform. I don’t just copy and paste the same caption.
On LinkedIn, I use a more professional tone.
On Twitter, I keep it very short and use hashtags.
On Instagram, I focus on the beautiful image or video.
Each platform has its own “vibe,” and you want to fit in. This shows your audience that you care about their experience.
It also makes your posts more likely to be shared by others, which grows your reach even further.
Don’t forget to link your different channels together. You can mention your YouTube video in your Instagram stories.
You can put a link to your podcast in your Facebook group. This creates a “web” of content that keeps people in your world.
If they like your video, they might click to read your blog. If they like your blog, they might sign up for your email list.
Cross-promotion is a smart way to build a loyal community. You are making it easy for people to find and enjoy your best work, no matter where they hang out online.
Convert Webinars into Mini Courses
Converting your past webinars into mini courses is a brilliant way to create a valuable product without starting from scratch. A webinar is usually a long video where you teach a specific topic.
Instead of letting that video sit on your computer, you can break it down into smaller, easy-to-digest lessons. I always tell my students that a webinar is like a giant loaf of bread.
A mini course is like taking that loaf and slicing it up so people can enjoy one piece at a time. This makes the learning process much less overwhelming for your audience.
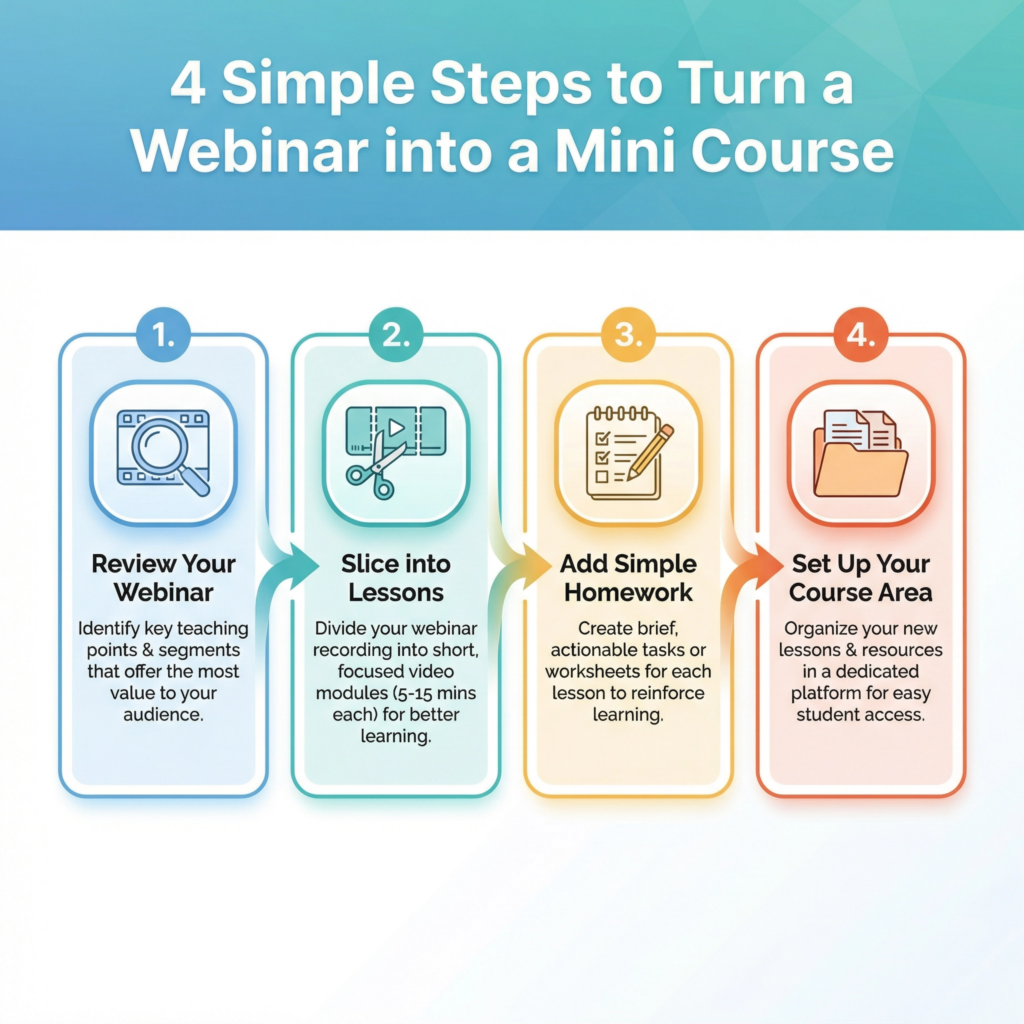
I start by watching the webinar and looking for natural breaking points. Most webinars have different sections, like an introduction, three main tips, and a question-and-answer part.
Each of these sections can become a separate lesson in your mini course. For example, if your webinar was 60 minutes long, you could turn it into six 10-minute videos.
I like to give each video a clear, catchy title so students know exactly what they will learn. This structure helps people feel like they are making progress as they complete each small step.
To make the mini course even better, I add simple “homework” or worksheets for each lesson.
You can take the main points from your webinar slides and turn them into a one-page PDF. This gives your students something to do after they watch the video.
It helps the information stick in their minds. You don’t need fancy software to host your mini course.
You can use a simple members’ area on your website or even a series of automated emails. The goal is to provide a guided experience that helps your students reach a specific goal.
Repurposing your webinars into mini courses also helps you build authority. When people see that you have a structured course, they see you as a real expert.
You can offer the mini course for free to grow your email list, or you can sell it as a low-cost entry product. It’s a smart way to get more life out of your video content.
You’ve already done the hard work of teaching the material.
Now, you’re just packaging it in a way that provides even more value to your community.
Create Email Series from Existing Content
Creating an email series from your existing content is a fantastic way to keep your audience engaged. You don’t need to write new emails every single day.
Instead, you can use the great information you have already shared in your blog posts. I always tell my students that an email series is like a guided tour of your best work.
You take your readers by the hand and show them your most helpful tips, one day at a time. This builds a strong relationship and keeps your brand at the top of their minds.

I start by picking a few blog posts that all relate to the same topic. For example, if you have three posts about “Gardening for Beginners,” you can turn them into a 5-day email series.
Each email can cover one small part of the topic. The first email could be about “Choosing the Right Tools.” The second could be “Preparing Your Soil.” I don’t just copy the whole blog post into the email.
I write a short, friendly summary and then provide a link to the full post for those who want to learn more. This drives more traffic back to your website!
I like to make my emails feel very personal. I use a friendly tone and talk directly to the reader.
I might say, “I know starting a garden can be tricky, so here is a quick tip to help you out today.” This makes people feel like you are talking just to them.
I also make sure to include a clear “subject line” that makes them want to open the email. Something like “Day 1: The Secret to Perfect Soil” works really well.
By breaking your content into small pieces, you make it much easier for people to learn and take action.
You can use an email marketing tool to set this up as an “automated sequence.” This means that once someone signs up, the emails go out on their own. It’s a smart way to put your marketing on autopilot.
You can even add a small “homework” task at the end of each email. This encourages your readers to actually use what they are learning.
Repurposing your content into an email series is a powerful way to provide value and turn new subscribers into loyal fans.
Create an Ebook from Multiple Blog Posts
Creating an ebook from multiple blog posts is one of the most rewarding ways to repurpose your content. If you have written several articles on the same topic, you already have most of a book ready!
I always tell my students that an ebook is like a “greatest hits” album for your blog. You take your best information and put it into one beautiful, organized file.
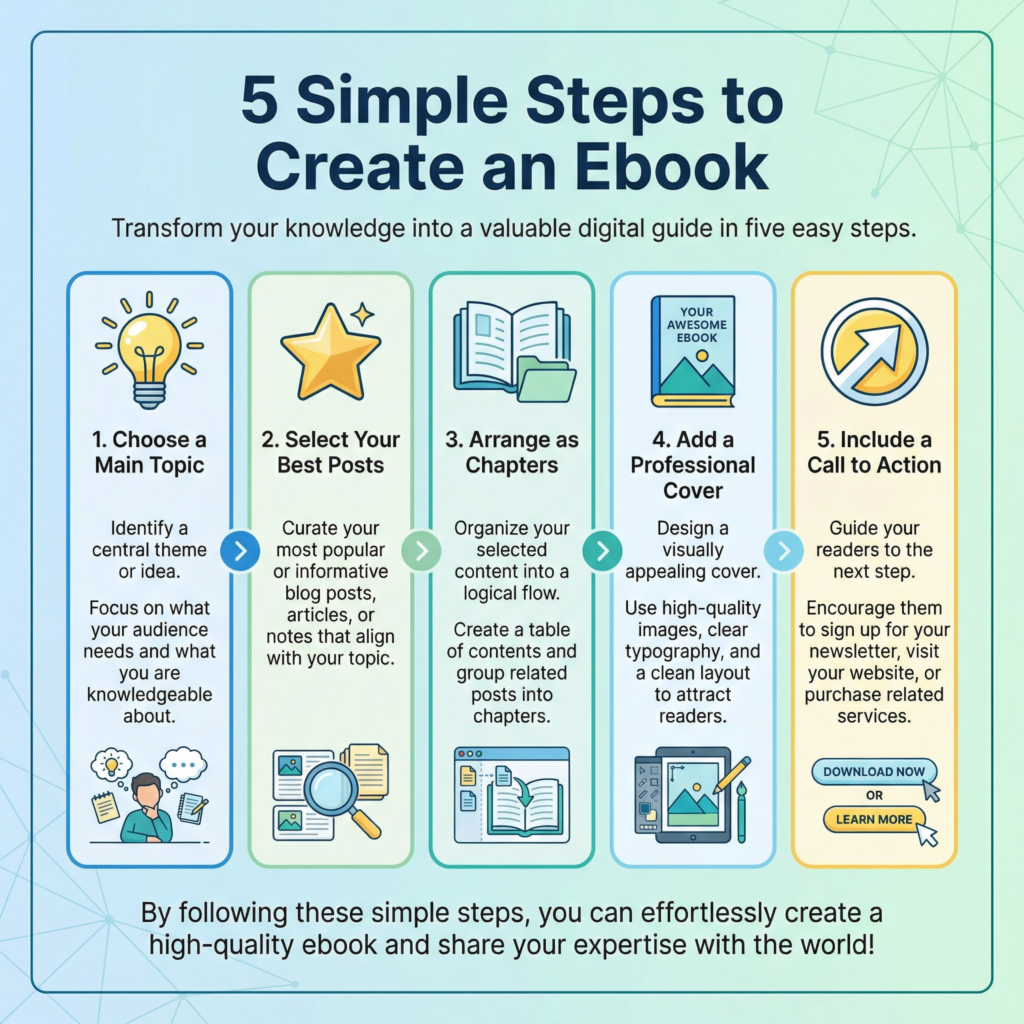
This makes your knowledge feel much more valuable and professional. It is a great way to show your readers that you are a real authority in your field. I start by picking a central theme for my ebook.
For example, if you have written five posts about “Digital Photography,” you can combine them into an ebook called “The Beginner’s Guide to Stunning Photos.” I look for a logical order for the chapters.
Maybe Chapter 1 is about “Choosing a Camera,” and Chapter 2 is about “Understanding Light.” I don’t just paste the blog posts as they are.
I add “bridge” sentences between the chapters to make the book flow smoothly. This makes it feel like one complete story rather than a collection of separate articles.
You can use simple tools like Google Docs or Canva to design your ebook. I like to add a professional-looking cover page and a clear table of contents.
Adding some nice images, pull-quotes, and a “About the Author” page at the end adds a nice touch.
I also make sure the font is easy to read on tablets and e-readers. Remember, people love to download and keep ebooks.
They feel like they are getting a “real” product that they can refer back to whenever they need help.
Once your ebook is finished, you can use it in many ways. You can give it away for free to grow your email list, or you can even sell it on your website or Amazon.
You can also share short excerpts from the book on social media to get people excited.
Repurposing your blog posts into an ebook is a smart way to get more value out of your hard work.
You are taking what you already have and turning it into a lasting asset for your brand. It’s a powerful way to leave a mark and help even more people.
Conclusion
Repurposing your content is the smartest way to work less and achieve more. We have covered many powerful strategies to help you give your hard work a second life.
We started by learning how to turn blog posts into Social Media Posts and Create Infographics from Key Points to reach people who love quick, visual tips.
We then explored how to turn blog posts into youtube videos and Turn Content into Podcasts for those who prefer to watch or listen on the go.
To add even more value, we discussed how to Create Slide Decks or Presentations for professional audiences and Combine Tips into Lead Magnets to grow your email list.
We also looked at the bigger picture by learning how to Cross-Promote on Multiple Channels, Convert Webinars into Mini Courses, and even Create an Ebook from Multiple Blog Posts.
Each of these steps helps you reach new people and build your authority without having to start from zero every single day.
Remember, you don’t have to do everything at once. Pick one strategy that feels easy and start there.
The goal is to make your content work harder for you, so you can focus on what you do best.
By sharing your knowledge in different ways, you are making it easier for your audience to learn, grow, and connect with your brand. Your past content is a gold mine—it’s time to start digging!