How to Sell Digital Products on Etsy can feel confusing for beginners, especially when you don’t know what to sell or how to get your first customer, and this often leads to frustration and no sales.
However, Etsy has over 90 million active buyers, which shows there is a huge opportunity if you use the right strategy.
In this blog post, you will learn simple steps to create and list digital products, how to choose the right ideas, and how to promote them effectively.
These easy tips will help you start selling with confidence and turn your digital products into a steady source of income.
Step 1: Choose the Right Digital Product
Starting to sell digital products on Etsy is exciting! The very first step, and I think one of the most important, is choosing what you’re going to sell. This isn’t just about picking something you like.
It’s about finding a digital product that people actually want to buy on Etsy. Think of it like planting a seed.
You want to plant a seed that will grow into a strong, healthy plant in the right soil. Etsy is a unique marketplace, and certain digital products do really well there.
I always start by looking at what’s popular. What are people searching for on Etsy? What kind of digital items are already selling well?
You can do this by using Etsy’s search bar and looking at the trending sections. Think about your own skills and passions too.
Are you good at graphic design? Maybe printable art or digital planners are for you. Love organizing? Digital templates for budgets or meal planning could be a hit. The key is to combine what you love with what the market needs.
Etsy buyers often look for things that help them with their hobbies, small businesses, or personal organization.
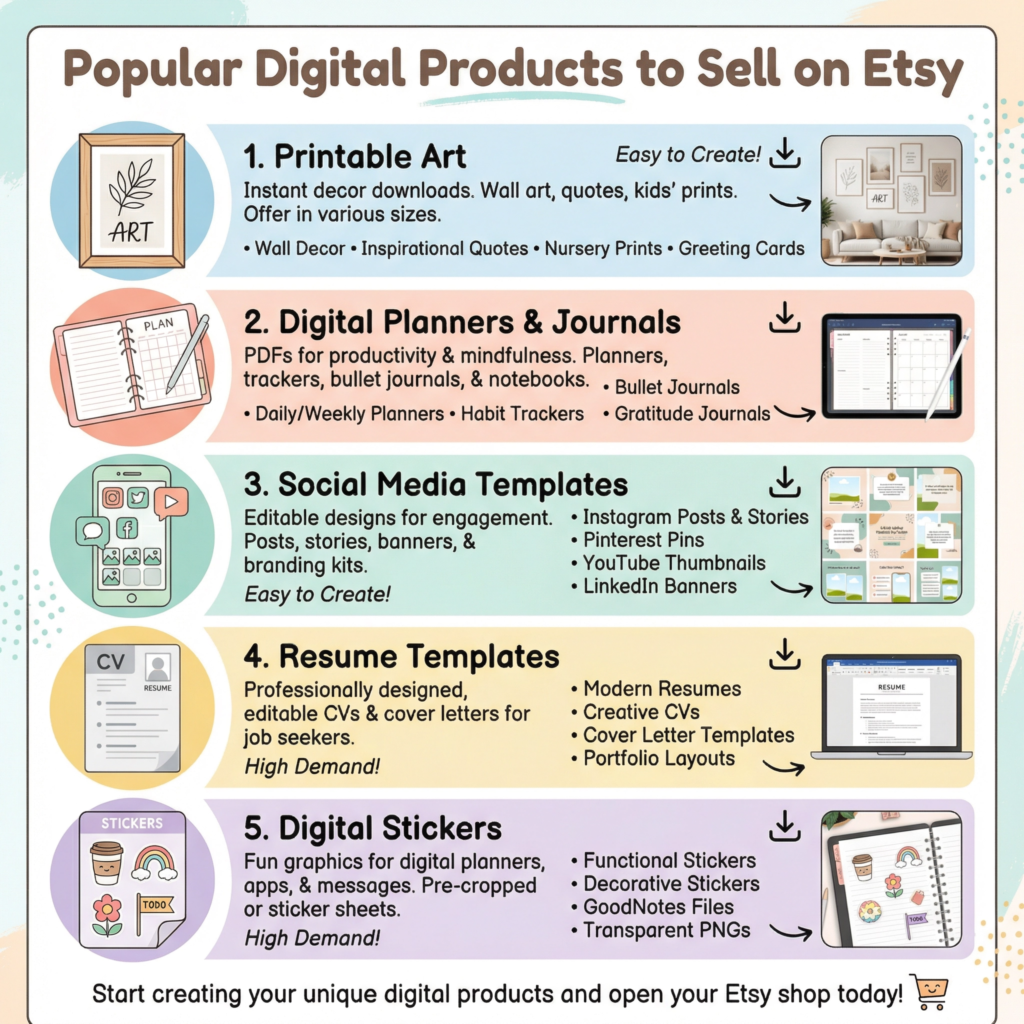
Some popular digital products include: printable wall art, digital planners and journals, social media templates, wedding invitations (digital downloads), resume templates, and even digital stickers.
I’ve seen people create amazing things! The beauty of digital products is that you create them once and can sell them over and over again. This means more profit for you without having to worry about shipping or inventory.
When you pick your product, think about who your ideal customer is. What problems do they have that your digital product can solve?
For example, if you create digital budget planners, your ideal customer might be someone who wants to get better control of their money.
If you make social media templates, your customer might be a small business owner who needs help with their online presence.
Understanding your customer helps you create a product they will truly value. It also helps you talk to them in your product descriptions and marketing.
Finally, make sure your chosen product is something you can create well. Quality matters a lot, even for digital items.
If your designs are sloppy or your templates are hard to use, people won’t buy them. Take your time to create something beautiful and functional.
I always recommend getting feedback from friends or family before you launch. Their fresh eyes can spot things you might have missed.
A high-quality product will lead to happy customers and good reviews, which are super important on Etsy.
Step 2: Create Your Digital Product
Once you know what digital product you want to sell, the next exciting step is to actually create it! This is where your ideas start to become real. Don’t worry if you’re not a tech wizard.
There are many easy-to-use tools out there that can help you. I always tell people that creativity is more important than complex software skills when you’re just starting out. Focus on making something useful and beautiful.
For many digital products, like printable art, digital planners, or social media templates, graphic design software is your best friend.
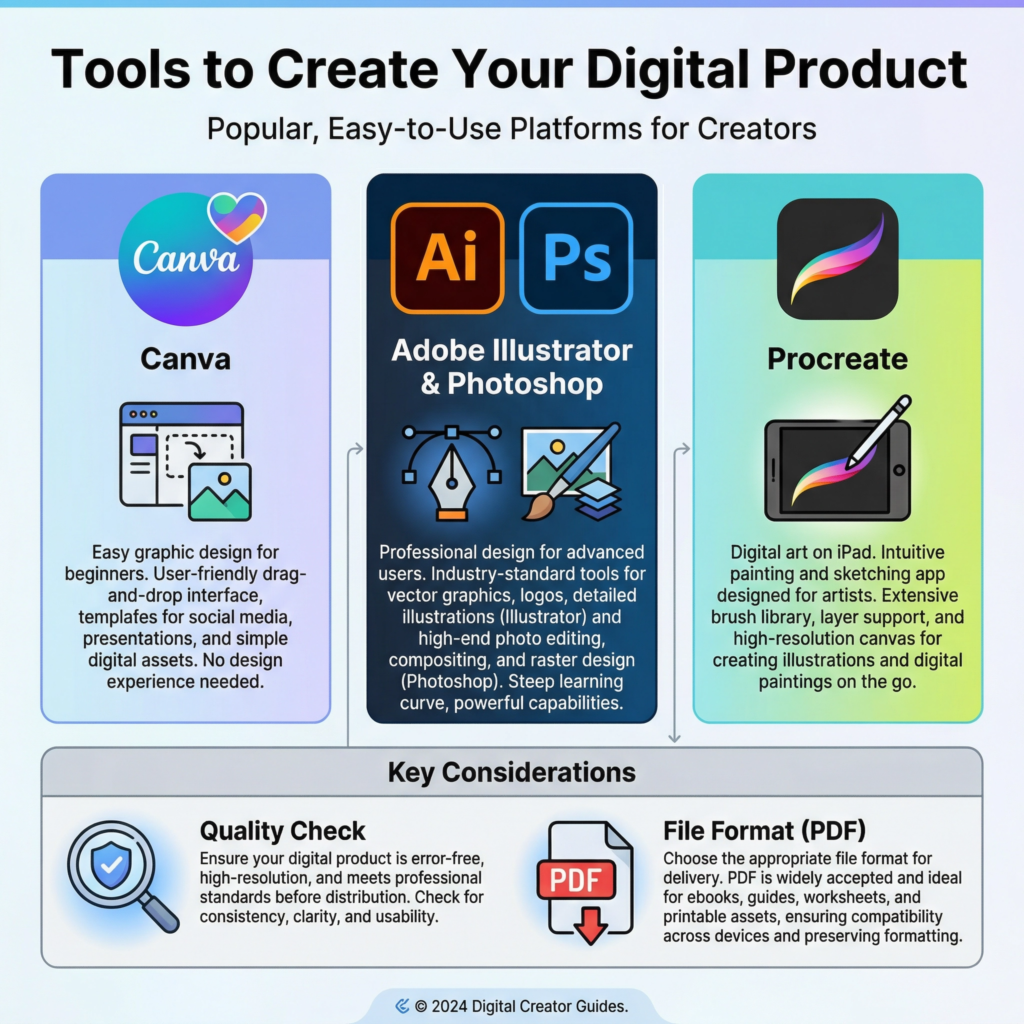
Programs like Canva are super popular because they are easy to learn and have lots of ready-made templates.
You can also use more advanced tools like Adobe Illustrator or Photoshop if you’re comfortable with them.
The goal is to create a high-quality file that your customers can download and use right away. Make sure your designs are clean, professional, and easy to understand.
Think about the format of your digital product. Most digital products sold on Etsy are PDF files.
This is because PDFs are easy to download and print, and they look the same on almost any device.
If you’re selling templates, you might also offer them in formats like JPG, PNG, or even editable files for Canva or other software.
Always make sure your files are organized and clearly labeled. This makes it easy for your customers to find what they need after they buy from you.
Before you list your product, test it out! I can’t stress this enough. Download your own product and try to use it as if you were a customer.
Does it look good? Is it easy to understand? Are there any typos? Ask a friend or family member to test it too.
Fresh eyes can catch mistakes you might have missed. A perfect product means happy customers, and happy customers leave good reviews, which helps your Etsy shop grow. Quality control is key to success.
Step 3: Open Your Etsy Shop
Now that you have a fantastic digital product ready, it’s time to open your very own Etsy shop! This is where you’ll showcase your creations to millions of potential customers.
Don’t be intimidated; Etsy makes the process quite straightforward.
I like to think of it as setting up a cozy little boutique online, but instead of physical items, you’re filling it with digital treasures. It’s your chance to make a great first impression.
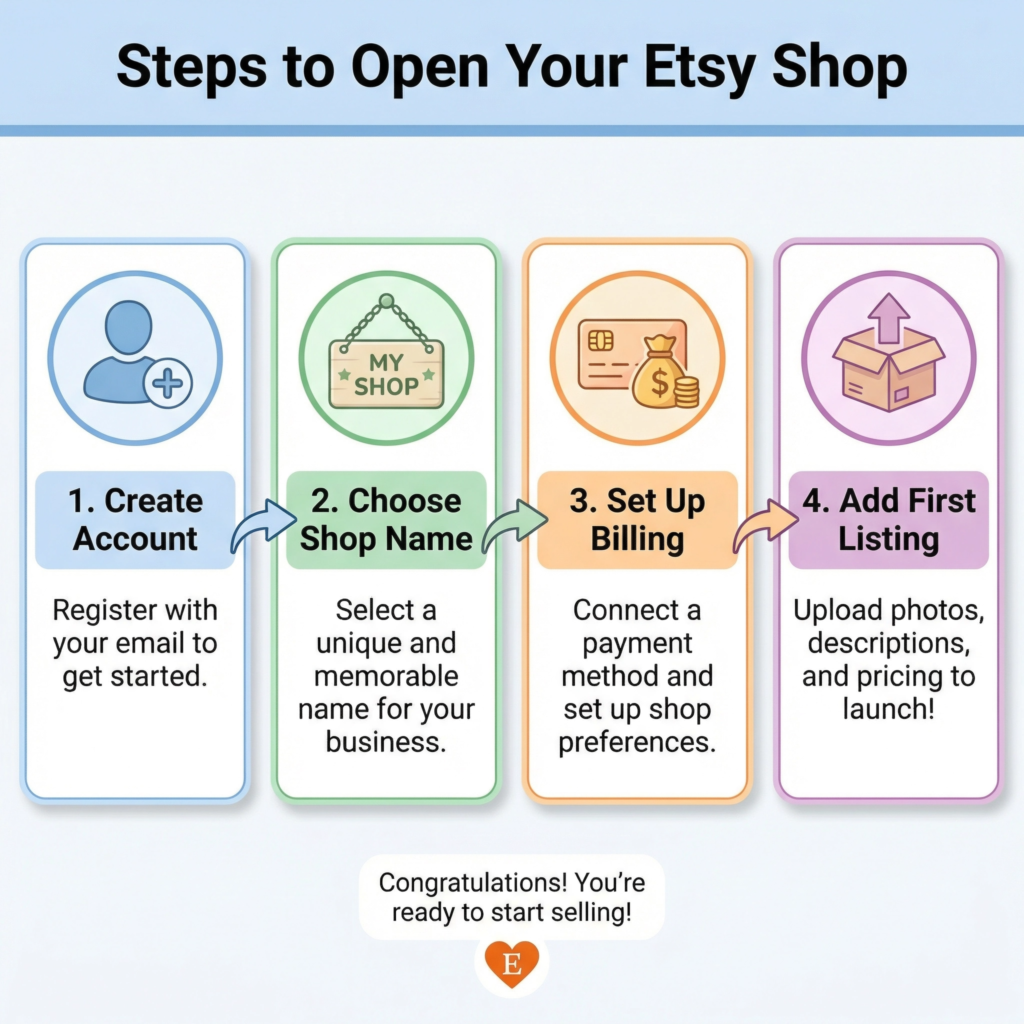
First, you’ll need to create an Etsy account if you don’t already have one.
Then, you’ll find the option to “Open your Etsy shop.” Etsy will guide you through a few basic setup steps.
You’ll choose your shop name, which should be catchy and easy to remember. I recommend picking something that reflects your brand or the type of products you sell.
You’ll also select your shop’s language, country, and currency. These initial choices are important for how buyers find and interact with your shop.
Next, you’ll set up your billing and payment information. Etsy needs to know how to pay you when you make sales and how to charge you for listing fees.
Don’t worry, the fees are very small. It costs just $0.20 to list an item for four months, and Etsy takes a small percentage of each sale.
These fees help Etsy run its platform and bring customers to your shop. It’s a small price to pay for access to such a huge marketplace.
Make sure all your financial details are correct to avoid any delays.
After the basic setup, you’ll start adding your first listing. This is where you upload your digital product files, write compelling descriptions, and add beautiful photos.
For digital products, you’ll mark the item as a “digital” download. This tells Etsy that buyers will receive a file directly after purchase.
I always advise using clear, high-quality images that show off your product. Think about how your product will look when someone uses it. A good listing is key to attracting buyers.
Step 4: Upload Your Product
Now that your Etsy shop is open and your digital product is created, it’s time for the exciting part: uploading your product!
This is where you prepare your digital item to be seen and bought by customers. It’s a crucial step because how you present your product can make a big difference in whether people click that ‘buy’ button. I always think of this as setting up a beautiful display in your shop window.
When you’re in your Etsy shop manager, you’ll go to the ‘Listings’ section and click ‘Add a listing.’ Etsy will then walk you through several important fields.
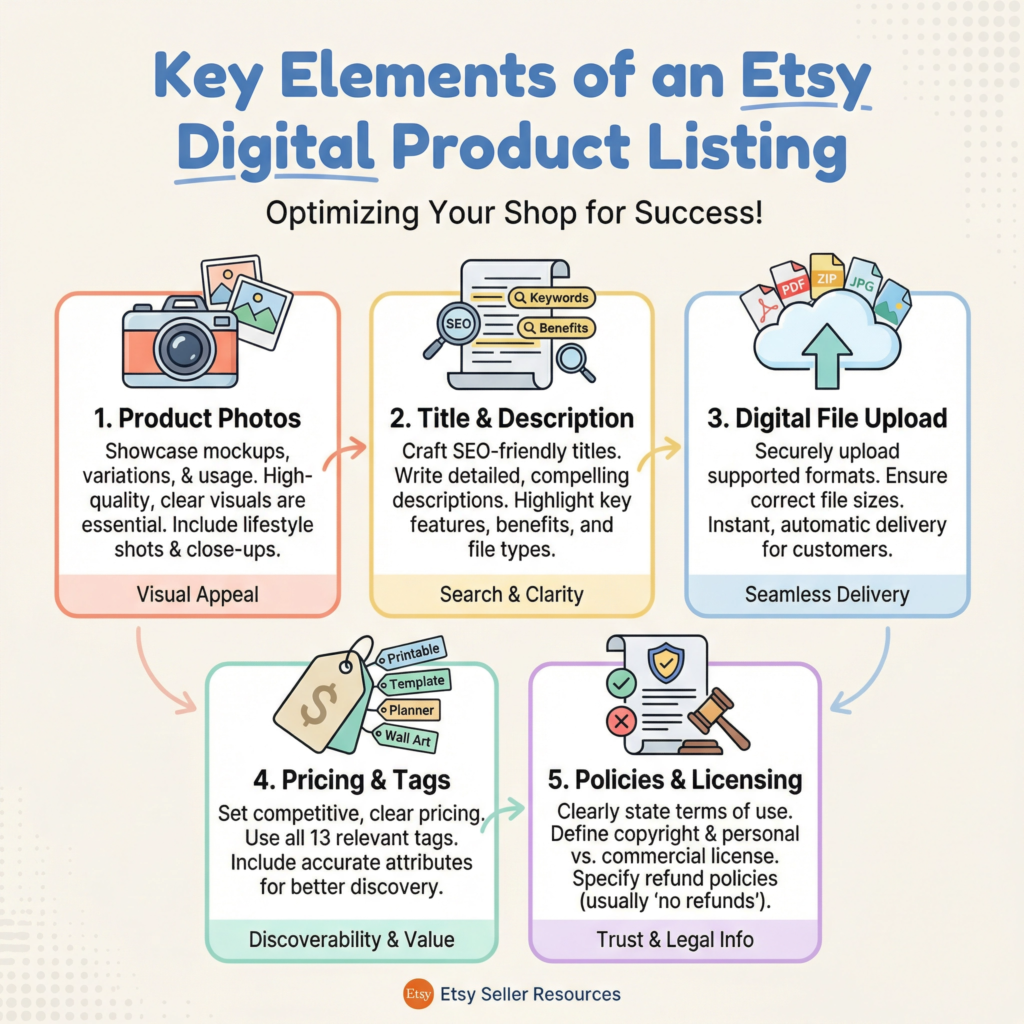
First, you’ll upload your product photos. These are super important! Since customers can’t touch or feel a digital product, your photos need to show exactly what they’re getting.
I recommend using mockups that show your digital product in use.
For example, if it’s a digital planner, show it open on a tablet. If it’s printable art, show it framed on a wall. Use all 10 photo slots if you can, showing different angles and features.
Next, you’ll write your listing title and description. Your title should be clear and include keywords that people might search for.
For example, instead of just ‘Planner,’ try ‘Digital Planner for iPad – Undated Daily Planner – GoodNotes Planner.’ In the description, tell customers all about your product.
What problems does it solve? What features does it have? How can they use it?
I always try to answer any questions a customer might have before they even ask. Be enthusiastic and highlight the benefits.
Then, you’ll select ‘Digital’ as the type of product. This is very important! It tells Etsy that this is a downloadable item.
After that, you’ll upload the actual digital file(s) that customers will receive after purchase.
Make sure these files are high-quality and correctly formatted (usually PDF, JPG, or PNG).
You can upload multiple files if your product includes different versions or bonus items. I always double-check that the correct files are uploaded here.
Finally, you’ll set your price and add tags. Your price should reflect the value of your product and be competitive.
For tags, use keywords that describe your product and what people might search for. Think broadly!
For example, for a digital planner, tags could include ‘digital planner,’ ‘iPad planner,’ ‘GoodNotes template,’ ‘productivity planner,’ ‘undated planner,’ and so on.
The more relevant tags you use, the easier it is for customers to find you. Once everything looks good, you can publish your listing!
Step 5: Write a High-Converting Description
Your product photos grab attention, but your description seals the deal! This is where you tell potential buyers everything they need to know about your digital product.
A good description doesn’t just list features; it tells a story and explains how your product will make their life better.
I always think of it as having a friendly chat with your customer, answering all their questions before they even ask. A high-converting description turns a browser into a buyer.
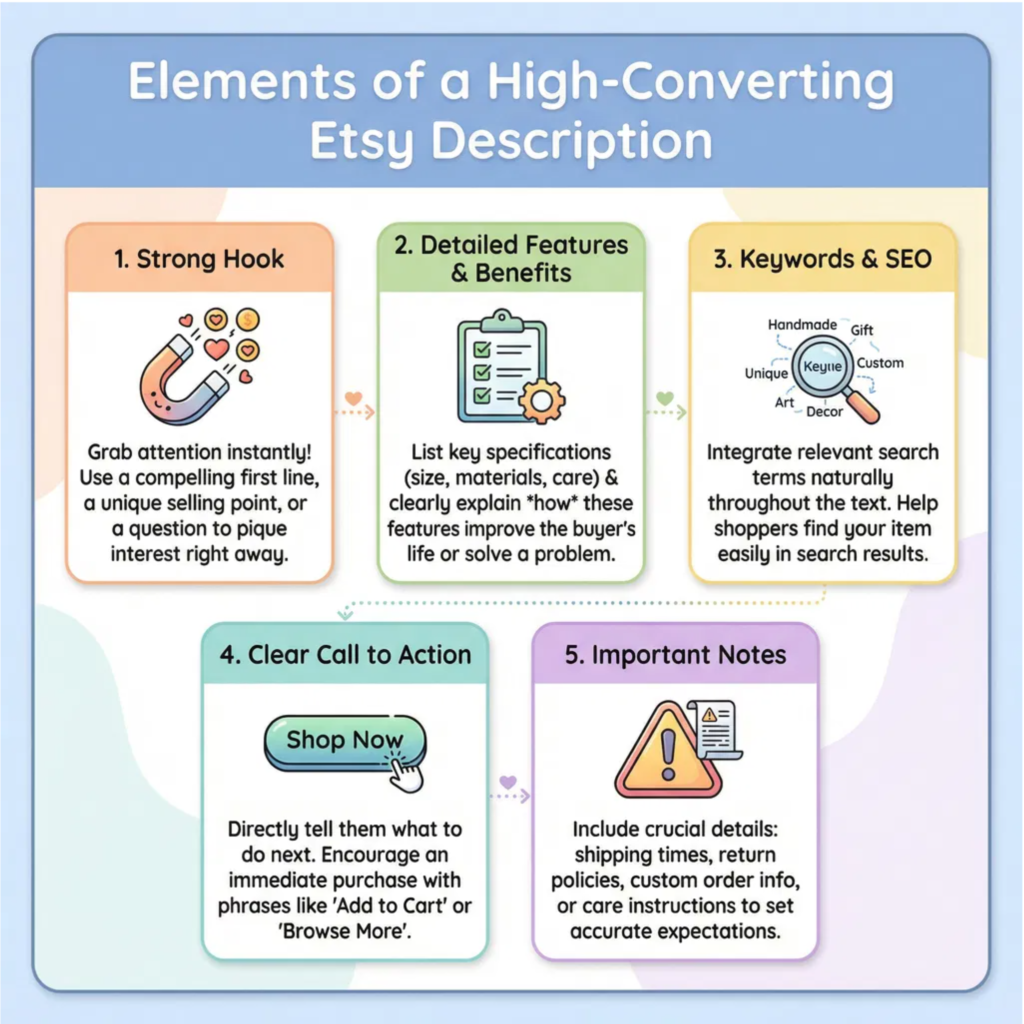
Start with a strong opening. The first few sentences are super important because they are what customers see right away.
Hook them in! Clearly state what your product is and what main problem it solves.
For example, if you’re selling a digital planner, you might say, “Tired of feeling disorganized?
This undated digital planner is designed to help busy individuals like you take control of their schedule and achieve their goals!” This immediately tells them the benefit.
Next, dive into the details. What exactly is included in your digital product? List all the files, sizes, and formats. If it’s a template, mention which software it’s compatible with (e.g., “Includes Canva template link”).
Be very clear about what they will receive. I also like to include a section on “How to Use” the product. This helps customers imagine themselves using it and makes the purchase feel less risky.
For digital products, clarity is king because they can’t physically examine the item.
Don’t forget about keywords! Just like in your title and tags, sprinkle relevant keywords naturally throughout your description.
This helps Etsy’s search engine understand what your product is about and show it to the right people. Think about what your ideal customer would type into the search bar.
Also, highlight the benefits, not just the features. A feature is “12 pages,” but a benefit is “12 pages to help you plan your entire year with ease.” Focus on how your product will help them.
Finally, include a clear call to action and important notes. Tell them exactly what to do next, like “Add to cart now!” or “Download instantly after purchase!”
For digital products, it’s also crucial to include notes about it being a digital download, no physical item will be shipped, and typically, no refunds are given due to the nature of digital goods.
This manages expectations and prevents misunderstandings. A well-written description builds trust and encourages sales.
Step 6: Use Keywords for SEO
SEO stands for Search Engine Optimization. It sounds fancy, but it just means helping people find your products when they search on Etsy.
Think of keywords as the secret words that connect your digital product to a buyer.
When someone types something into the Etsy search bar, Etsy tries to match those words with products that have similar keywords.
I always say, if you want to sell, you need to be found! This step is all about making your products easy to discover.
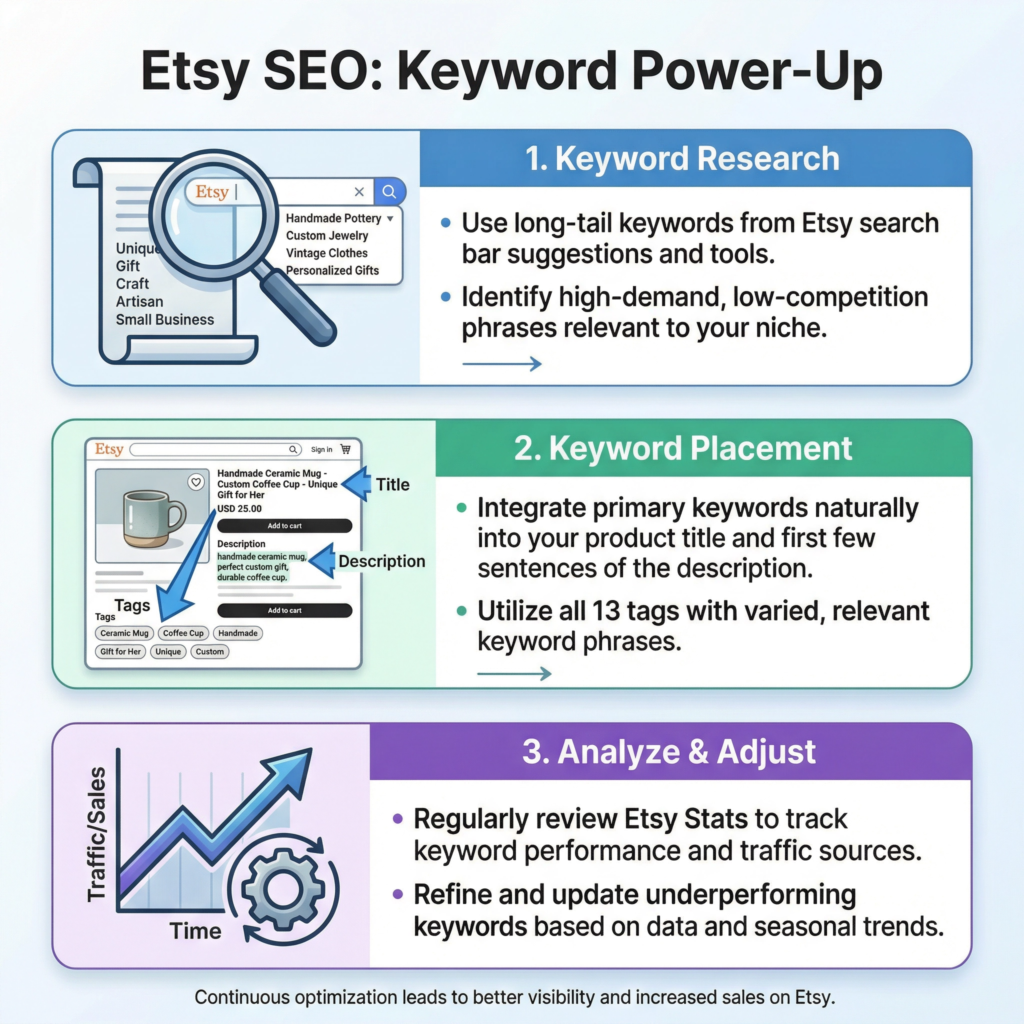
Finding the right keywords is like being a detective. Start by thinking about what your ideal customer would type into the search bar to find your product.
If you sell digital planners, they might type “digital planner,” “iPad planner,” “GoodNotes template,” or “undated planner.” Don’t just guess!
You can use Etsy’s search bar itself. As you type, Etsy suggests popular searches. These suggestions are gold!
You can also look at what keywords successful shops in your niche are using. I often check out competitor listings to see their tags and titles for inspiration.
Once you have a list of keywords, you need to use them wisely. Don’t just stuff them everywhere. Etsy likes it when you use keywords naturally.
The most important places for keywords are your listing title and your tags. Your title should be clear and include your main keywords.
For example, “Digital Planner for iPad – Undated Daily Planner – GoodNotes Template.” Then, use all 13 tag slots Etsy gives you.
Mix broad keywords (like “digital planner”) with more specific ones (like “boho weekly planner”).
Also, sprinkle keywords throughout your product description. This helps Etsy understand your product even better.
But remember, write for people first, then for search engines. Your description should still be easy to read and helpful.
I also recommend using keywords in your shop sections and announcements. The more places you use relevant keywords, the better your chances of showing up in search results.
It’s a continuous process of learning and adjusting, but it pays off by bringing more eyes to your amazing digital products.
Step 7: Set the Right Price
Setting the right price for your digital products on Etsy is a bit like finding the sweet spot. You want your price to be fair to you, covering your time and effort.
But you also want it to be attractive to buyers. If your price is too high, people might not buy.
If it’s too low, people might think your product isn’t very good, or you might not make enough profit.
I always aim for a price that feels good to me and makes sense to my customers.
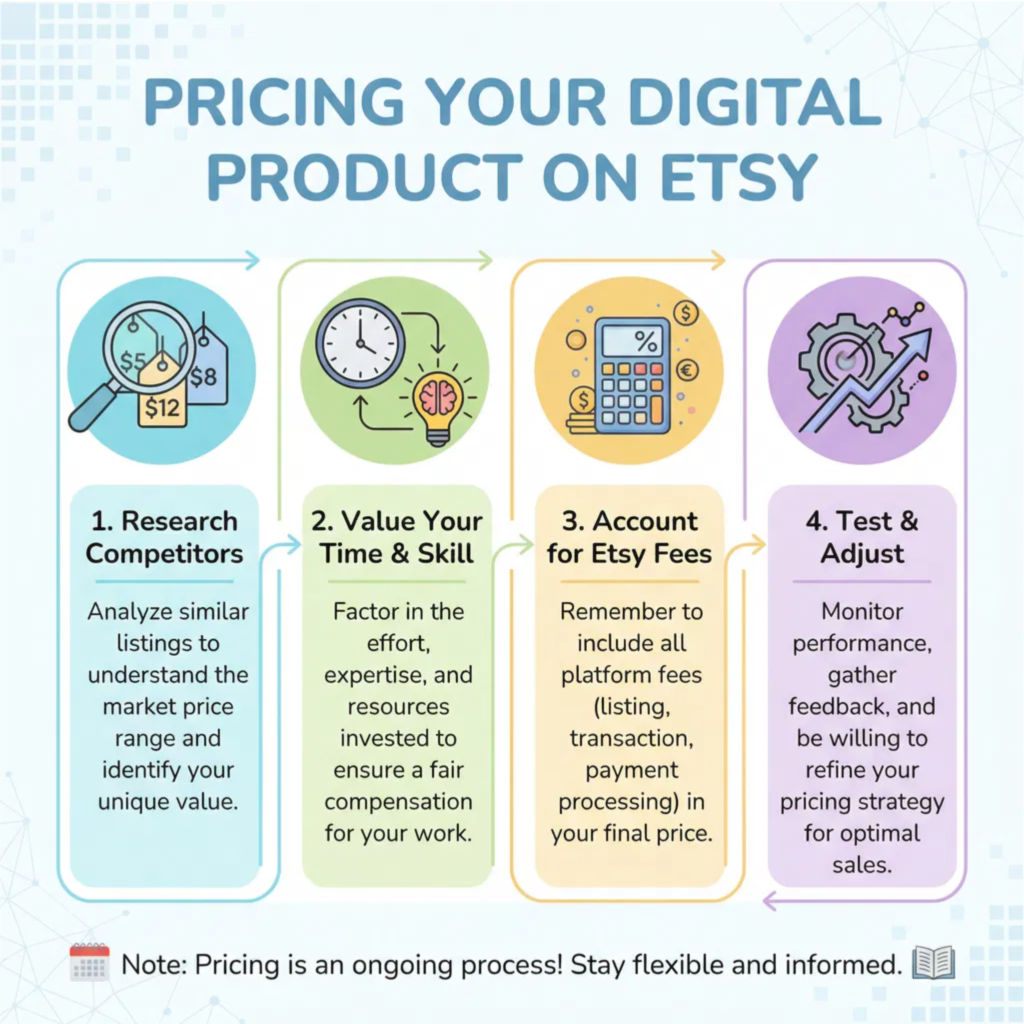
First, research what similar digital products are selling for on Etsy.
Search for items like yours and see their price ranges. This gives you a good starting point. Don’t just copy the lowest price!
Look at the quality, the number of items included, and the overall presentation of those products.
If your product offers more value or is higher quality, you can charge a bit more.
I often find that unique designs or products that solve a specific problem well can command a better price.
Next, think about the value you’re offering. Even though digital products don’t have material costs, your time and skill are valuable.
How long did it take you to create the product? What expertise did you put into it? What benefit does it bring to the customer?
For example, a digital planner that saves someone hours of organization time is worth more than a simple printable quote.
I like to list out all the benefits and features, and then think about what that’s truly worth to someone.
Consider Etsy’s fees. Remember, Etsy charges a listing fee ($0.20 per listing) and a transaction fee (a percentage of the sale).
You need to make sure your price covers these fees and still leaves you with a good profit. Don’t forget about any payment processing fees too.
I always do a quick calculation to make sure I’m happy with the amount I’ll actually receive after a sale. It’s important to be clear on your profit margins.
Finally, don’t be afraid to experiment. Pricing isn’t set in stone. You can always adjust your prices later based on how your products are selling.
If a product isn’t selling, try lowering the price a little. If it’s selling really well, you might be able to increase it.
You can also offer sales or bundles to attract more buyers. I often run promotions during holidays or special events.
The goal is to find what works best for your products and your audience over time.
Step 8: Promote Your Products
Having amazing digital products and a perfectly set up Etsy shop is great. But if no one knows about them, you won’t make sales! This is where promotion comes in.
Promoting your products means telling people they exist and encouraging them to visit your shop.
Think of it like opening a new store on a busy street – you need to put up signs and tell everyone about your grand opening!
I always say, don’t be shy about sharing your creations.
Social media is your best friend for promoting digital products.
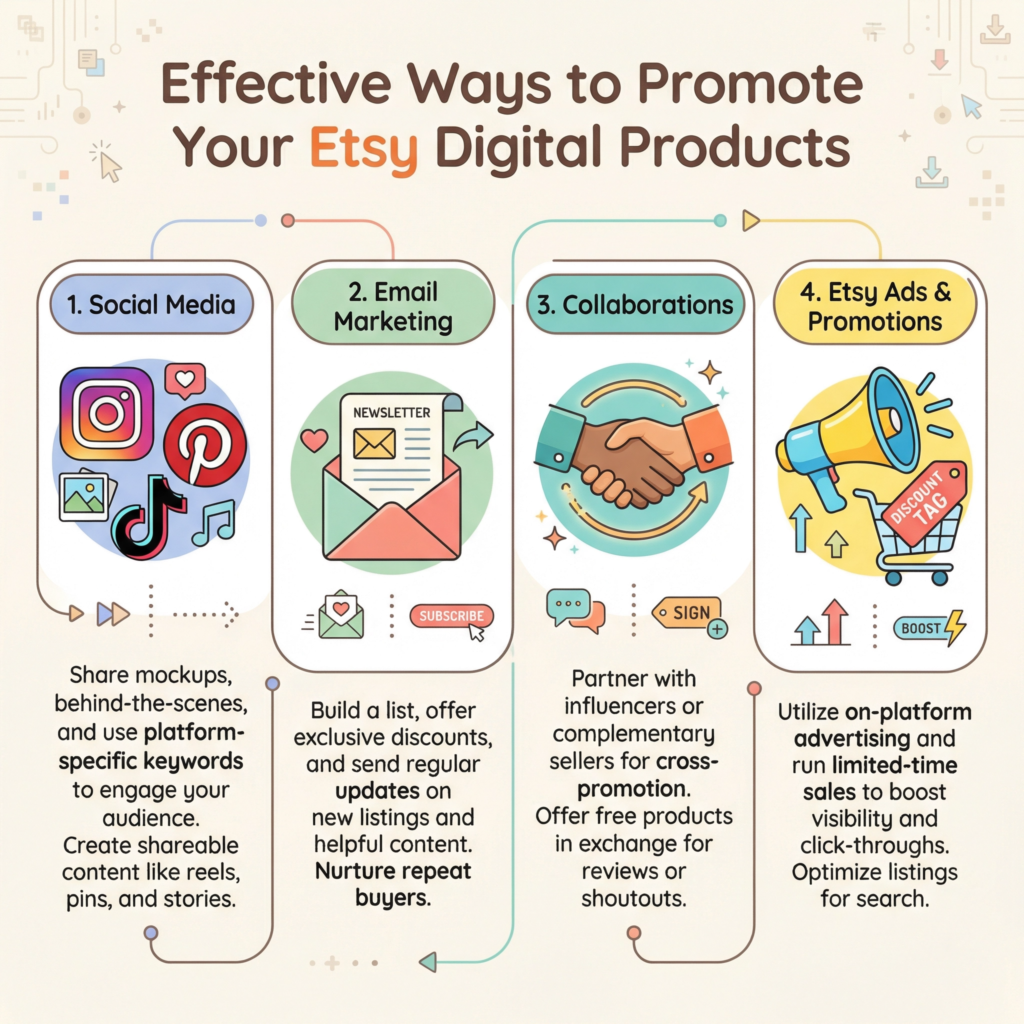
Platforms like Instagram, Pinterest, and TikTok are very visual, which is perfect for showing off your designs.
Create engaging posts that highlight your products in action.
For example, if you sell digital planners, share videos of you using them to organize your day. If it’s printable art, show it styled in a beautiful room.
Use relevant hashtags to reach a wider audience. I find that behind-the-scenes content or tutorials on how to use your products often perform very well.
Consider starting an email list. This might sound a bit advanced, but it’s a powerful tool.
When someone signs up for your email list, it means they are interested in what you do. You can offer a free digital download (like a mini-planner or a free printable) as a thank you for signing up.
Then, you can send out newsletters to your subscribers, letting them know about new products, sales, or helpful tips related to your niche.
I love email marketing because it allows you to build a direct relationship with your most interested customers.
Collaborate with others! Look for other Etsy sellers, bloggers, or influencers in your niche.
You could do a joint giveaway, promote each other’s products, or even create a bundle together.
This helps you reach new audiences that might be interested in your products.
For example, if you sell digital stickers, you could partner with someone who sells digital planners. It’s a win-win situation where both of you get more exposure.
Don’t forget about Etsy’s own promotional tools. Etsy Ads can help your listings appear higher in search results.
You can set a daily budget and target specific keywords. While it costs money, it can be a great way to get initial visibility.
You can also run sales and promotions directly through Etsy. Offering a discount for a limited time can create a sense of urgency and encourage sales.
I always recommend trying out different promotion methods to see what works best for your specific products and audience.
Step 9: Deliver and Automate
One of the best things about selling digital products is the automation! Once you set everything up correctly, your products can be delivered to customers instantly, even while you’re sleeping.
This means less work for you and happy customers who get their purchases right away.
I love this part because it truly makes your Etsy shop a passive income stream. It’s all about making the process smooth and seamless.
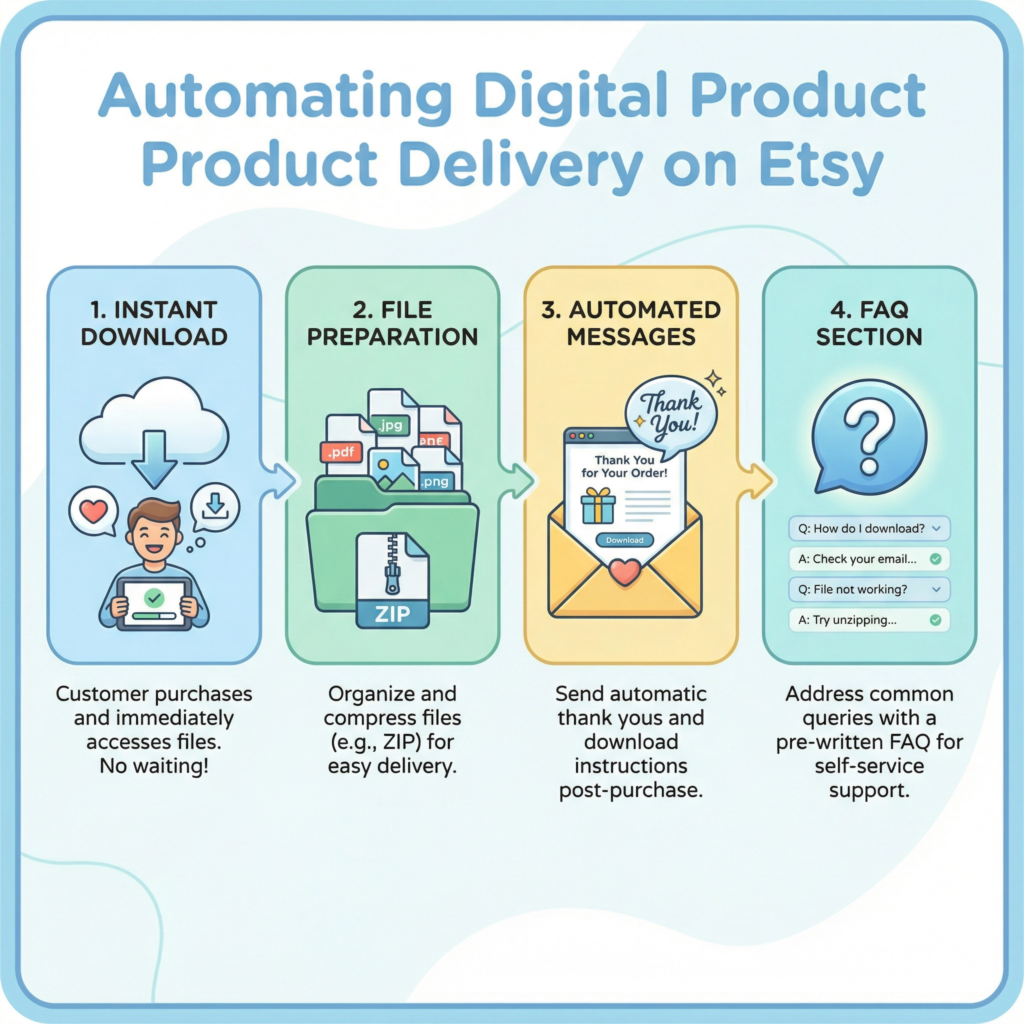
Etsy handles the delivery of digital products automatically. When a customer buys a digital item from your shop,
Etsy sends them an email with a link to download their files. The files are also available in their Etsy account under “Purchases and Reviews.” You don’t have to manually send anything!
This is a huge time-saver and one of the main reasons digital products are so appealing.
I always make sure my files are clearly named and organized so customers can easily find what they’re looking for.
To ensure a smooth delivery, double-check your file setup when creating your listing.
Make sure you’ve uploaded the correct files and that they are in the right format (like PDF, JPG, or PNG).
If your product includes multiple files, you can zip them into a single folder before uploading. This keeps everything tidy for the customer.
I also recommend including a simple “Read Me” file or a short instruction guide within your download.
This can answer common questions and improve the customer experience.
Beyond the automatic delivery, think about other ways to automate your customer service.
You can set up automated messages on Etsy to thank buyers for their purchase or to remind them where to find their downloads.
This personal touch, even if automated, can make a big difference.
I also like to have a clear FAQ section in my shop policies or listing descriptions.
This helps customers find answers quickly without needing to contact you directly, saving you time.
Automation frees up your time to focus on other important tasks, like creating new products, marketing your shop, or simply enjoying your life!
It means you can scale your business without constantly being tied to your computer.
Imagine making sales while you’re on vacation – that’s the power of automation with digital products on Etsy. It’s truly a game-changer for small business owners.
Step 10: Improve and Scale
Selling digital products on Etsy isn’t a one-time thing. It’s a journey of learning, growing, and improving.
Once you’ve made some sales, it’s time to look at what’s working and what’s not.
This step is all about making your shop even better and finding ways to reach more people.
Think of it as fine-tuning your engine so it runs faster and more efficiently. I always say, there’s always room to grow!
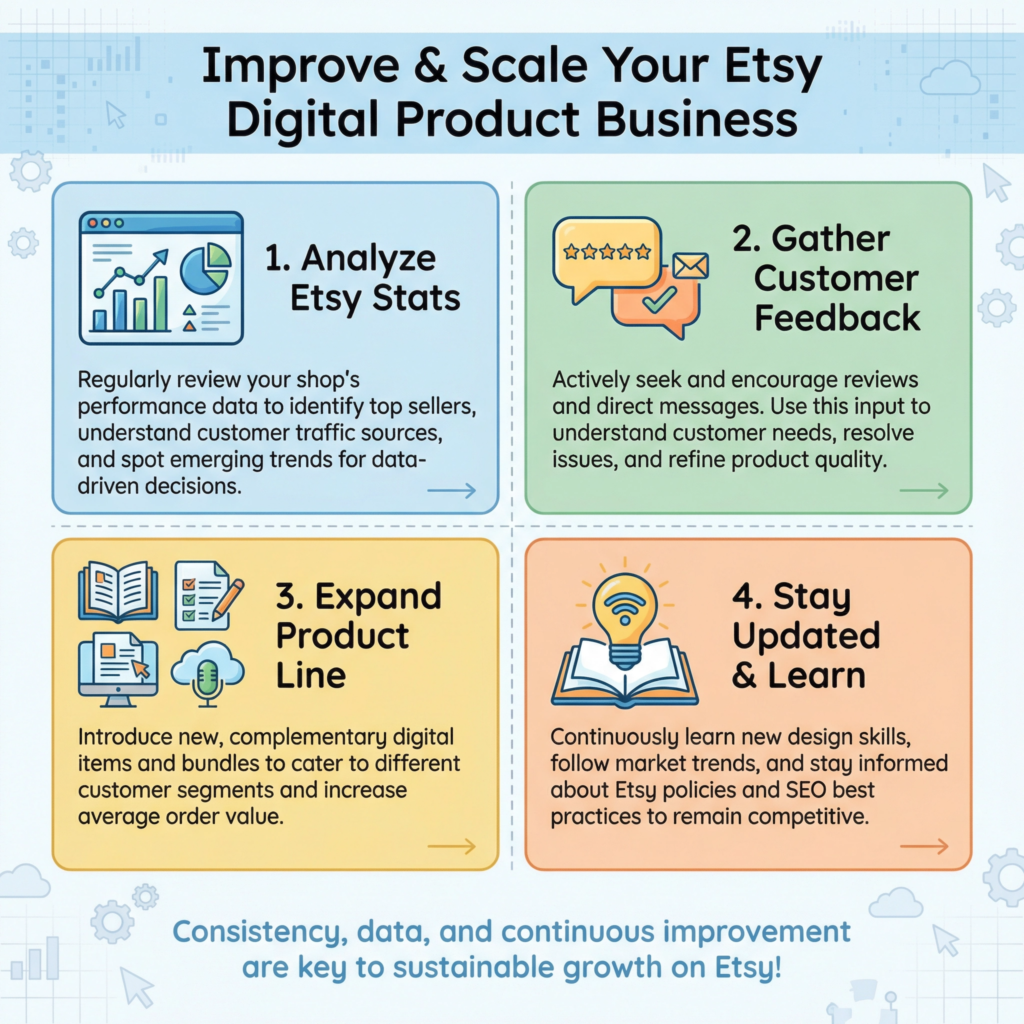
First, pay close attention to your Etsy stats. Etsy provides a lot of helpful information in your shop manager.
You can see which listings are getting the most views, which keywords are bringing people to your shop, and where your sales are coming from.
This data is super valuable! If a product isn’t getting many views, maybe its photos or title need to be improved.
If a keyword is bringing in lots of traffic but no sales, perhaps the description isn’t convincing enough. I use these insights to make small changes that can lead to big results.
Customer feedback is another goldmine. Read your reviews! What do people love about your products? What suggestions do they have?
Even negative feedback can be helpful because it shows you areas where you can improve.
Respond to all reviews, both good and bad, professionally and kindly. This shows future customers that you care.
I often get ideas for new products or improvements to existing ones just by listening to what my customers are saying.
To scale your business, think about expanding your product line. Once you have a few successful products, you can create variations or related items.
For example, if your digital planner is popular, you could create matching digital stickers, a budget tracker, or a goal-setting workbook.
Bundling related products together can also increase your average order value.
I also explore other platforms beyond Etsy once my Etsy shop is running smoothly. This can include your own website or other marketplaces.
Finally, stay updated with Etsy trends and changes. Etsy is always evolving, and what works today might change tomorrow.
Follow Etsy’s seller handbook, join seller forums, and keep an eye on what’s popular.
Learning new design skills or marketing strategies can also help you stay ahead. I see continuous learning as an investment in my business.
By constantly improving and adapting, you can ensure your digital product business on Etsy continues to thrive and grow.
Conclusion
Etsy has become a thriving marketplace for unique, handmade, and vintage items, but did you know it’s also a goldmine for digital products?
In fact, digital downloads are one of the fastest-growing categories on the platform, offering creators an incredible opportunity to generate passive income.
Imagine designing something once and selling it countless times without worrying about shipping or inventory!
This guide will walk you through every essential step to successfully launch and grow your digital product business on Etsy.
From choosing the perfect product to mastering SEO, setting smart prices, and automating your delivery, I’ll share practical, easy-to-understand advice to help you turn your creative ideas into a profitable online venture. Let’s unlock the potential of digital sales together!