How to set up Shopify store is a common question for beginners who want to start an online business but feel confused about where to begin, what steps to follow, and how to make their first sale.
Many people give up early because the process looks complicated.
However, Shopify powers millions of businesses in over 175 countries, showing that it is a trusted and easy platform to use.
In this blog post, you will learn simple step-by-step instructions to set up your store, add products, accept payments, and launch successfully, so you can start selling online with confidence.
Step 1: Create Your Shopify Account
Starting an online store can feel like a big task. But with Shopify, it’s actually quite simple. The very first thing you need to do is create your Shopify account. This is like setting up your digital storefront.
It’s where all your products will live and where customers will come to buy them. I’ve found that getting this step right makes everything else much smoother.
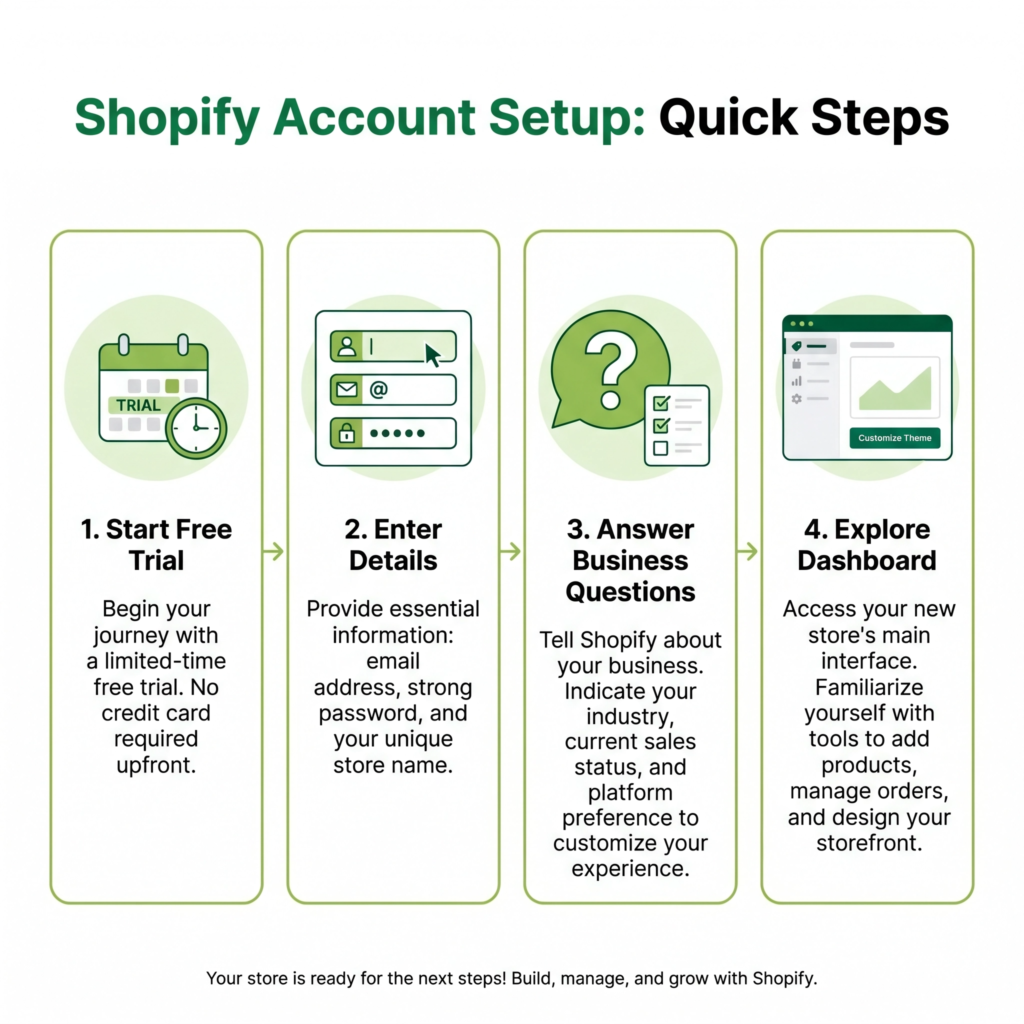
First, visit the Shopify website. You’ll see a prominent button to start your free trial.
Shopify usually offers a free trial period, which is great for getting familiar with the platform without any immediate cost.
Click on this button to begin. You’ll be asked to enter your email address, create a password, and give your store a name.
Choose a name that is easy to remember and reflects your brand. Don’t worry too much if you can’t think of the perfect name right away; you can change it later if needed.
I always recommend picking something that sounds professional and unique.
Next, Shopify will ask you a few questions about your business. These questions help them understand your needs better.
For example, they might ask if you’re already selling products, what your current revenue is, or what industry you’re in. Be honest with your answers.
This information helps Shopify tailor your experience and provide relevant advice. It also helps them suggest features that might be useful for your specific type of business.
I remember when I first started, these questions felt a bit daunting, but they’re just there to help you.
After answering these questions, you’ll be taken to your Shopify admin dashboard. This is the control center for your entire online store.
It might look a bit overwhelming at first, but don’t worry. We’ll go through each important section step-by-step.
The dashboard is where you’ll add products, manage orders, customize your store’s look, and much more.
Think of it as the back office of your shop. I spend a lot of time here, making sure everything is running smoothly.
During the setup, you’ll also need to provide some basic personal and business information. This includes your address, phone number, and currency.
This is important for setting up payments and ensuring your store operates legally. Make sure all the information you provide is accurate.
Shopify needs this to process transactions and pay you. I always double-check these details to avoid any issues down the line.
Finally, take a moment to explore the dashboard. Click around and see what’s there.
You’ll notice sections for ‘Orders,’ ‘Products,’ ‘Customers,’ ‘Analytics,’ and ‘Online Store.’ Getting a feel for the layout will make future steps easier.
The more comfortable you are with the dashboard, the more efficiently you’ll be able to manage your store.
I encourage new users to spend at least an hour just clicking through everything to get acquainted.
Step 2: Choose Your Store Theme
Once your Shopify account is set up, the next exciting step is to choose a theme for your store.
Think of your theme as the visual design and layout of your online shop. It’s what your customers will see and interact with.
A good theme makes your store look professional, trustworthy, and easy to navigate. I always tell new sellers that their theme is their first impression, so make it count!
Shopify offers a wide range of themes, both free and paid. You can find these in the Shopify Theme Store.
To access it, go to your Shopify admin dashboard, click on “Online Store,” and then “Themes.”
Here, you’ll see a selection of free themes provided by Shopify, as well as a vast marketplace of paid themes from third-party designers.
I recommend starting with a free theme, especially if you’re on a budget or just starting out. They are professionally designed and offer plenty of customization options.
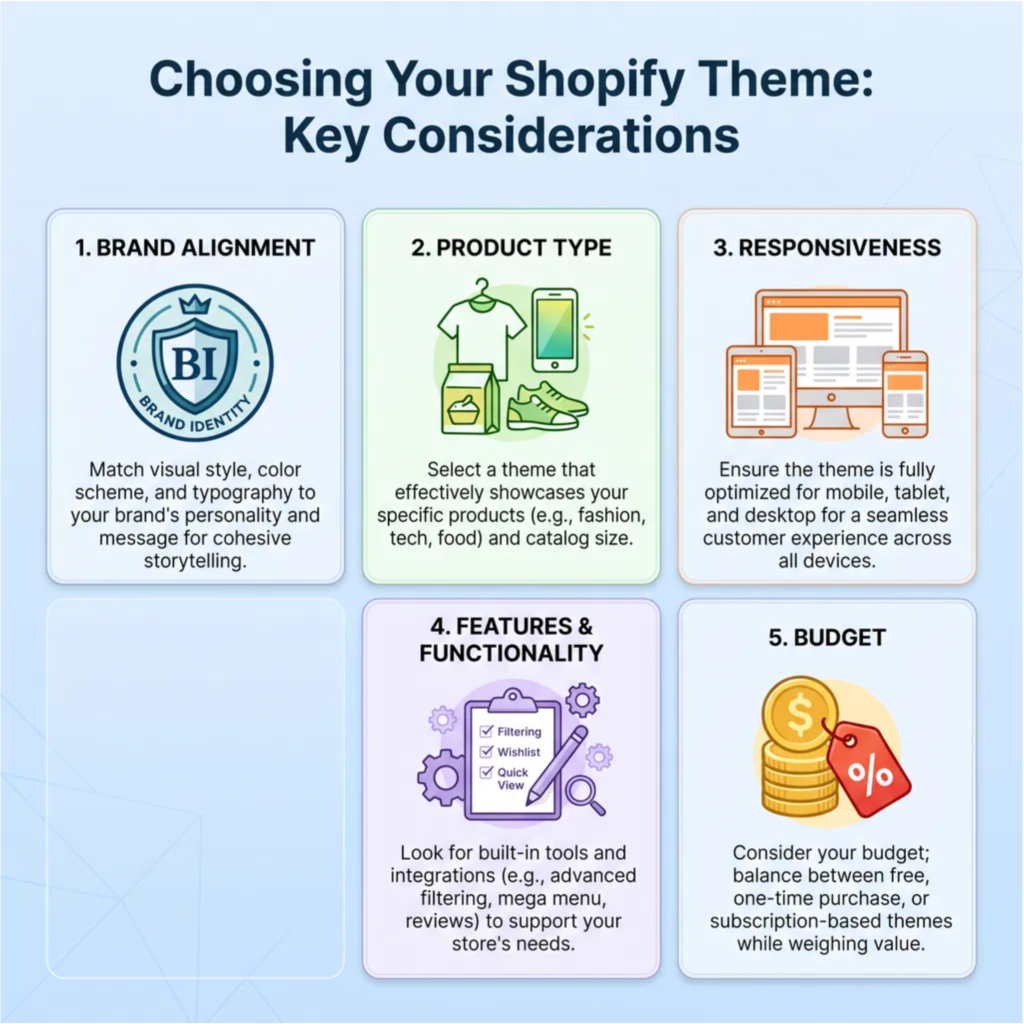
When choosing a theme, consider your brand and the type of products you’ll be selling.
For example, if you’re selling handmade jewelry, you might want a theme that emphasizes beautiful product photography and a clean, elegant layout.
If you’re selling tech gadgets, a modern, minimalist theme might be more suitable.
Look for themes that are responsive, meaning they look good and function well on all devices, from desktops to smartphones.
Most Shopify themes are responsive, but it’s always good to double-check. I always test themes on my phone to ensure a smooth mobile experience.
Previewing themes is a crucial step. Before you commit to a theme, you can preview how it will look with your products and content.
Click on a theme you like, and then select “View demo store” or “Try theme.” This allows you to explore its features and layout without installing it.
You can even add a free theme to your store to experiment with it in your own admin area without publishing it live.
This way, you can play around with colors, fonts, and section layouts. I spend a lot of time in the preview mode, imagining how my products would fit.
Customization is where you make the theme truly yours. Once you’ve chosen a theme, you can customize it using Shopify’s intuitive drag-and-drop editor.
You don’t need any coding knowledge! You can change colors, fonts, add sections, rearrange elements, and upload your logo.
This is where you infuse your brand’s personality into your store. Make sure your store reflects your unique style and appeals to your target audience.
I love this part because it’s where my store truly comes to life.
Step 3: Customize Your Store Design
After choosing a theme, the real fun begins: customizing your store design! This is where you bring your brand to life and make your shop stand out.
A well-designed store not only looks good but also creates a positive shopping experience for your customers.
I always say, your store design is your silent salesperson, so make sure it speaks volumes about your brand.
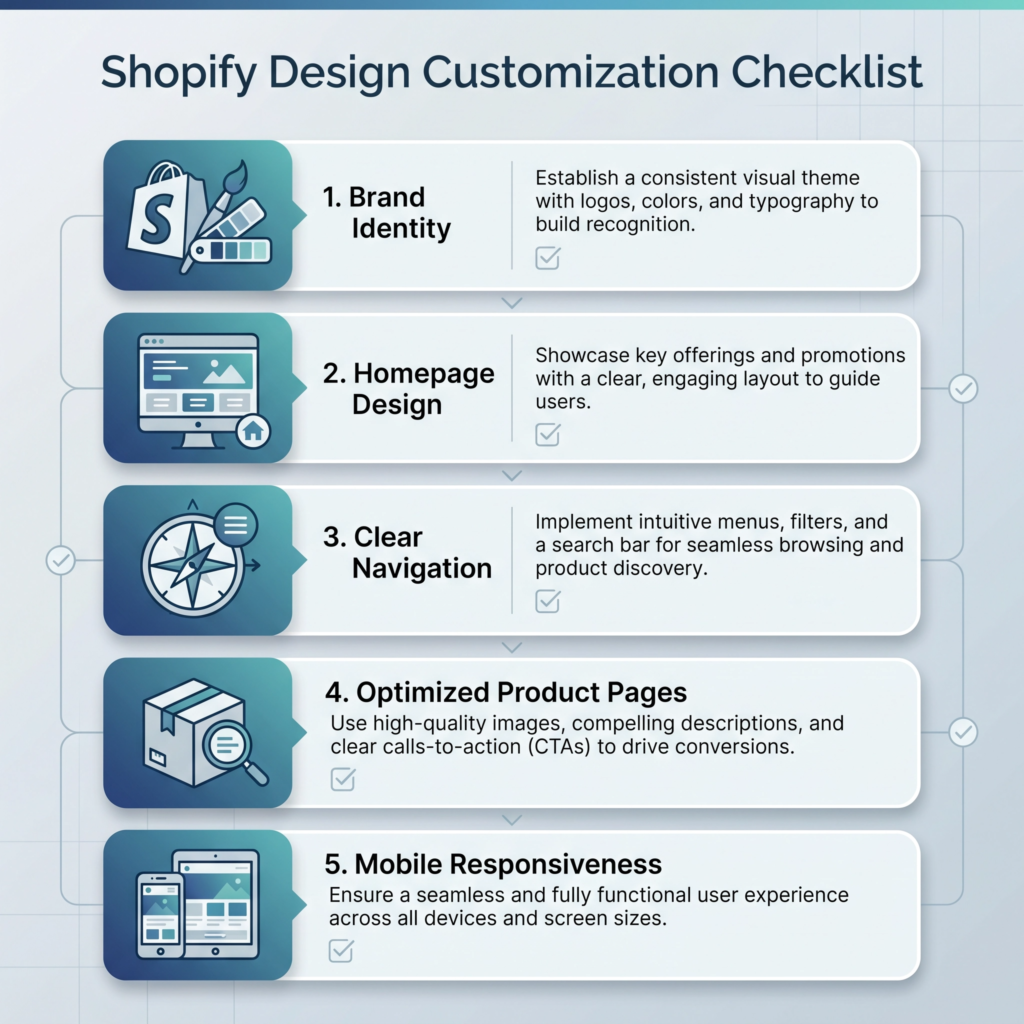
Start with your brand identity. Upload your logo, choose your brand colors, and select fonts that match your style.
Consistency is key here. Use the same colors and fonts across your website, social media, and any other marketing materials. This helps customers recognize your brand instantly.
Shopify’s theme editor makes it easy to adjust these elements. I recommend having your brand guidelines ready before you start, even if they’re just a few notes on colors and fonts.
Next, focus on your homepage. This is often the first thing customers see. Make it visually appealing and easy to understand.
Use high-quality images or videos that showcase your products. Add clear headings and calls to action.
You can use sections like “Featured Products,” “New Arrivals,” or “Customer Testimonials” to highlight important content.
Think about what you want customers to see and do when they first land on your site. I always try to tell a story with my homepage, guiding visitors through what I offer.
Organize your navigation. A clear and intuitive menu is vital for a good user experience.
Make sure your main menu links to your product categories, about page, contact information, and any other important sections.
Avoid cluttering your menu with too many options. Use dropdowns for subcategories if needed.
The easier it is for customers to find what they’re looking for, the more likely they are to make a purchase. I spend a lot of time simplifying my navigation to ensure it’s super easy to use.
Don’t forget about product pages. These are crucial for converting visitors into buyers.
Ensure each product has multiple high-quality images from different angles.
Write detailed and engaging product descriptions that highlight benefits, not just features.
Include customer reviews and clear calls to action like “Add to Cart.” Consider adding a size guide or FAQ section if relevant to your products.
I always put myself in the customer’s shoes and ask, “What information do I need to feel confident buying this?”
Finally, test your design. Before launching, view your store on different devices (desktop, tablet, mobile) to ensure everything looks and functions correctly.
Ask friends or family to navigate your site and give you feedback. Look for broken links, typos, or areas that are confusing.
A smooth, error-free experience builds trust with your customers. I never launch a store without thoroughly testing every single page and button.
Step 4: Add Your Products
With your Shopify account created and your store design taking shape, it’s time for the most exciting part: adding your products!
This is where you showcase what you’re selling to the world. Whether you have physical goods, digital downloads, or services, Shopify makes it easy to list them.
I always feel a surge of excitement when I start populating a new store.
To begin, navigate to your Shopify admin dashboard. Click on “Products” in the left-hand menu, then select “Add product.”
This will open a new page where you can enter all the details about your item. Don’t rush this step.
The more information you provide, the better your customers will understand what they’re buying. I make sure every detail is accurate and appealing.
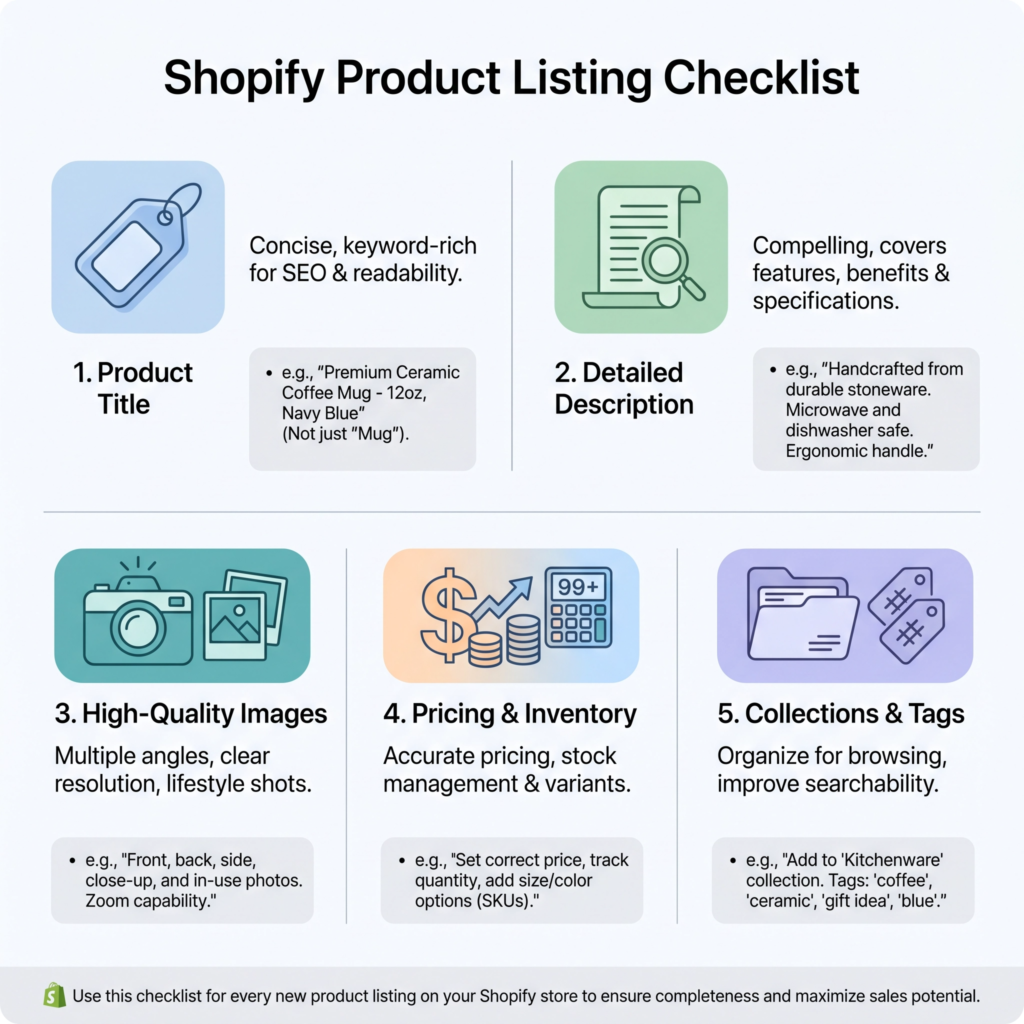
First, enter the product title and a detailed description. Your title should be clear and include relevant keywords that customers might search for.
The description is your chance to tell a story about your product. Highlight its features, benefits, and what makes it unique.
Use bullet points for readability and break up long paragraphs. Good descriptions help with search engine optimization (SEO) and convince customers to buy.
I always try to answer any questions a customer might have before they even ask.
Next, upload high-quality images or videos. Visuals are incredibly important for online shopping.
Take clear, well-lit photos from different angles. If your product has variations (like different colors or sizes), make sure to include images for each one.
For digital products, consider mock-ups that show the product in use. Great images can significantly increase your conversion rate.
I invest in good photography because it truly makes a difference.
Set your pricing and inventory. Enter the price your product will sell for. You can also add a “Compare at price” to show a discount.
For physical products, track your inventory quantity. For digital products, you usually don’t need to worry about inventory limits.
Specify if the product requires shipping. If it’s a digital download, make sure to mark it as a digital product so Shopify handles the delivery automatically.
I carefully consider my pricing to be competitive yet profitable.
Organize your products with collections and tags. Collections are like categories (e.g., “T-Shirts,” “Home Decor,” “Digital Planners”).
Tags are keywords that help customers find your products through search.
Assigning products to collections and adding relevant tags makes your store easier to browse and improves discoverability.
This organization is key for a smooth shopping experience. I think of collections as departments in a physical store.
Finally, review all the details before saving. Double-check your spelling, pricing, and image quality.
Make sure all necessary fields are filled out. You can save your product as “Active” to make it visible in your store immediately, or as “Draft” if you want to work on it more later.
I always do a final check before making anything live. It’s better to catch mistakes before customers do.
Step 5: Set Up Payments
Setting up payments is a crucial step in launching your Shopify store. This is how you’ll get paid for your products!
Shopify makes it straightforward to connect various payment providers, ensuring your customers have a smooth and secure checkout experience.
I always emphasize that a seamless payment process builds trust and encourages sales.
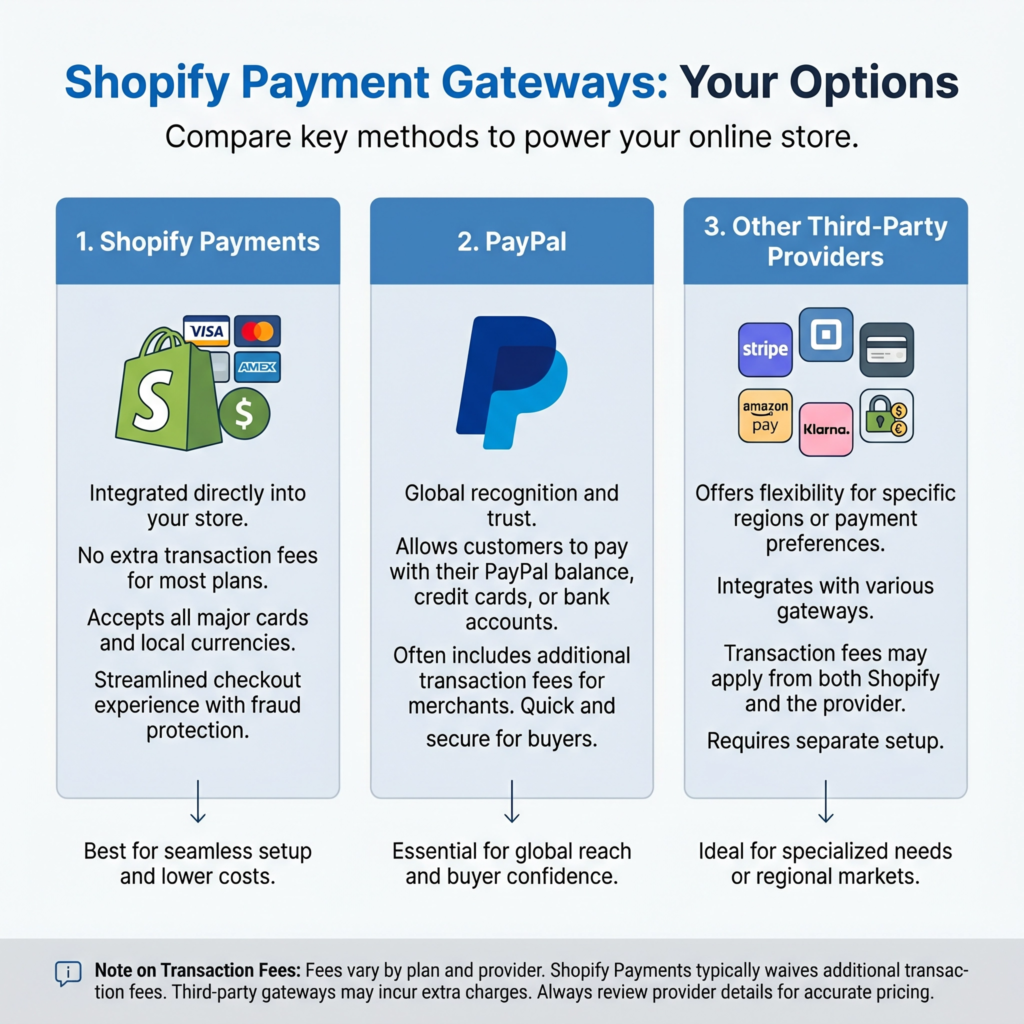
Shopify Payments is often the easiest option. It’s Shopify’s own payment gateway, and it’s integrated directly into your store. This means you don’t need a separate third-party account.
With Shopify Payments, you can accept major credit cards like Visa, Mastercard, American Express, and Discover.
It also supports accelerated checkouts like Shop Pay, Apple Pay, and Google Pay. I find it incredibly convenient because it simplifies everything, from setup to managing transactions.
To activate Shopify Payments, go to your Shopify admin, click on “Settings,” then “Payments.” You’ll see the option to complete your account setup.
This usually involves providing some basic business information, like your business type, address, and bank account details for payouts.
Shopify will guide you through each step. It’s a secure process designed to protect both you and your customers. I always make sure my bank details are correct to avoid any payout delays.
Consider other payment options too. While Shopify Payments is great, offering a variety of payment methods can cater to more customers.
You can integrate popular third-party payment providers like PayPal. Many customers prefer using PayPal for its familiarity and security.
To add PayPal, you’ll typically find it listed under “Third-party providers” in your “Payments” settings.
You’ll need to connect your existing PayPal Business account or create a new one. I always offer PayPal because it’s a widely trusted option.
Think about alternative payment methods. Depending on your target audience and location, you might want to offer other options.
This could include local payment methods or even cryptocurrency gateways. Shopify’s app store has many integrations for different payment solutions.
Research what your ideal customers prefer. The more convenient you make it for them to pay, the better. I constantly look for ways to make checkout as easy as possible.
Don’t forget about transaction fees. Every payment gateway charges a fee for processing transactions.
Shopify Payments has competitive rates, and if you use it, Shopify waives transaction fees for third-party providers.
If you use a third-party provider without Shopify Payments, Shopify will charge a small transaction fee on top of the provider’s fee.
Understand these costs to price your products correctly. I factor these fees into my pricing strategy to ensure profitability.
Step 6: Set Up Shipping
Setting up shipping is a key part of running an online store. It ensures your products reach your customers smoothly.
Shopify offers flexible shipping options to fit different business needs. I know shipping can seem complicated, but Shopify makes it much easier.
First, go to your Shopify admin. Click on “Settings,” then “Shipping and delivery.” Here, you’ll find options to manage your shipping rates and methods.
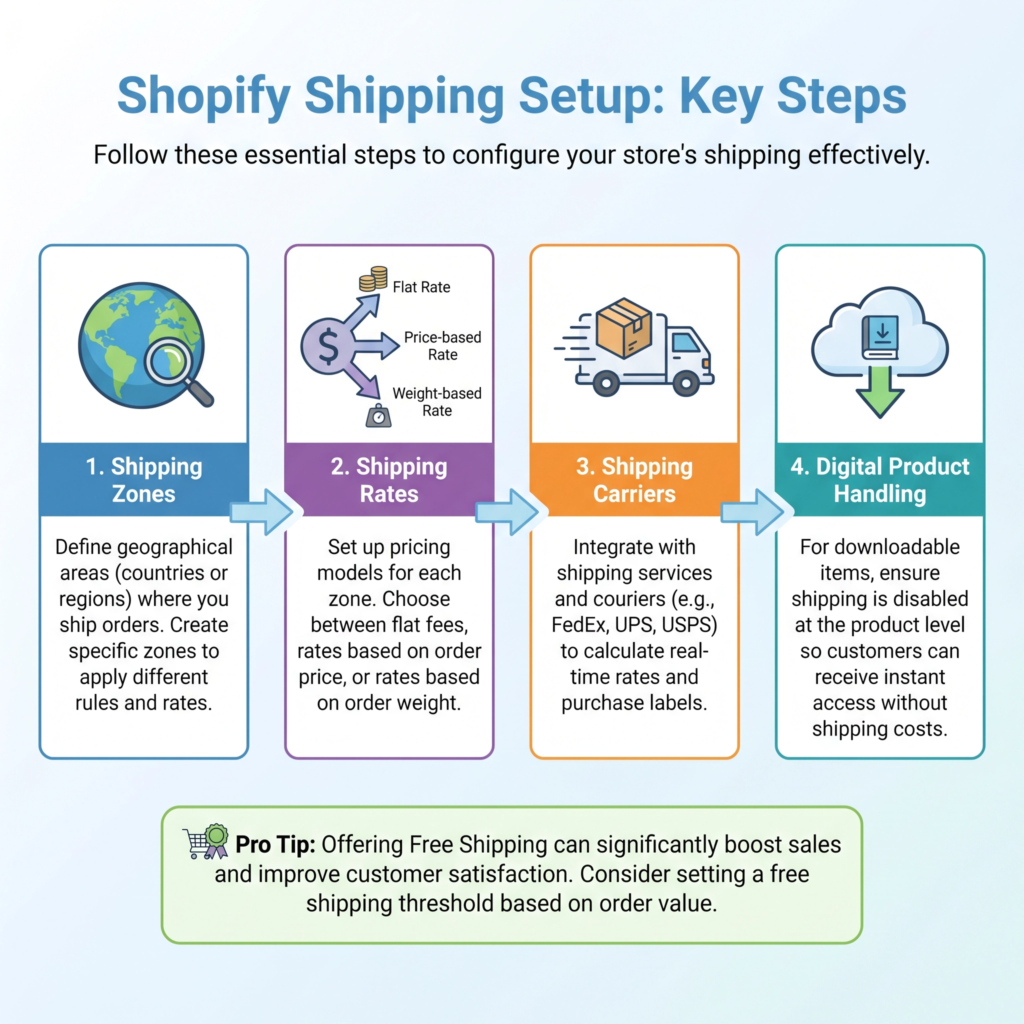
It’s important to set up your shipping zones correctly. Shipping zones are geographical areas where you ship your products.
You can create zones for your local area, your country, or international regions. I always start with my home country and then expand as needed.
Within each shipping zone, you can set up different shipping rates. There are a few common types of rates.
Flat rate shipping means you charge a single, fixed price for shipping, no matter the order size or weight.
This is simple for customers to understand. Price-based rates mean the shipping cost changes based on the total value of the order.
For example, orders under $50 might cost $5 to ship, while orders over $50 ship free.
Weight-based rates mean the shipping cost depends on the total weight of the items in the order. I often use a mix of flat rates and free shipping for orders over a certain amount.
For physical products, you’ll need to decide on your shipping carriers. Shopify integrates with major carriers like USPS, UPS, FedEx, and DHL.
You can connect your carrier accounts to get real-time shipping rates directly from them.
This means customers see the exact shipping cost at checkout. This can save you money and offer transparency to your buyers. I find real-time rates very helpful for accuracy.
Consider offering free shipping. This is a powerful marketing tool. Many customers expect free shipping, especially for higher-value orders.
You can build the shipping cost into your product prices to cover the expense.
Or, offer free shipping for orders above a certain amount to encourage larger purchases. I’ve seen free shipping significantly boost sales.
Don’t forget about digital products. If you’re selling digital items, you usually don’t need to worry about physical shipping.
Shopify handles digital downloads automatically. Just make sure your product is marked as a digital product when you add it.
This ensures customers receive their files instantly after purchase. This is one of the big advantages of selling digital goods.
Finally, review your shipping settings carefully. Make sure your rates are fair and cover your costs. Test the checkout process to ensure customers see the correct shipping options.
Clear and transparent shipping policies build customer trust. I always do a test purchase to double-check everything before going live.
Step 7: Connect a Domain Name
Connecting a custom domain name is a vital step in making your Shopify store look professional and trustworthy.
Instead of a generic yourstorename.myshopify.com address, you’ll have something like yourstore.com.
This makes your brand memorable and easier for customers to find. I always tell new store owners that a custom domain is like having a proper storefront sign.
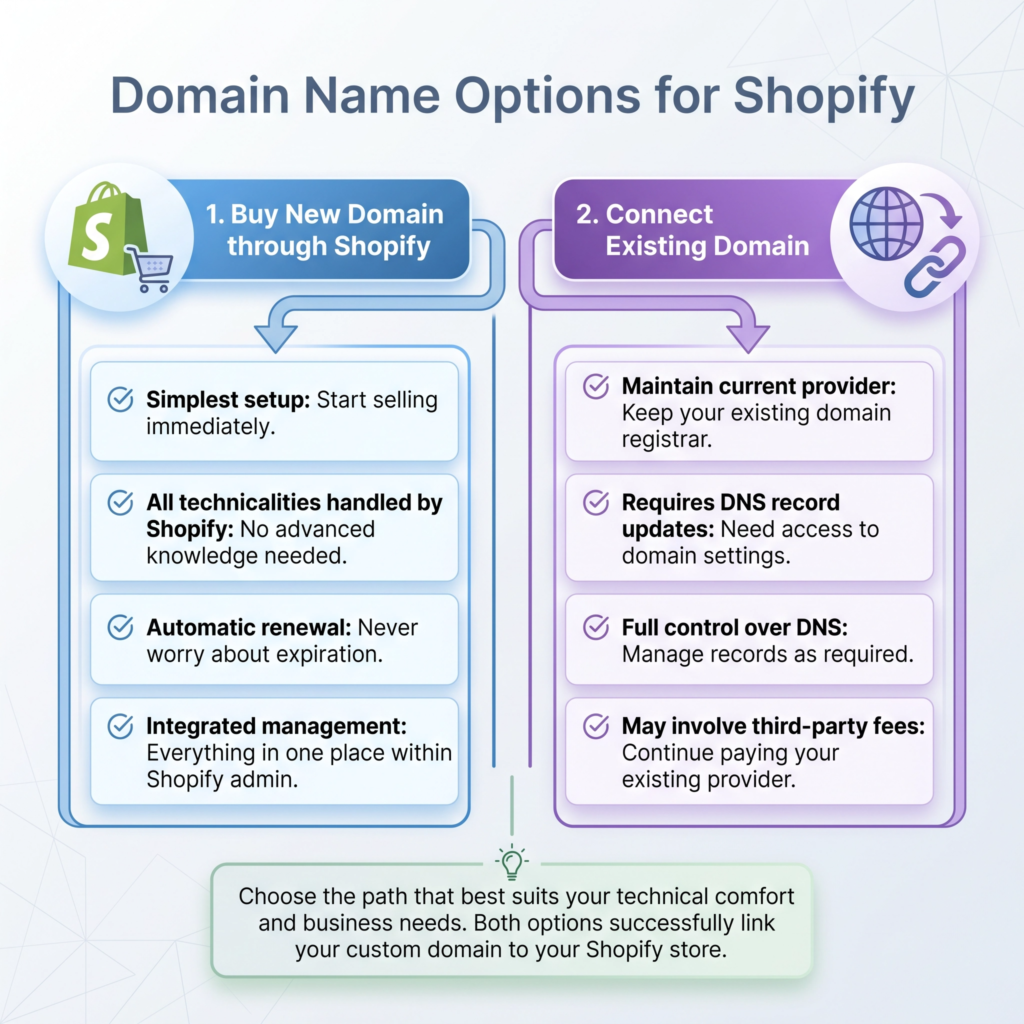
Shopify offers two main ways to get a custom domain. You can buy a new domain directly through Shopify. This is often the simplest option, especially for beginners.
Shopify handles all the technical setup for you, making the process seamless. To do this, go to your Shopify admin, click on “Settings,” then “Domains.” You’ll see an option to “Buy new domain.”
Follow the prompts to search for available domain names and purchase one. I recommend choosing a domain name that is short, memorable, and relevant to your brand.
The second option is to connect an existing domain that you already own from a third-party provider (like GoDaddy, Namecheap, or Google Domains). This process involves a few more steps, but it’s still manageable.
In your Shopify admin, under “Settings” > “Domains,” select “Connect existing domain.”
Shopify will then provide instructions on how to point your domain to your Shopify store. This usually involves changing some DNS settings (like A record and CNAME record) with your domain provider.
Don’t worry if these terms sound technical; Shopify provides clear, step-by-step guides. I’ve connected many domains this way, and it’s quite straightforward once you know where to look.
Why is a custom domain so important?
Firstly, it builds brand credibility. A professional domain name signals to customers that your business is legitimate and established.
Secondly, it’s better for search engine optimization (SEO). A custom domain helps search engines recognize and rank your store more effectively.
Thirdly, it offers consistency. All your marketing materials, from social media to business cards, can feature your clean, custom domain. I believe a strong domain name is a foundation for a strong brand.
Before you finalize your domain choice, consider a few things. Make sure the name is easy to spell and pronounce.
Avoid hyphens and numbers if possible, as they can make it harder for people to remember.
Check if the corresponding social media handles are available to maintain brand consistency across platforms.
Also, think about future growth – will this domain name still be relevant if your product offerings expand? I always try to think long-term when choosing a domain.
Once your domain is connected, Shopify automatically handles the SSL certificate, which encrypts data between your store and your customers. This is crucial for security and trust.
You’ll see a padlock icon in the browser, assuring customers their information is safe. This peace of mind is invaluable. I never launch a store without ensuring SSL is active.
Step 8: Test Your Store
Before you officially launch your Shopify store, thorough testing is absolutely essential. You want to make sure everything works perfectly for your customers.
Imagine a customer trying to buy something and encountering a problem – it could lead to lost sales and a bad first impression. I always say, test, test, and test again!
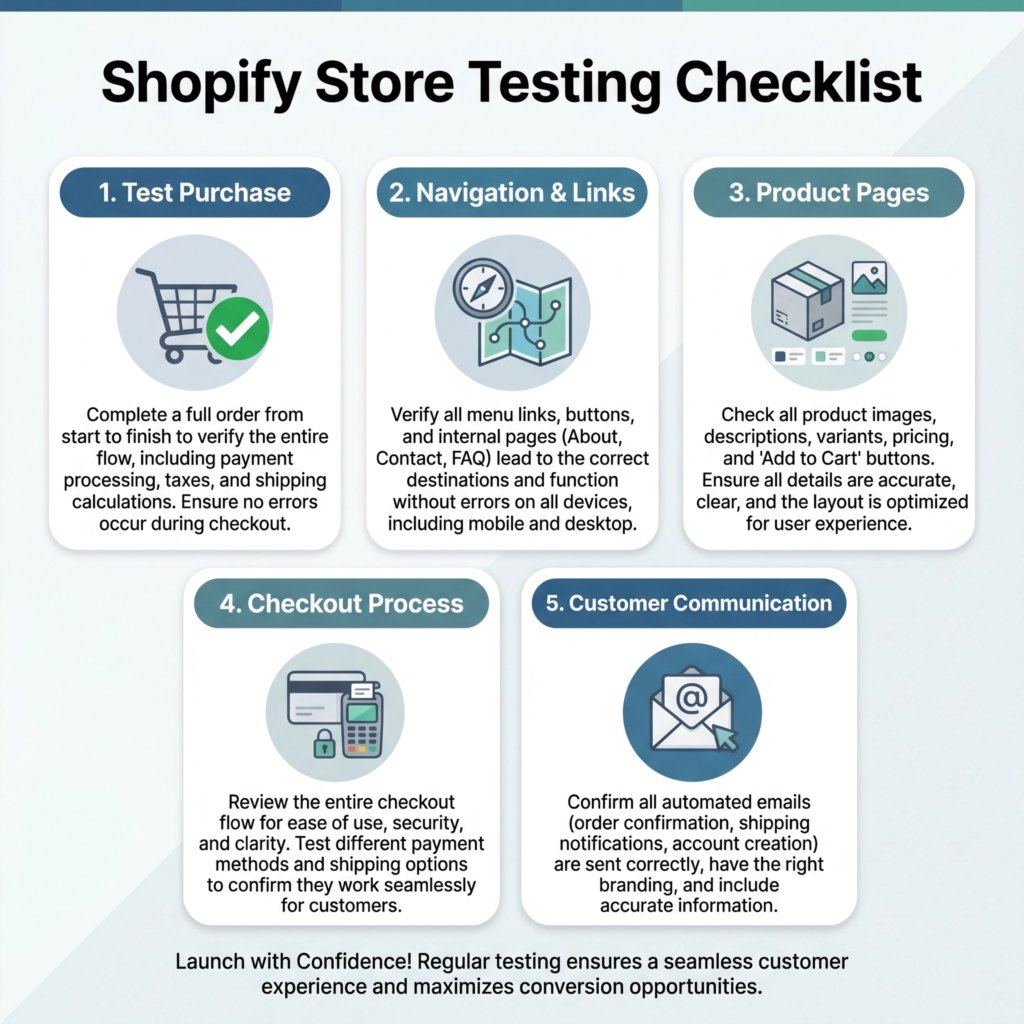
Start by performing a test purchase. This is the most important step. Shopify allows you to simulate a real order without actually spending money.
Go to your store as if you were a customer. Add a product to your cart. Proceed to checkout. Fill in all the customer information, including shipping details. Select a shipping method.
Choose a payment option (you can use a test credit card number provided by Shopify or select a manual payment method for testing). Complete the order. I go through this process for every single product type I offer.
After completing the test purchase, check your Shopify admin.
Does the order appear correctly?
Do you receive an order confirmation email?
Does the inventory update as expected?
This helps you verify that your payment gateway, shipping settings, and order processing are all functioning correctly. I make sure all notifications are firing as they should.
Next, test your website navigation. Click through all your menus, categories, and product pages.
Are all links working?
Is it easy to find what you’re looking for?
Is the search bar effective?
A well-organized store makes for a happy customer. I pretend I’m a new visitor and try to find specific items.
Review your product pages. Check each product description for accuracy and clarity.
Are all images loading correctly and looking good?
Do product variants (like different sizes or colors) display properly?
Is the pricing correct?
Pay attention to how your product pages look on different devices, especially mobile phones. Most people shop on their phones now. I check every detail on both desktop and mobile.
Test your checkout process thoroughly. This includes checking that all fields are clear and easy to fill out.
Ensure that shipping costs are calculated correctly. Verify that discount codes work. Make sure the checkout is secure and instills confidence in your customers.
A smooth checkout is critical for converting browsers into buyers. I try to break it to see if it holds up.
Finally, check your customer communication. If you have automated emails for order confirmations, shipping updates, or abandoned carts, make sure they are sending and look professional.
Consider sending a test email to yourself. Good communication keeps customers informed and happy. I ensure all my automated messages are clear and friendly.
Step 9: Launch Your Store
After all your hard work, it’s finally time to launch your Shopify store! This is the exciting moment when you make your store visible to the world and start accepting orders.
It’s like opening the doors to your physical shop for the very first time. I remember the thrill of my first launch!
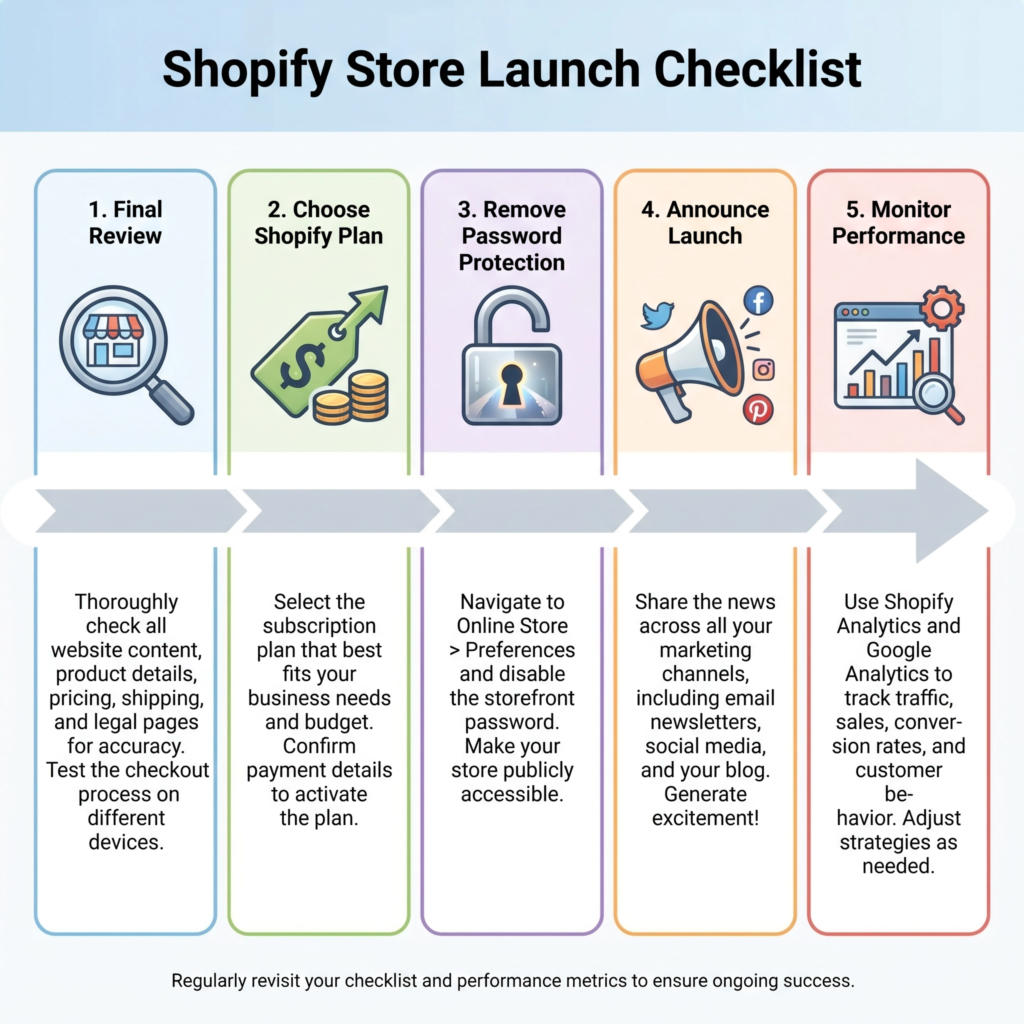
Before you hit that launch button, make sure you’ve completed all the previous steps. Double-check your products, pricing, shipping settings, and payment gateways.
Ensure your theme looks great on all devices. Test the entire checkout process one last time.
A smooth launch sets the stage for a successful business. I always run through a final checklist.
To launch your store, you first need to choose a Shopify plan. During your free trial, your store is password-protected.
To remove this password and start selling, you must select a paid plan. Shopify offers various plans to suit different business needs, from basic to advanced.
Consider your current budget and future growth when making your choice. You can always upgrade later as your business grows.
I started with a basic plan and upgraded as my sales increased.
Once you’ve chosen a plan, you can remove your store’s password. In your Shopify admin, go to “Online Store” > “Preferences.” You’ll see a section for “Password protection.”
Uncheck the box that says “Enable password” or similar, and then save your changes.
Your store will instantly become live and accessible to anyone with your domain name. This is the moment of truth! I always take a deep breath before doing this.
After launching, it’s time to spread the word. Share your new store on social media platforms like Instagram, Facebook, and Pinterest. Announce it to your email list.
Tell your friends and family. The more people who know about your store, the more potential customers you’ll attract.
Don’t be shy about promoting your hard work. I use every channel available to me.
Consider running a launch promotion. This could be a special discount, a free gift with purchase, or a limited-time offer to encourage those first sales.
A good launch promotion can create buzz and drive initial traffic to your store. It’s a great way to get momentum early on. I’ve found that a small incentive can go a long way.
Monitor your store closely in the first few days and weeks after launch. Keep an eye on your sales, website traffic, and customer inquiries.
Be ready to respond quickly to any questions or issues that arise. This initial period is crucial for gathering feedback and making any necessary adjustments. I keep my analytics dashboard open.
Remember, launching is just the beginning. The real work of marketing and growing your store starts now.
But take a moment to celebrate this huge milestone! You’ve built an online business, and that’s a fantastic achievement. I always celebrate small victories along the way.
Step 10: Promote Your Store
Launching your Shopify store is a huge accomplishment, but the journey doesn’t end there. To get sales, you need to tell people about your amazing products!
This step is all about promoting your store and attracting your first customers. Think of it as throwing a grand opening party for your online shop.
I always make sure to shout about my new ventures from the rooftops.
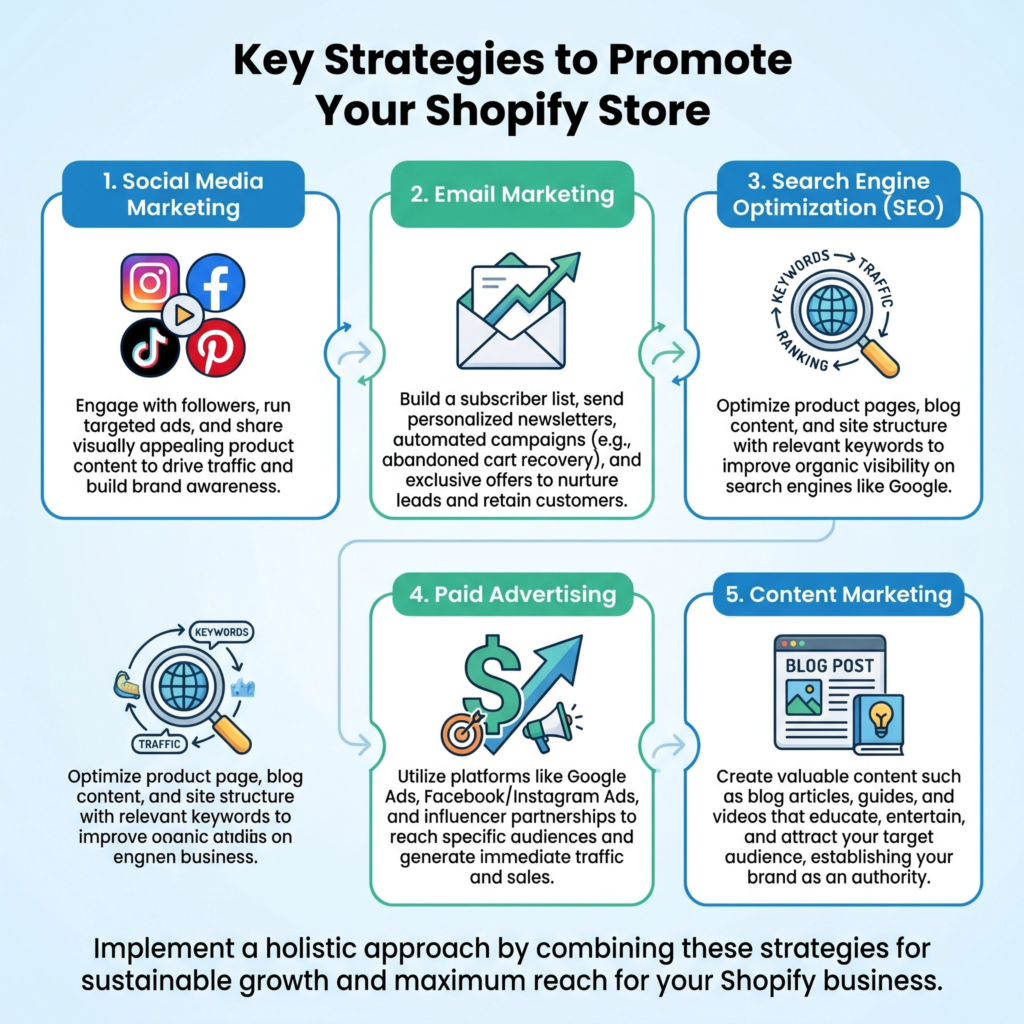
One of the most effective ways to promote your store is through social media marketing. Identify where your target audience spends their time online.
Is it Instagram, Facebook, Pinterest, TikTok, or X (formerly Twitter)? Create engaging content that showcases your products.
Use high-quality images and videos. Run contests or giveaways to build excitement.
Interact with your followers and build a community around your brand. I find that authentic engagement goes a long way.
Email marketing is another powerful tool. Start building an email list from day one.
Offer a small discount or a free guide in exchange for an email address. Send out newsletters with new product announcements, special promotions, and valuable content related to your niche.
Email marketing allows you to communicate directly with your most interested customers. I always prioritize my email list; it’s gold.
Consider search engine optimization (SEO). This involves optimizing your store and product listings so they appear higher in search results on Google and other search engines.
Use relevant keywords in your product titles, descriptions, and blog posts. Ensure your store loads quickly and is mobile-friendly.
While it takes time, good SEO can bring consistent organic traffic. I think of SEO as planting seeds for future growth.
Paid advertising can give your store an immediate boost. Platforms like Google Ads, Facebook Ads, and Instagram Ads allow you to target specific demographics with precision.
You can set a budget and reach a large audience quickly. Start with a small budget to test what works best for your products and audience. I often use paid ads to kickstart sales and gather data.
Collaborate with influencers or other businesses. Find influencers in your niche who have an audience that aligns with your products. Offer them free products in exchange for reviews or sponsored posts.
You can also partner with complementary businesses for cross-promotion. This can expose your brand to a new, relevant audience. I’ve seen great results from smart collaborations.
Don’t forget about content marketing. Start a blog on your Shopify store. Write articles related to your products or industry.
For example, if you sell digital planners, write about productivity tips or goal setting.
This not only helps with SEO but also positions you as an expert and provides value to potential customers. I believe in giving value first.
Finally, encourage customer reviews. Positive reviews build trust and social proof, which are crucial for attracting new buyers.
Make it easy for customers to leave reviews on your product pages. You can even send follow-up emails after a purchase, politely asking for feedback.
I always respond to reviews, both good and bad, to show I care.
Conclusion
Starting an online store can feel overwhelming, but with the right guidance, it’s an exciting journey.
Shopify, a leading e-commerce platform, powers over 1.75 million businesses worldwide, making it a popular choice for entrepreneurs.
This comprehensive guide will walk you through every essential step to set up your own successful Shopify store.
From choosing your niche to launching and promoting your products, I’ll provide clear, easy-to-understand instructions.
Get ready to transform your business idea into a thriving online reality and reach customers globally.
Let’s build your dream store together!