If you’re looking for an easy way to create a website without needing technical expertise, the Hostinger Website Builder is a fantastic option. Known for its user-friendly design and powerful features, this tool is ideal for beginners and small business owners who want to launch a website quickly and affordably. Let’s explore how the Hostinger Website Builder can help you get a polished, professional site up and running in no time!
Table of Contents
What Is the Hostinger Website Builder?
The Hostinger Website Builder is a drag-and-drop tool that enables you to create a website from scratch without writing any code. Designed for ease of use, it’s perfect for those who want to build a site on their own terms—whether that’s a personal blog, business website, or even an e-commerce store. With customizable templates, intuitive design features, and built-in tools for SEO and analytics, Hostinger’s website builder simplifies every step of creating a website.
Key Features of Hostinger Website Builder
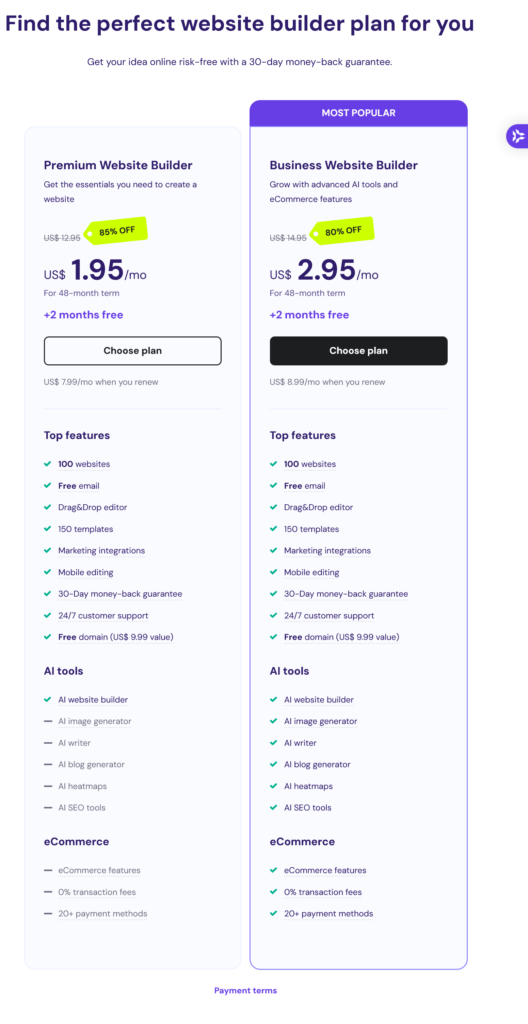
Hostinger’s Website Builder is packed with tools to help you create a professional and engaging website. Here are some of the key features:
- Drag-and-Drop Editor: Effortlessly design your website by dragging and dropping elements wherever you need them.
- Mobile Optimization: Ensures your website looks great on any device.
- SEO Tools: Built-in tools help improve your site’s search engine rankings.
- E-Commerce Options: Create product pages, manage stock, and accept payments to start your online store.
- Free SSL Certificate: Protect your site and give visitors peace of mind with a free SSL certificate on most plans.
How to Get Started with the Hostinger Website Builder
Step 1: Sign Up for Hostinger
The first step to getting started with Hostinger is, of course, signing up. Hostinger’s hosting plans often come bundled with the website builder, so choose a plan that includes the builder if that’s your main focus. Here’s how to get started:
- Visit the Hostinger Website: Go to Hostinger.com.
- Select a Plan: Choose a hosting plan that includes the website builder. The “Premium” or “Business” plans are popular for website building because they offer a balance of features and cost.
- Create an Account: Enter your details to set up a Hostinger account, or sign in with an existing Google or Facebook account for convenience.
- Complete Payment: Follow the steps to complete your payment securely. Hostinger often offers discounts, so be on the lookout for deals!

Once your account is set up, you’re ready to dive into the website-building process.
Step 2: Access the Hostinger Website Builder
With your account in place, it’s time to access the website builder. Hostinger’s dashboard makes it straightforward to find and launch the builder tool:
- Go to Your Hosting Dashboard: After logging in, you’ll land on your hosting dashboard, known as hPanel.
- Find the Website Builder Option: Look for the “Website” or “Website Builder” section in the menu. This is where you’ll launch the Hostinger Website Builder.
- Select Your Domain: If you already have a domain connected, select it to start building your site on that address. If you haven’t yet chosen a domain, you can either purchase one through Hostinger or choose a temporary subdomain to use while building.
Once you’re in, Hostinger’s intuitive builder will guide you step-by-step.
Step 3: Choose a Template
A great website starts with a great template. Hostinger offers a wide range of professional, customizable templates suited for different purposes, such as blogs, online stores, portfolios, and business sites.
- Browse Template Options: Hostinger categorizes templates by industry and purpose, so you can easily find one that fits your vision.
- Preview the Templates: Click on any template you’re interested in to see a live preview. This helps you visualize how the design would look with your content.
- Select a Template: Once you’ve found a template you like, select it. Remember, templates are fully customizable, so it’s okay if you don’t love every detail—you’ll be able to make adjustments later.
Step 4: Customize Your Website
Now, the fun begins! With the Hostinger Website Builder’s drag-and-drop editor, you can start personalizing the template to create a unique look for your website.
- Change Text and Images: Click on any text box or image to replace it with your own content. Hostinger’s editor lets you upload images, adjust font styles, and modify colors easily.
- Add New Sections: Need more content? Add new sections like “About Us,” “Services,” or “Testimonials.” The builder provides pre-designed sections you can simply drag and drop where you want them.
- Organize Your Layout: Arrange elements until you’re happy with the layout. Hostinger’s editor allows you to resize, reposition, and add space for a professional look.
- Adjust Colors and Fonts: Personalize the look and feel by adjusting the theme colors, fonts, and overall style. These design choices help make your website unique and aligned with your brand.
Step 5: Set Up Important Pages
Every successful website has a few core pages to provide visitors with the information they’re looking for. At a minimum, consider including these essential pages:
- Home Page: This is your website’s main page and typically introduces visitors to your brand or purpose.
- About Page: Share your story, mission, and values. An “About” page is especially important for building trust with visitors.
- Contact Page: Include ways for visitors to reach you, whether through a contact form, email, or social media links.
- Services/Products Page: If you’re offering services or selling products, have a dedicated page to showcase them. Be clear, informative, and visually appealing.
If you’re building a blog, don’t forget to add a “Blog” page to house your posts. For an online store, create a “Shop” page with your products.
Step 6: Configure SEO Settings
Search engine optimization (SEO) is key to helping people find your website. Hostinger makes it simple to add SEO basics to each page:
- Edit Meta Titles and Descriptions: Go to the SEO settings for each page and enter a title and meta description. These are what show up in search engine results.
- Add Alt Text to Images: Alt text improves your website’s accessibility and helps search engines understand what’s in your images.
- Customize URLs: Hostinger lets you edit page URLs to be clear and keyword-friendly. This is another small but effective SEO boost.
- Connect to Google Analytics: Use Hostinger’s integration options to link your website with Google Analytics. This tool lets you track visitor behavior, traffic sources, and more.
Step 7: Preview and Test Your Website
Before you hit “publish,” take a few minutes to ensure your website looks and works exactly how you want.
- Preview on Different Devices: Hostinger’s website builder lets you view your site in desktop, tablet, and mobile views, so make sure it’s responsive across devices.
- Test Links and Forms: Click through all links, forms, and navigation menus to verify everything is working properly.
- Check Load Times: Test your website’s load time to ensure visitors won’t be waiting too long. A fast site creates a better experience and helps with SEO.
Step 8: Publish Your Website
Once you’re happy with how your website looks and functions, it’s time to go live.
- Click Publish: In the Hostinger Website Builder, simply click “Publish” to make your website live on the internet.
- Verify Your Domain: If you’re using a custom domain, double-check that it’s correctly configured so people can easily find your site.
- Celebrate Your Launch: Congratulations, your website is live! Share it with friends, family, and on social media to start attracting visitors.
Step 9: Maintain and Update Your Website
Creating a website is just the beginning. Regularly updating your site will keep it fresh and help attract returning visitors.
- Update Content Regularly: Fresh content helps with SEO and keeps your visitors engaged.
- Monitor Performance: Use analytics to track visitor behavior and identify any areas for improvement.
- Add New Features: Hostinger’s builder allows you to expand your website over time. As your audience grows, consider adding features like a blog, newsletter signup, or online store.
Final Thoughts
Building a website shouldn’t be complicated, and with the Hostinger Website Builder, it isn’t. From selecting a template to going live, Hostinger guides you through the process with ease, giving you the freedom to focus on what matters—creating a website that reflects your brand and goals. If you’re ready to create a website using Hostinger, now’s the time to start building!


