Hostinger Website Builder makes it easy for anyone to create a professional website without coding skills. Many beginners struggle with complicated website builders, expensive developers, and confusing design tools.
Hostinger solves this problem with an easy drag-and-drop editor and AI-powered features that help users build websites faster.
According to Hostinger, 93–95% of its AI website builder users are first-time website creators, showing how beginner-friendly the platform is.
Additionally, the AI website builder market is expected to reach $3.24 billion in 2026 as more people look for simple website creation tools.
In this guide, you’ll learn Hostinger Website Builder features, benefits, pricing, setup process, and whether it is the right choice for your website.
Step 1: Choose a Hostinger Hosting Plan
Starting your website journey with Hostinger is super easy. The first big step is picking the right hosting plan. Think of a hosting plan like renting a spot on the internet for your website to live.
Hostinger offers different plans, each with its own benefits. You don’t need to be a tech wizard to understand them. Let’s break it down simply.
First, consider what kind of website you want to build. Are you making a small personal blog? Or a big online store? Hostinger has plans for everyone.
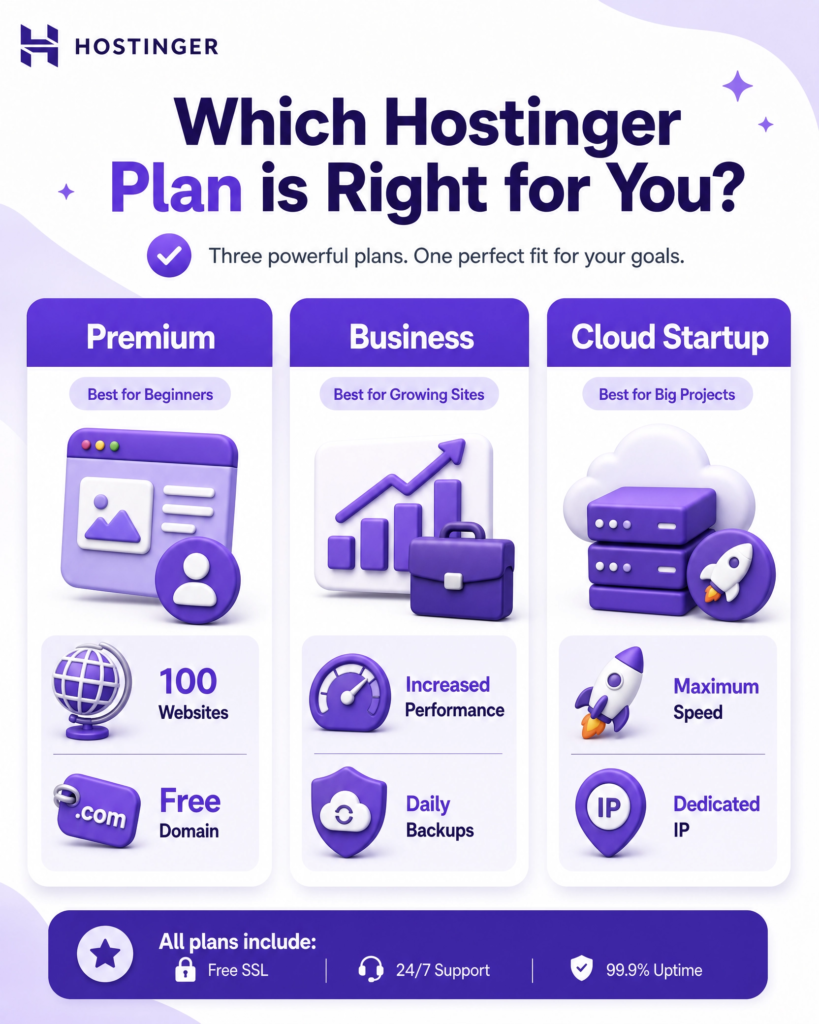
For beginners, the ‘Premium Web Hosting’ plan is often a great choice. It’s affordable and gives you enough power for one website.
This plan lets you host up to 100 websites, gives you a free domain name for a year, and includes free SSL certificates. SSL is like a security guard for your website, keeping your visitors’ information safe. It also helps your website show up better in search engines like Google.
If you plan to have many websites or expect lots of visitors, you might look at their ‘Business Web Hosting’ or ‘Cloud Startup’ plans. These plans offer more storage, faster speeds, and more resources.
More resources mean your website can handle more people visiting at the same time without slowing down. Imagine a small road versus a big highway; more resources mean a bigger highway for your website traffic.
Hostinger also has special plans for WordPress users. WordPress is a very popular tool for building websites. If you know you want to use WordPress, their ‘WordPress Hosting’ plans are optimized for it. This means your WordPress site will run extra fast and smoothly. They even offer tools to help you install WordPress with just a few clicks.
When choosing, look at the features like storage space (how much content your website can hold), bandwidth (how much data can be transferred), and email accounts.
Most plans come with professional email addresses (like yourname@yourwebsite.com), which makes your business look more professional. Don’t forget about customer support.
Hostinger has 24/7 support, so if you ever get stuck, help is always there. Take your time to compare the plans. Pick one that fits your current needs and can grow with your website. You can always upgrade later if your website becomes super popular!
Step 2: Register a Domain Name
After picking your hosting plan, the next exciting step is to get your very own domain name. Think of your domain name as your website’s address on the internet. It’s what people type into their browser to find you, like google.com or yourbusiness.com. A good domain name is easy to remember and tells people what your website is about.
Hostinger makes registering a domain name super simple. Many of their hosting plans, especially the Premium and Business ones, even include a free domain name for the first year. This is a great perk that saves you money!
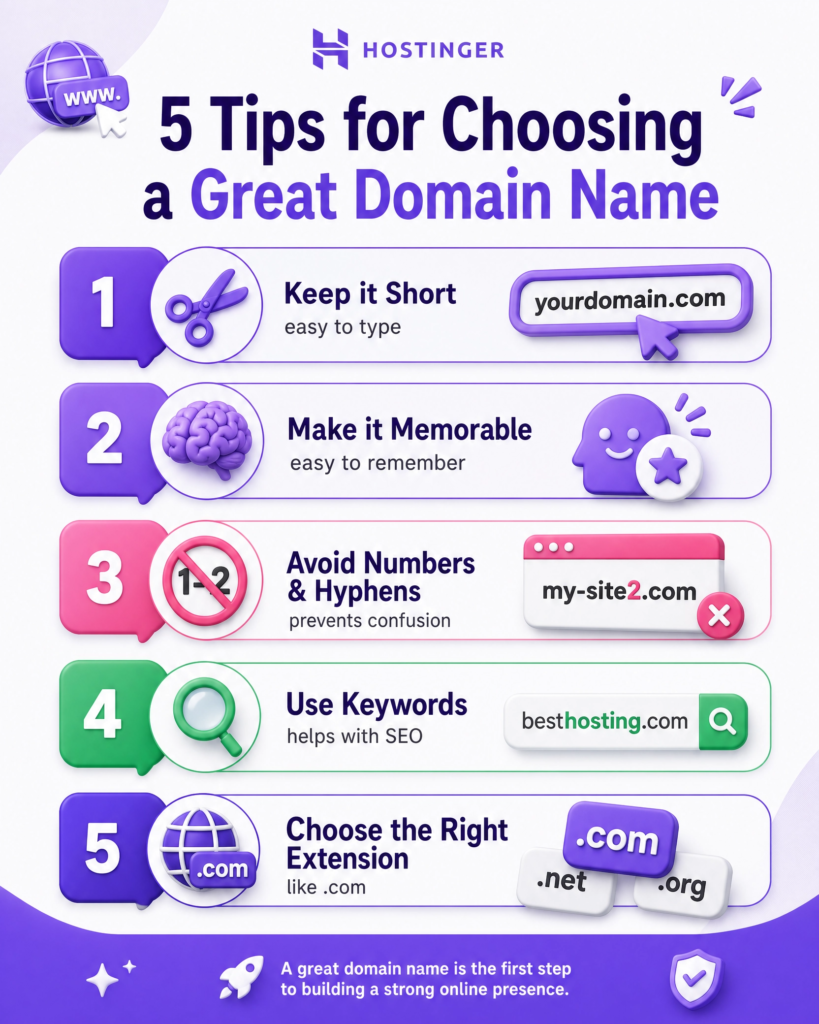
When choosing your domain name, try to make it short, catchy, and relevant to your business or blog. Avoid using numbers or hyphens if possible, as they can make it harder for people to remember and type.
To register your domain, you’ll use Hostinger’s domain checker tool. You simply type in the name you want, and it will tell you if it’s available. If your first choice is taken, don’t worry!
The tool will suggest other similar names or different endings (like .net, .org, or .co instead of .com). The .com ending is the most popular and usually the best choice if available, but other endings can work too, especially if they fit your brand.
Once you find an available domain name you like, you’ll add it to your cart and complete the registration process.
Hostinger will guide you through adding your contact information, which is required for domain ownership. This information is kept private by default with a service called WHOIS privacy protection, which is often included for free or at a small cost. This keeps your personal details safe from public view.
Choosing your domain name is a big part of building your brand online. It’s the first thing people will see and remember about your website.
So, take a moment to pick a name that you love and that truly represents what you do. With your hosting plan and domain name secured, you’re well on your way to having a live website!
Step 3: Set Up Your Hosting Account
Now that you have your hosting plan and domain name, it’s time to set up your Hostinger account. This is where you connect your domain to your hosting and get everything ready for your website. Hostinger makes this process very straightforward, even if you’re new to building websites.
First, you’ll need to log in to your Hostinger account. If you just bought a plan, you might be automatically directed to the setup wizard. This wizard is a helpful guide that walks you through the initial steps. It’s designed to be super easy to follow, asking you simple questions about your website.
The wizard will ask you to choose your domain name. This is the domain you just registered or one you already own. Make sure to select the correct one.
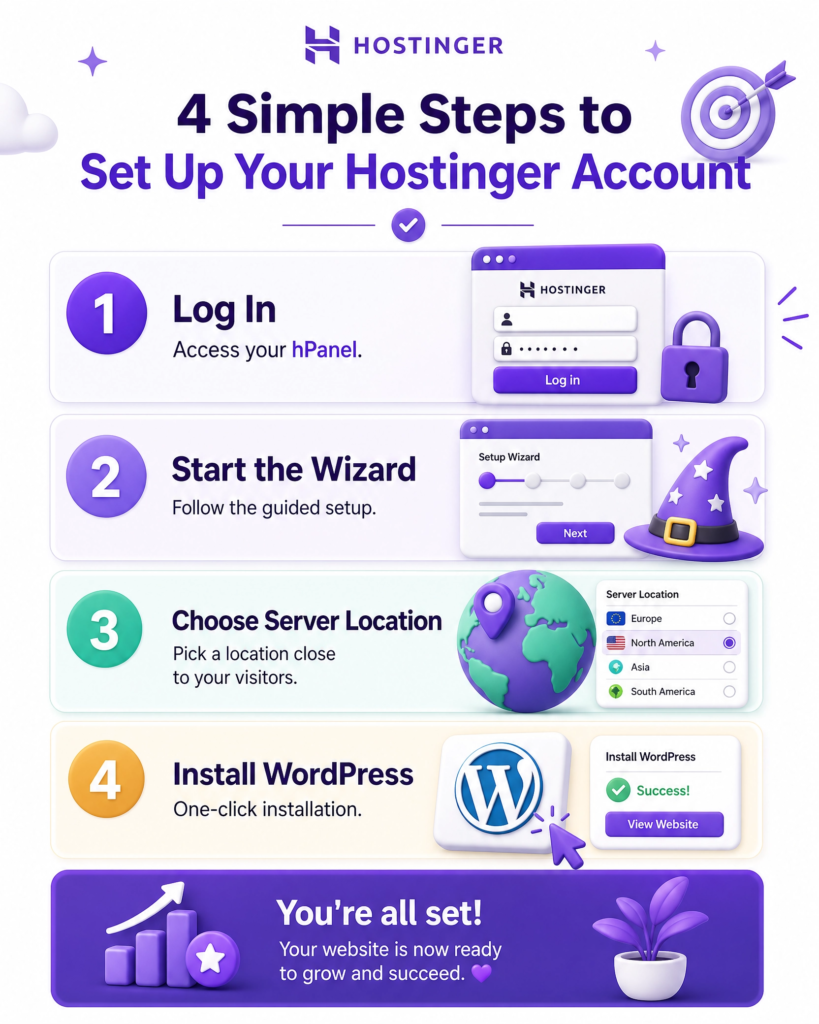
Next, it will ask you to choose a server location. Think of this as choosing where your website’s main computer (server) will be located. It’s best to pick a location that is closest to most of your website visitors. For example, if most of your audience is in Europe, choose a European server. This helps your website load faster for them.
After that, you’ll likely be asked if you want to install a website building platform. For most beginners, WordPress is the best choice. It’s free, easy to use, and powers a huge number of websites around the world. Hostinger has a one-click WordPress installer, which means you can get WordPress up and running on your site in just a few moments. You won’t need any special coding skills.
The setup wizard will also help you create an administrator account for your WordPress site. This is important! You’ll choose a username and a strong password.
Remember these details, as you’ll use them to log in to your website’s backend later. Once you’ve gone through all the steps in the wizard, Hostinger will take a few minutes to set everything up for you. You’ll get a confirmation message when your hosting account is ready. Now you’re ready to start building your actual website!
Step 4: Install WordPress
Installing WordPress on your Hostinger account is super easy. Hostinger has a special tool that does most of the work for you. This is called a one-click installer. It means you don’t need to be a tech expert to get your website platform ready.
After you finish setting up your hosting account (from Step 3), you will usually find an option to install WordPress right in your Hostinger control panel, called hPanel. Look for a section named ‘Website’ or ‘Auto Installer’. Click on it, and you’ll see WordPress as one of the choices.
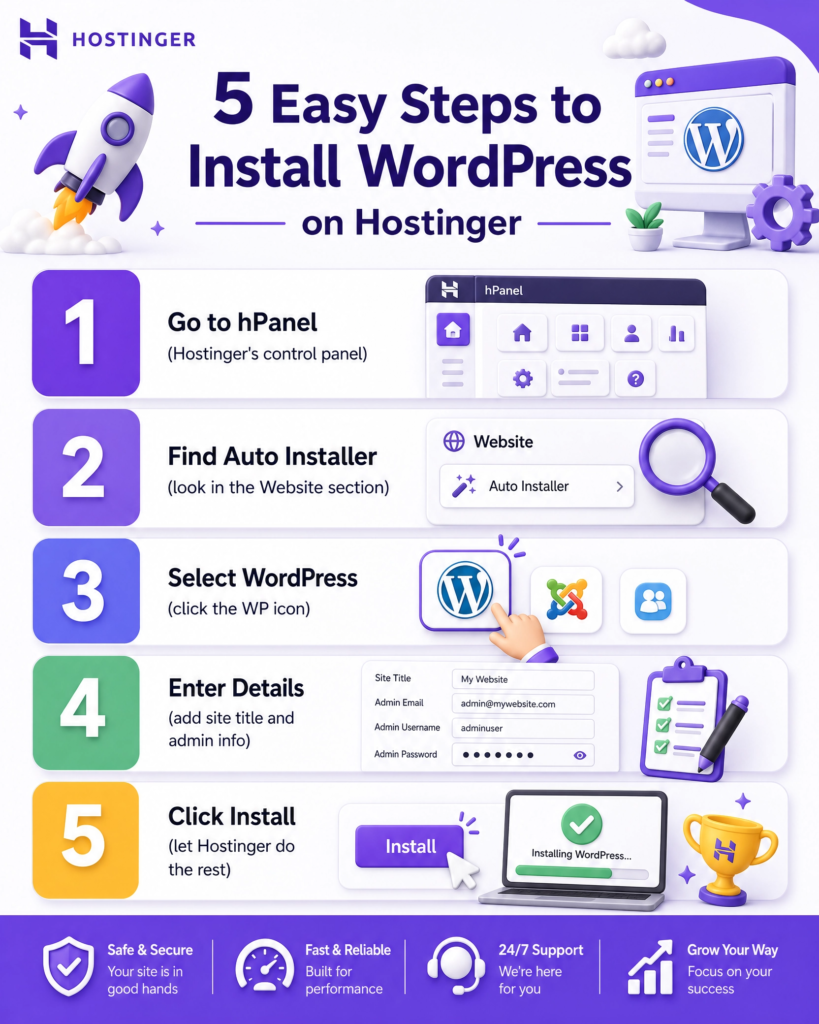
When you click on WordPress, Hostinger will ask you a few simple questions. You’ll need to choose which domain name you want to install WordPress on. If you have only one domain, it will be pre-selected. You’ll also create a username and password for your WordPress admin area. This is very important! Make sure to pick a strong password that is hard for others to guess. Write it down somewhere safe.
Hostinger might also ask you to choose a website title. This is the name that will show up in your browser tab. You can always change this later. Once you’ve filled in these details, click ‘Install’. Hostinger will then work its magic. It will set up all the necessary files and databases for your WordPress website. This usually takes only a few minutes.
When the installation is done, you’ll get a message saying it was successful. You’ll also see a link to your new WordPress website and a link to your WordPress admin area (often called the dashboard). The admin area is where you will manage all your website’s content, design, and settings. Congratulations! You now have a working WordPress website. The next steps will be about making it look good and adding your content.
Step 5: Log Into Your WordPress Dashboard
After successfully installing WordPress, the next crucial step is to log into your WordPress dashboard. This dashboard is like the control center for your entire website. From here, you can change how your site looks, add new content, install helpful tools (plugins), and manage everything else.
There are two main ways to log into your WordPress dashboard. The easiest way is often directly through your Hostinger hPanel.
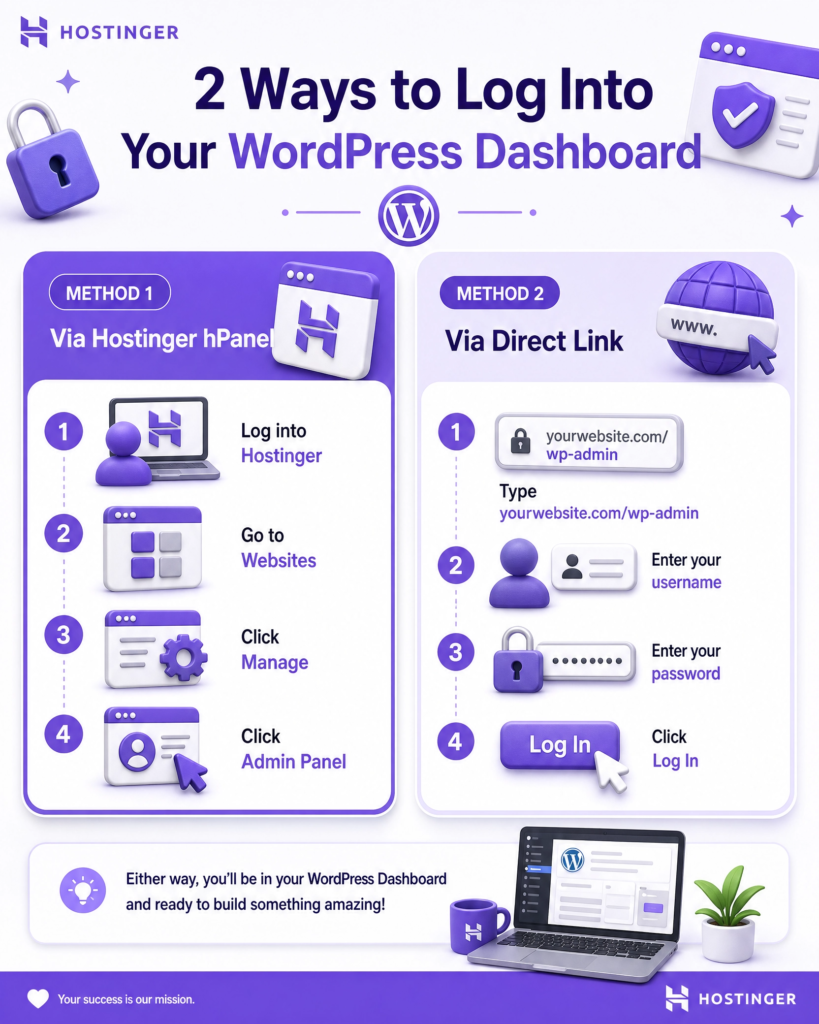
After logging into your Hostinger account, navigate to the ‘Websites’ section. You should see your website listed there.
Look for an option like ‘Manage’ or ‘WordPress Dashboard’ next to your site. Clicking this will usually take you straight to your WordPress admin area without needing to enter your username and password again.
The second way is to go directly to your website’s login page. You can do this by typing your website address into your browser, followed by /wp-admin.
For example, if your website is yourwebsite.com, you would type yourwebsite.com/wp-admin. This will take you to the WordPress login screen. Here, you’ll need to enter the username and password you created during the WordPress installation process (from Step 4). Remember to keep these details safe and secure!
Once you log in, you’ll see the WordPress dashboard. Don’t feel overwhelmed if it looks a bit busy at first. It’s designed to give you a quick overview of your site.
On the left side, you’ll find a menu with different options like ‘Posts’ (for blog articles), ‘Pages’ (for static content like an ‘About Us’ page), ‘Appearance’ (to change your site’s design), and ‘Plugins’ (to add new features). Take a few minutes to explore these menus and get a feel for where everything is.
Logging into your dashboard means you’re officially ready to start customizing and building your website. This is where the real fun begins!
You’ve done all the technical setup, and now you can focus on making your website look and feel exactly how you want it.
Step 6: Choose a WordPress Theme
Now that you’re inside your WordPress dashboard, it’s time for the fun part: choosing a theme!
Think of a WordPress theme as the clothes for your website. It controls how your site looks and feels to visitors. It sets the colors, fonts, layout, and overall style. A good theme makes your website look professional and easy to use.
WordPress has thousands of themes available, both free and paid.
For beginners, starting with a free theme is a great idea. You can find these by going to ‘Appearance’ then ‘Themes’ in your WordPress dashboard. Click on ‘Add New’ to browse the free themes. You can search for themes based on what your website is about, like ‘blog,’ ‘business,’ ‘portfolio,’ or ‘e-commerce.’ When you find a theme you like, you can click ‘Preview’ to see how it would look with your content.
When choosing a theme, keep a few things in mind.
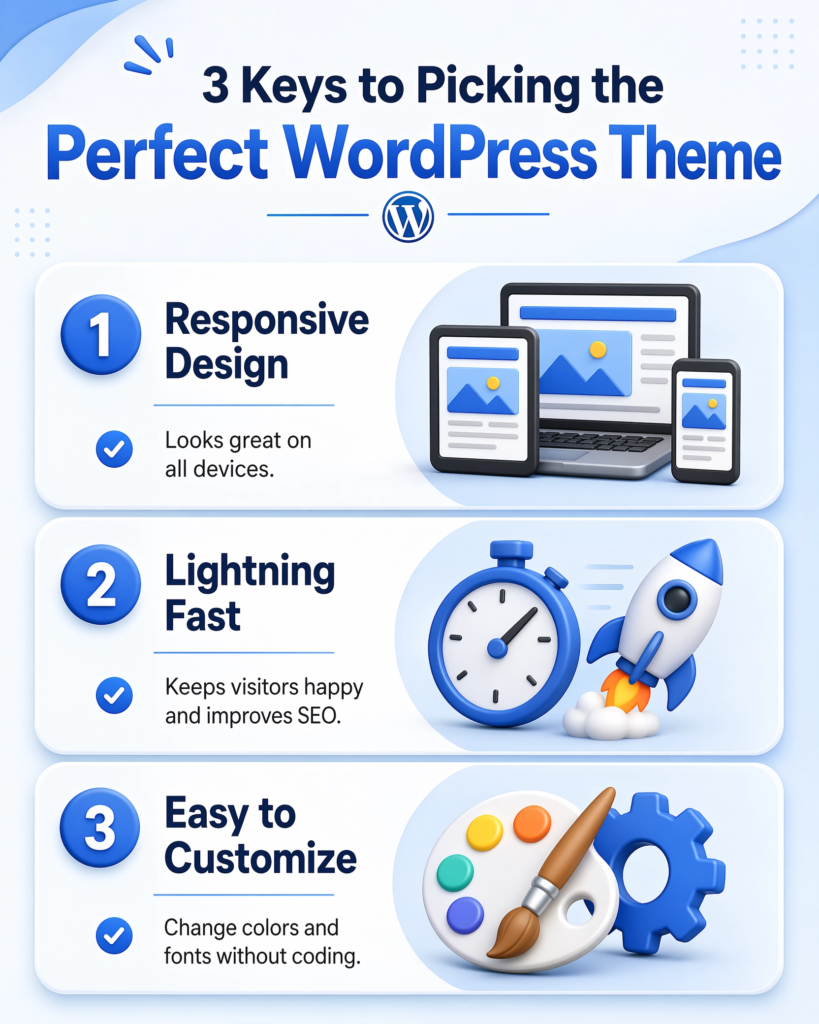
First, make sure it’s responsive. This means it looks good on all devices, from big computer screens to small smartphones. Most modern themes are responsive, but it’s always good to check.
Second, look for a theme that is fast. A slow website can make visitors leave. You can often find information about a theme’s speed in its description or reviews.
Third, choose a theme that is easy to customize. You want to be able to change colors, fonts, and layouts without needing to know complex code.
Some popular free themes that are great for beginners include Astra, OceanWP, and GeneratePress. These themes are known for being fast, flexible, and easy to use with page builders (which we’ll talk about later).
Once you’ve picked a theme, click ‘Install’ and then ‘Activate.’ Activating a theme instantly changes your website’s appearance. Don’t worry if it doesn’t look perfect right away; you can always customize it further. This step is all about getting a good foundation for your website’s design.
Step 7: Customize Your Website Design
Now that you have a theme, it’s time to make your website truly yours! Customizing your design means changing colors, fonts, layouts, and adding your own pictures and text. This step is where your website starts to look unique and reflect your brand or personality.
WordPress offers several ways to customize your theme. The most common way is through the WordPress Customizer. You can find this by going to ‘Appearance’ then ‘Customize’ in your dashboard.

The Customizer lets you see your changes live as you make them. You can change things like your site title, tagline, colors, fonts, header, footer, and even how your blog posts look. Take your time here. Play around with the options. You can always revert changes if you don’t like them.
For more advanced design, many themes work well with page builders. These are plugins that let you design your pages using a drag-and-drop interface. Popular page builders include Elementor, Beaver Builder, and SeedProd.
They make it super easy to create beautiful, complex layouts without any coding. You can drag elements like text boxes, images, buttons, and videos onto your page and arrange them exactly how you want. If your chosen theme is compatible, installing a page builder can unlock a lot of creative possibilities.
When customizing, think about your audience. What colors and fonts will appeal to them? Is your website easy to read and navigate? Keep your design clean and simple. Too many colors or fancy fonts can make your site look messy.
Use high-quality images that relate to your content. Make sure your important information is easy to find. The goal is to create a website that looks good and is easy for your visitors to use.
Remember, your website is a living thing. You can always come back and tweak your design later. The important thing is to get started and make it functional. With Hostinger and WordPress, you have all the tools you need to create a stunning website that stands out.
Step 8: Create Essential Pages
With your design taking shape, it’s time to add the core content to your website. These are the pages that almost every website needs. They help your visitors understand who you are, what you do, and how to get in touch. Think of them as the backbone of your online presence.
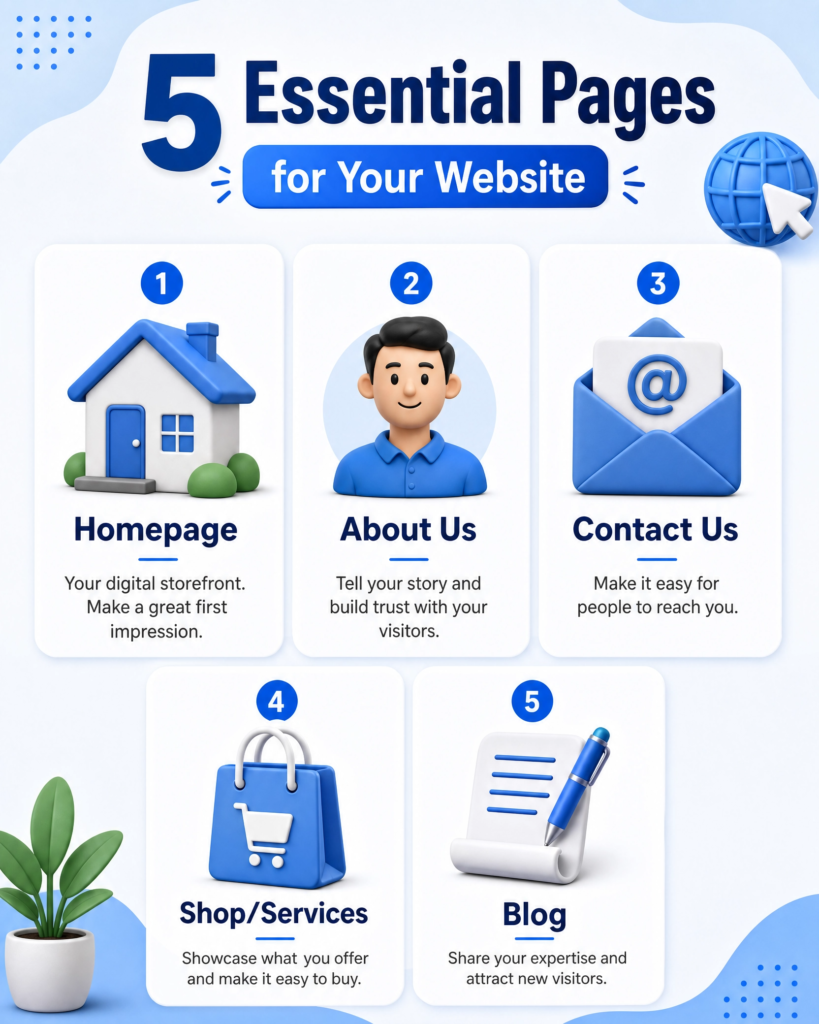
First, you’ll want to create your Homepage. This is the first page visitors see. It should clearly state what your website is about and what you offer. Keep it clean and inviting. Use a strong headline and a clear call to action, like “Learn More” or “Shop Now.” Your homepage is your digital storefront, so make a good first impression.
Next, an About Us page is crucial. This page tells your story. Who are you? What is your mission? Why did you start this website? People connect with stories, so share yours. This builds trust and helps visitors feel a connection to you or your brand. You can include a photo of yourself or your team to make it more personal.
Then, create a Contact Us page. This makes it easy for people to reach you. Include a simple contact form, your email address, and maybe even your social media links. Make sure it’s easy to find. Good communication is key to any successful website.
If you plan to sell products or services, you’ll need a Shop or Services page. This is where you list what you offer. Use clear descriptions and high-quality images. Make it easy for customers to browse and buy. If you’re selling digital products, this is where you’ll showcase them.
Finally, consider a Blog page. A blog is a great way to share useful information, attract new visitors, and show your expertise. You can write about topics related to your niche, answer common questions, or share updates. Regular blog posts keep your website fresh and give people a reason to keep coming back.
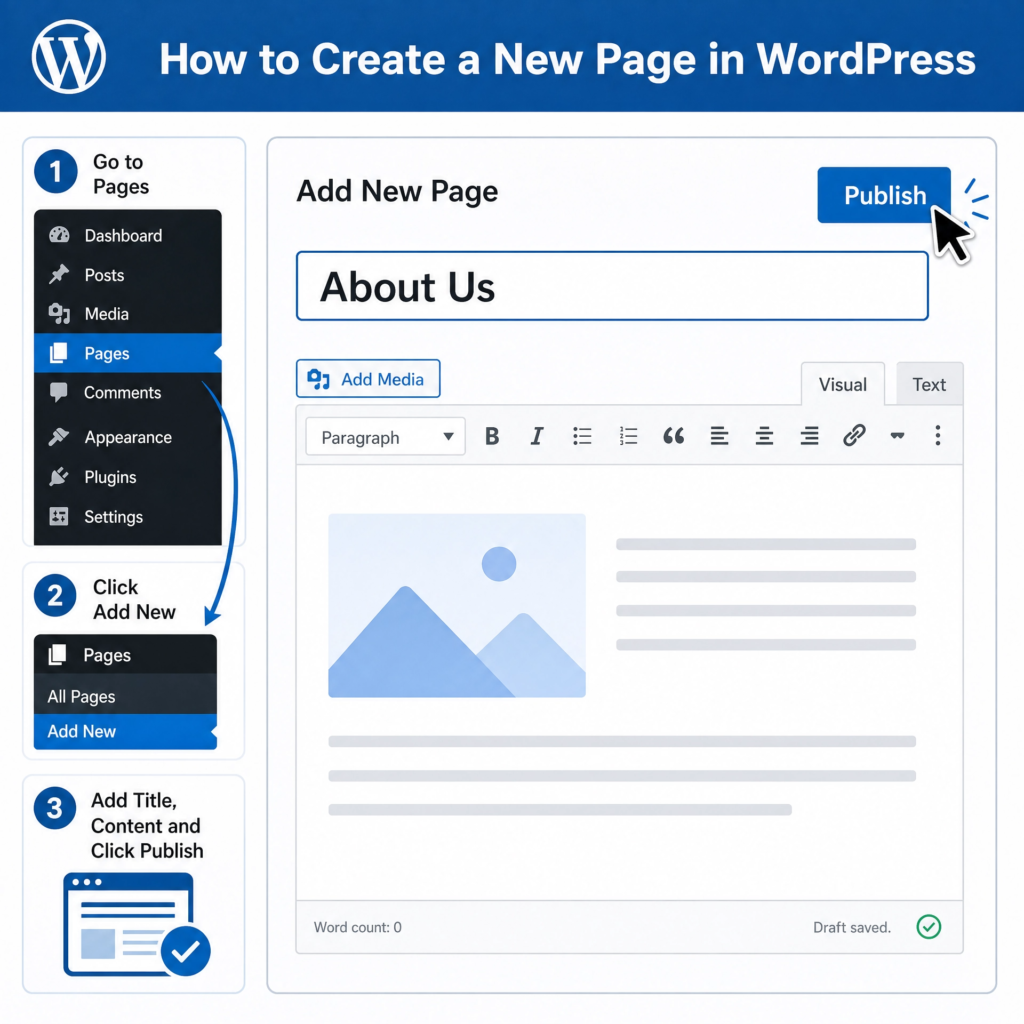
To create these pages in WordPress, go to ‘Pages’ then ‘Add New’ in your dashboard. Give your page a title, add your content, and then click ‘Publish’. It’s that simple!
Step 9: Install Important WordPress Plugins
Plugins are like apps for your WordPress website. They add new features and functions without needing to write any code. Think of them as tools that make your website more powerful and easier to manage.
There are thousands of free and paid plugins available, but some are essential for almost every website.
First, you’ll want a security plugin. Websites can be targets for hackers, so protecting yours is very important. Plugins like Wordfence or Sucuri help guard your site against bad guys. They scan for problems, block suspicious activity, and keep your website safe. Installing one of these is a must-do step.
Next, consider a backup plugin. Imagine losing all your hard work! A backup plugin, like UpdraftPlus or BackWPup, saves copies of your entire website. If something goes wrong, you can easily restore your site to an earlier version. This gives you peace of mind.
An SEO plugin is also crucial. SEO stands for Search Engine Optimization. This helps your website show up higher in search results when people look for things online. Yoast SEO and Rank Math are popular choices. They guide you to make your content friendly for search engines like Google, so more people can find your site.
If you plan to collect emails or have contact forms, a form builder plugin is very useful. Plugins like WPForms or Contact Form 7 let you create simple forms for visitors to get in touch or sign up for your newsletter. This is key for building your audience.
Finally, for better website speed, an optimization plugin can help. Plugins like WP Super Cache or LiteSpeed Cache make your website load faster. A fast website keeps visitors happy and helps with your search engine ranking. Nobody likes a slow website!
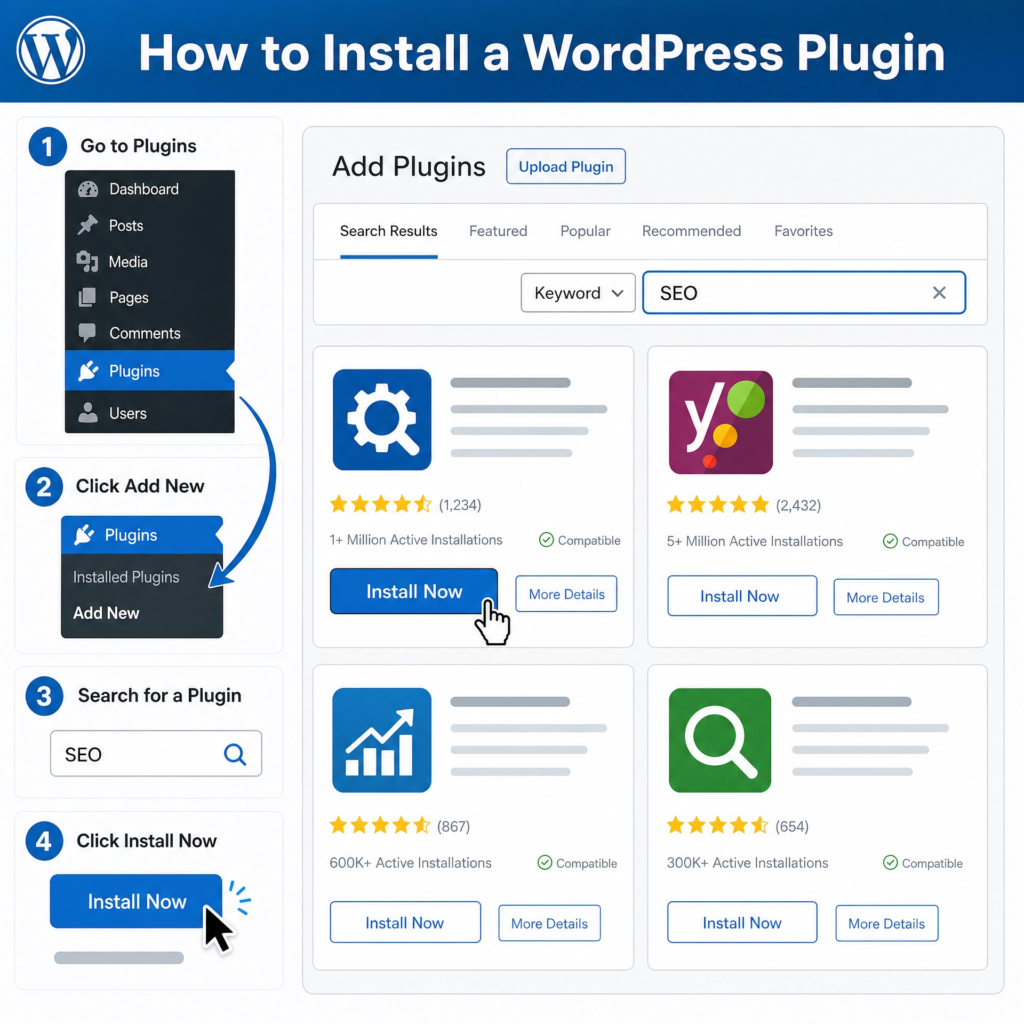
To install a plugin, go to ‘Plugins’ then ‘Add New’ in your WordPress dashboard. Search for the plugin you want, click ‘Install Now’, and then ‘Activate’. It’s a simple process that adds a lot of power to your site.
Step 10: Optimize Your Website for SEO
SEO stands for Search Engine Optimization. It’s how you help search engines like Google understand your website. When people search for things online, you want your website to appear high in the results. Good SEO means more people will find your site naturally. This is very important for getting visitors.
First, choose good keywords. These are the words or phrases people type into search engines. If your website sells handmade jewelry, keywords might be “handmade necklaces” or “unique earrings.” Think about what your potential visitors would search for. Use these keywords naturally in your website’s content, titles, and descriptions.
Next, make sure your website is mobile-friendly. Many people browse on their phones. Google prefers websites that look good and work well on all devices. Hostinger themes are usually responsive, meaning they adjust automatically. Always check how your site looks on a phone.
Create high-quality content. This is perhaps the most important SEO tip. Write helpful, interesting, and unique articles or pages. Google loves content that provides real value to users. The more useful your content, the more likely others are to link to it, which also boosts your SEO.
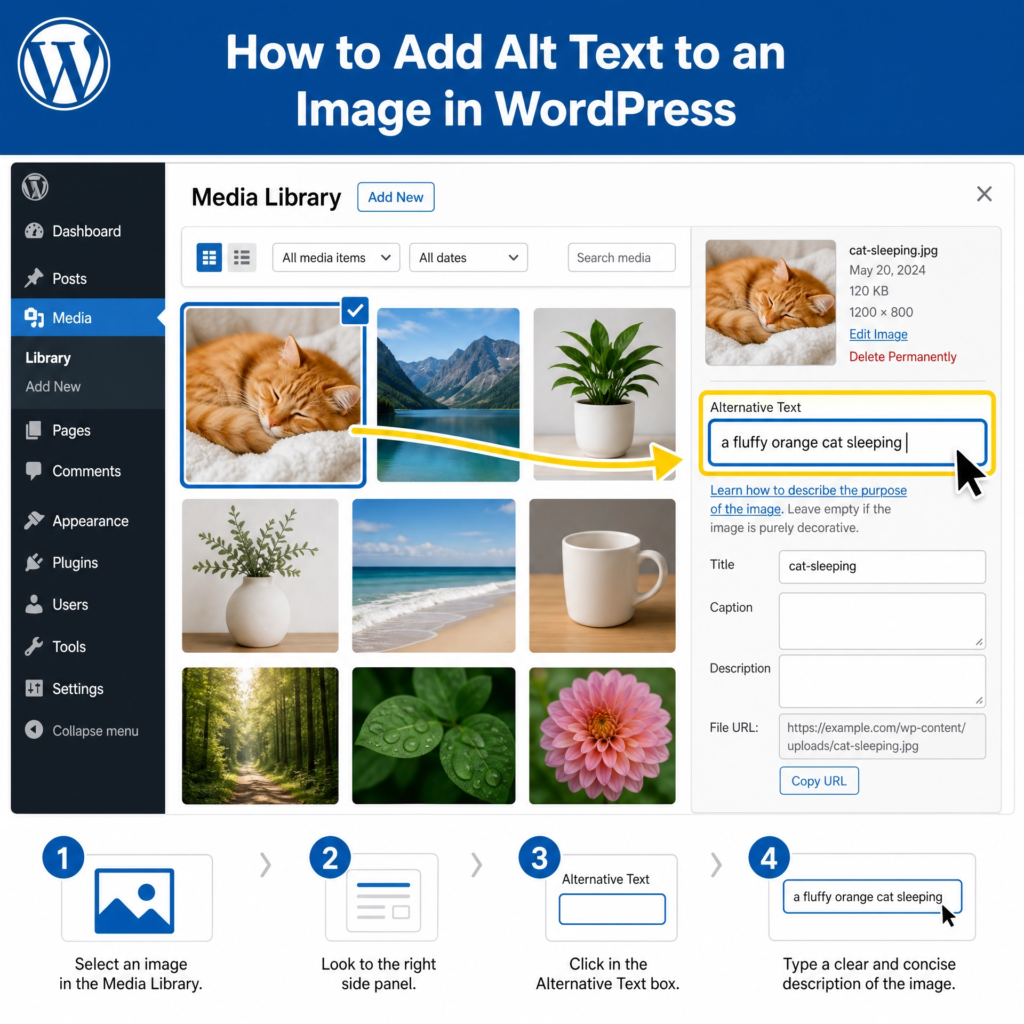
Optimize your images. Large images can slow down your website. Slow websites hurt SEO. Before uploading, resize your images to a reasonable size. Also, add “alt text” to each image. This describes the image for search engines and visually impaired users. For example, alt text for a picture of a cat could be “a fluffy orange cat sleeping.”
Finally, use an SEO plugin. We talked about these in Step 9. Plugins like Yoast SEO or Rank Math help you with all these tasks. They guide you to add keywords, create good titles, and improve your content for search engines. They make SEO much easier for beginners. Following these steps will help your website get noticed.
Step 11: Add Content to Your Website
Now that your website is set up, it’s time to fill it with content. Content is what your visitors come to see. This includes text, images, videos, and more. Good content keeps people on your site. It also helps them understand what you offer. Think about what your audience wants to know.
Start with your main pages. Most websites need an “About Us” page. This tells your story and what your website is for. A “Contact Us” page is also essential. It provides ways for people to reach you. If you sell products, you’ll need product pages. If you offer services, create service pages. These are the core of your site.
Next, consider a blog. A blog is a great way to share information. You can write about topics related to your niche. For example, if you have a cooking website, you can share recipes. Regular blog posts keep your website fresh. They also give search engines new content to index. This helps with SEO, as discussed in Step 10.
When writing, keep your audience in mind. Use simple language. Break up long paragraphs into shorter ones. Use headings and subheadings to organize your text. This makes it easier to read. Use bullet points for lists. Clear and concise writing is key.
Images and videos make your content more engaging. Don’t just use text. High-quality visuals grab attention. They can explain complex ideas quickly. Make sure your images are relevant. Optimize them for web use to keep your site fast. You can find free stock photos on sites like Unsplash or Pexels. Or, use your own unique photos.
Always proofread your content. Check for spelling and grammar mistakes. Errors can make your website look unprofessional. Read your content aloud to catch awkward sentences. Ask a friend to review it too. Quality content builds trust with your visitors. It makes them want to come back.
Step 12: Secure Your Website
Securing your website is very important. It protects your site from hackers and malicious attacks. A secure website also builds trust with your visitors. They will feel safe browsing your content or making purchases. Neglecting security can lead to lost data, damaged reputation, and even legal issues. So, let’s make sure your website is safe.
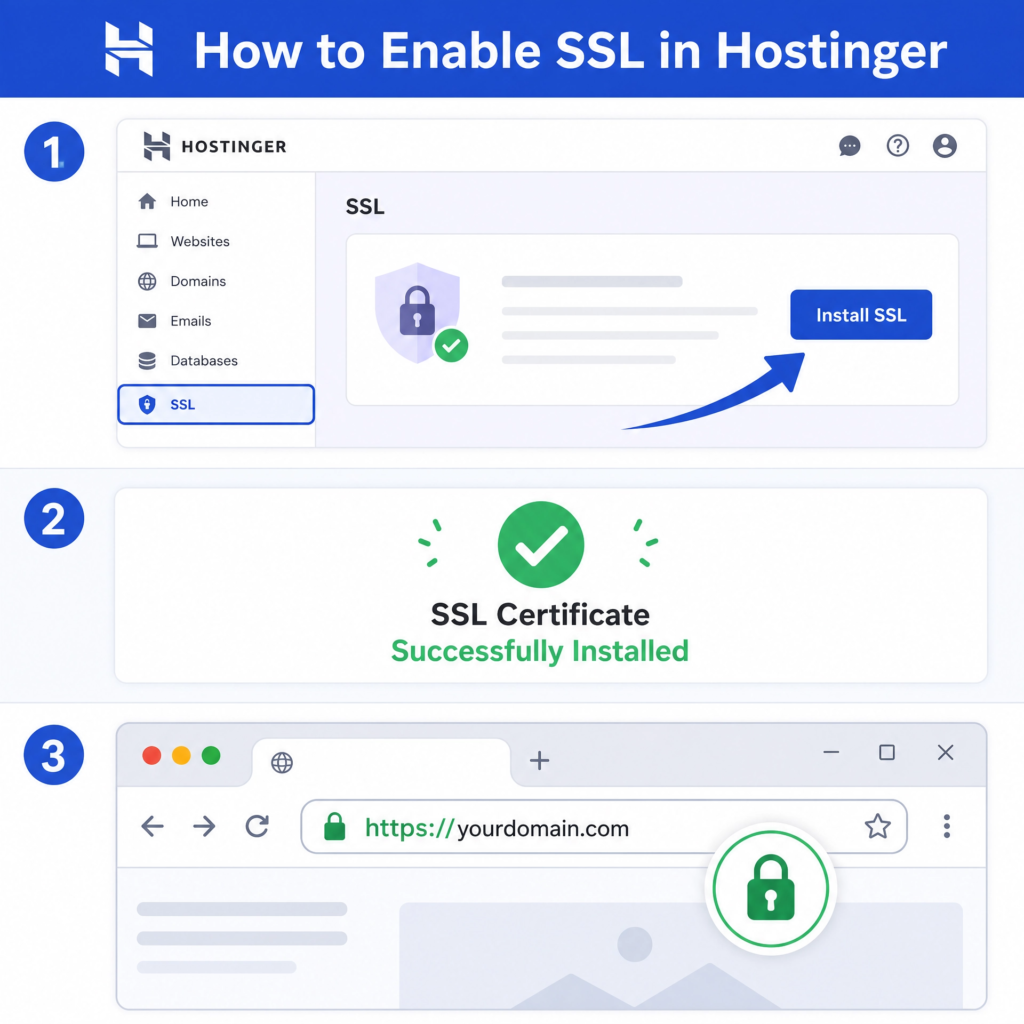
First, install an SSL certificate. SSL stands for Secure Sockets Layer. It encrypts the connection between your website and your visitors’ browsers. This means any data exchanged, like passwords or credit card numbers, is protected. Websites with SSL have https:// in their address bar and a padlock icon. Hostinger often provides free SSL certificates, so make sure yours is active. This is a basic but crucial security step.
Next, use strong passwords. This might seem obvious, but many security breaches happen because of weak passwords. Use a mix of uppercase and lowercase letters, numbers, and symbols. Make them long and unique for each account. Never use the same password for your WordPress admin, Hostinger account, and email. Consider using a password manager to keep track of them.
Keep your WordPress core, themes, and plugins updated. Developers regularly release updates to fix security vulnerabilities. If you don’t update, you leave your website open to known threats. Always back up your website before updating, just in case something goes wrong. This was covered in Step 9 with backup plugins.
Install a security plugin. As mentioned in Step 9, plugins like Wordfence or Sucuri are essential. They act as a firewall, scanning for malware and blocking suspicious login attempts. They can also help you clean your site if it ever gets infected. These plugins provide an extra layer of defense.
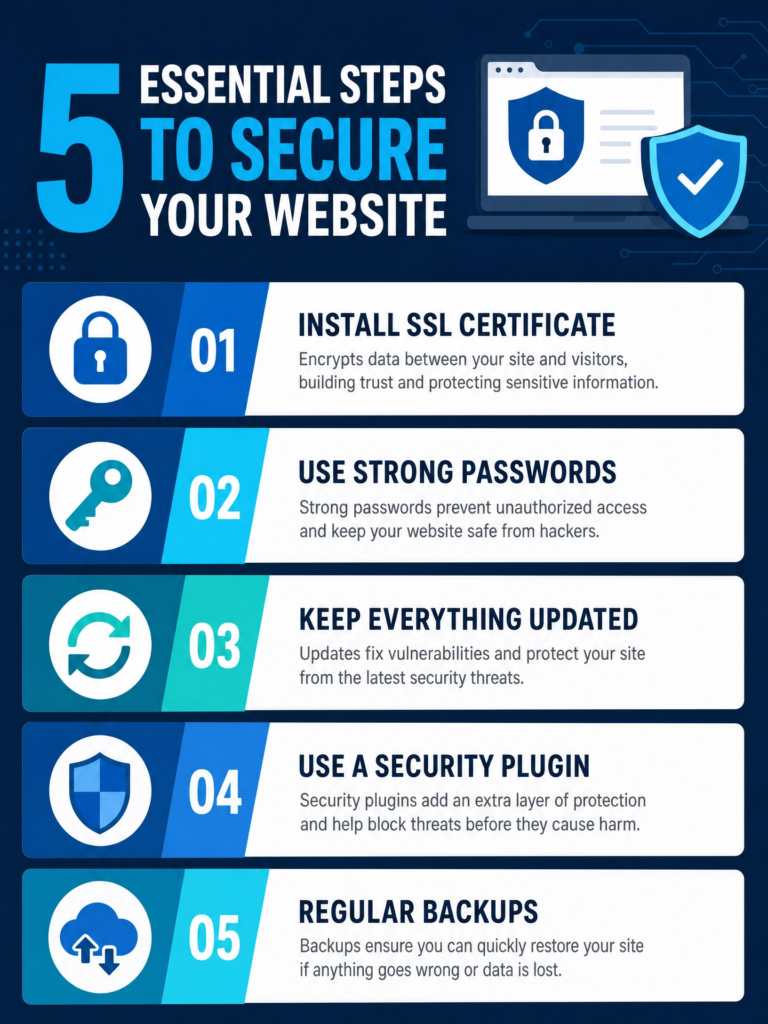
Finally, regularly back up your website. Even with all precautions, things can still go wrong. Having recent backups means you can restore your website quickly if it’s ever compromised or crashes. Store your backups in a safe place, ideally off-site. Hostinger also offers automatic backups, which is a great feature to rely on. These steps will help keep your website secure and running smoothly.
Step 13: Test Your Website Before Launching
Before you show your website to the world, you need to test it thoroughly. Testing helps you find and fix any problems. A smooth, error-free website gives visitors a good experience. It also makes your site look professional. Don’t rush this step. A little testing now can save you big headaches later.
First, check all your links. Click on every link on your website. Make sure they go to the right pages. This includes links in your navigation menu, within your text, and in your footer. Broken links are frustrating for users. They can also hurt your search engine ranking.
Next, test all your forms. If you have contact forms, subscription forms, or comment sections, fill them out. Make sure they send messages correctly. Check that you receive the submissions. This is vital for communication with your audience. A non-working form means lost opportunities.
Check your website on different devices and browsers. Your site should look good on desktops, laptops, tablets, and smartphones. It should also work well in different web browsers like Chrome, Firefox, Safari, and Edge. What looks great on your computer might look broken on someone else’s phone. Hostinger themes are usually responsive, but always double-check.
Look for any spelling or grammar mistakes. Read through all your content carefully. Even small errors can make your site seem unprofessional. Ask a friend or family member to read it too. A fresh pair of eyes can spot things you missed. This is an easy fix that makes a big difference.
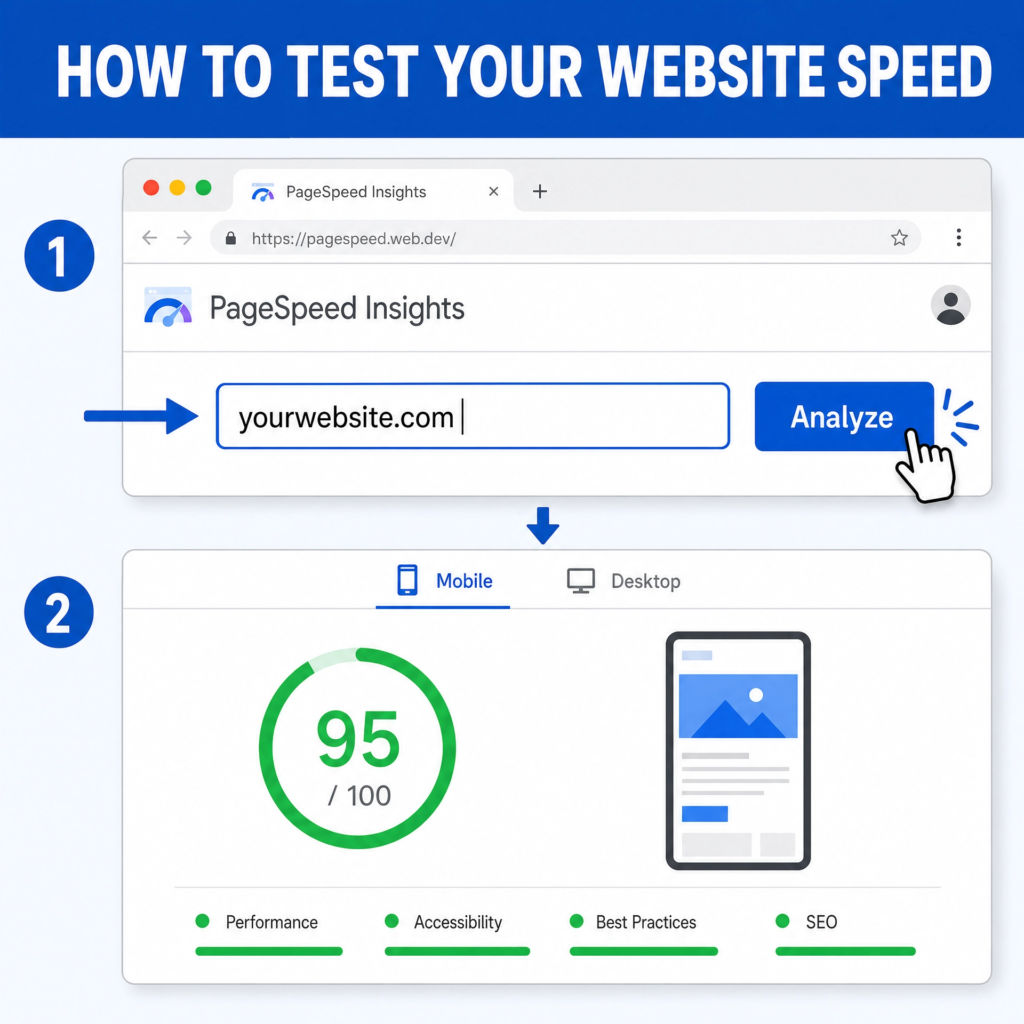
Finally, check your website speed. A slow website can drive visitors away. Use online tools like Google PageSpeed Insights or GTmetrix to check your loading times. These tools also give you tips to make your site faster. Remember, speed is important for user experience and SEO. Once everything is perfect, you are ready to launch!
Step 14: Launch Your Website
After all your hard work, it’s finally time to launch your website! This is the exciting moment when your site goes live for everyone to see. Launching means making your website publicly accessible. It’s the culmination of all the steps you’ve followed. A successful launch means your website is ready for visitors.
First, do a final check. Even after thorough testing, a quick last review is always a good idea. Open your website in a browser. Click through a few pages. Make sure everything looks correct. Check for any broken images or text formatting issues. This last look can catch small errors before they become public.
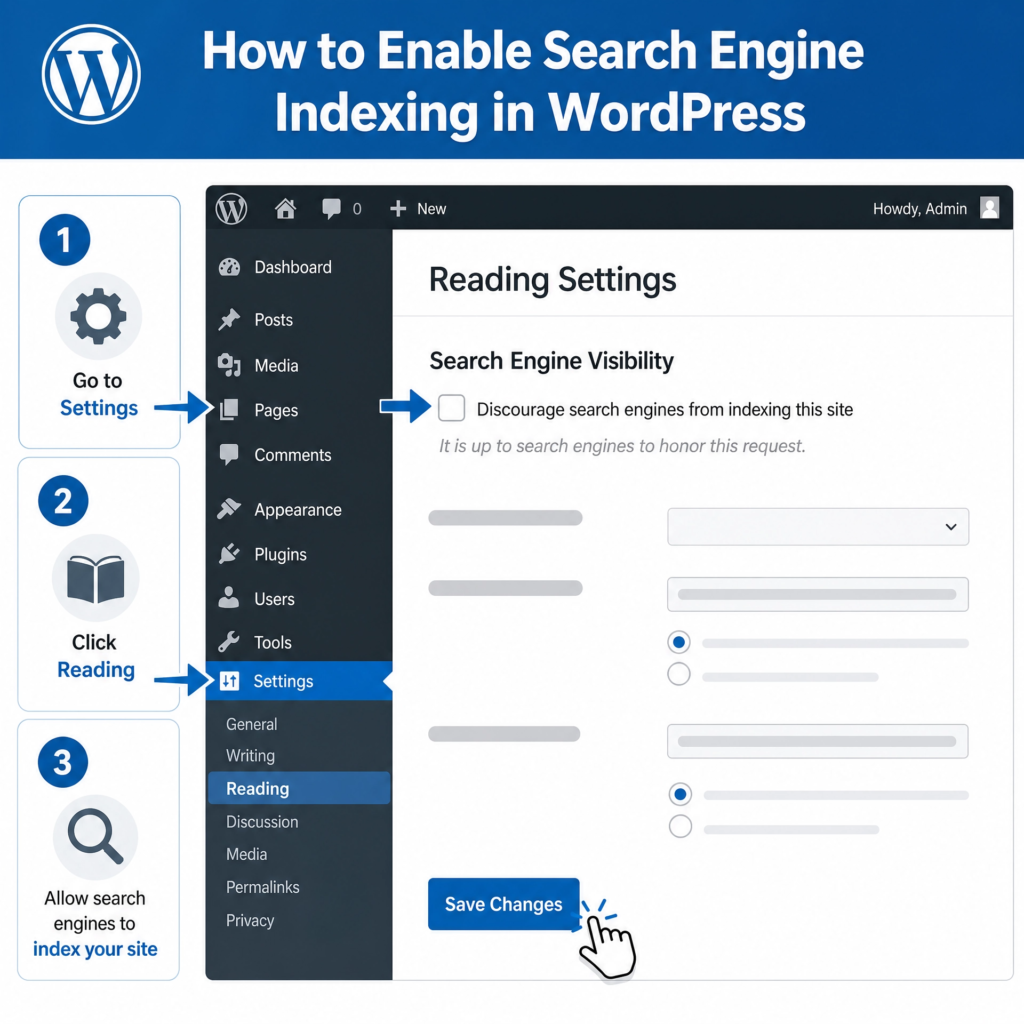
Next, make sure your website is visible to search engines. In WordPress, go to Settings > Reading. Ensure the option “Discourage search engines from indexing this site” is unchecked. If it’s checked, search engines won’t find your site. You want Google and others to see your new website. This is crucial for getting organic traffic.
If you used a “Coming Soon” page or maintenance mode during development, disable it. Your website should now be fully accessible. Remove any plugins or settings that were hiding your site. You want visitors to see your complete website, not a placeholder.
Consider announcing your launch. Share the news on social media. Tell your friends, family, and colleagues. Send out an email to your contact list. The more people who know about your website, the better. This helps drive initial traffic to your new site. It also creates excitement around your brand.
Finally, monitor your website. After launching, keep an eye on its performance. Use tools like Google Analytics to track visitors. See which pages they visit most. Check for any errors or slow loading times. Continuous monitoring helps you improve your website over time. Launching is just the beginning of your website journey. Enjoy your new online presence!
Conclusion
Congratulations! You’ve successfully created a website using Hostinger. This journey has taken you from choosing a domain to launching your site. You’ve learned how to set up hosting, install WordPress, pick a theme, and add essential plugins. You also discovered how to optimize your site for search engines and create engaging content. This is a huge achievement. You now have a powerful online presence.
Remember, building a website is not a one-time task. It’s an ongoing process. Your website will need continuous care and attention. Think of it as a garden that needs regular watering and weeding. Keep your content fresh and relevant. Update your WordPress, themes, and plugins regularly. Monitor your website’s performance. This ensures it stays secure, fast, and engaging for your visitors.
Keep Learning: The world of websites and online marketing changes fast. Stay curious and keep learning new things. There are many resources available online. Hostinger itself offers many tutorials. WordPress has a huge community. Don’t be afraid to explore new features or try new plugins. The more you learn, the better your website will become.
Engage with Your Audience: Your website is a tool for connection. Respond to comments on your blog. Answer questions through your contact forms. Use social media to drive traffic to your site. Building a community around your website can bring many rewards. It helps you understand what your audience needs. This allows you to create even better content.
Be Patient: Don’t expect overnight success. Building an audience and getting traffic takes time. Be consistent with your efforts. Keep creating valuable content. Promote your website.
Over time, your hard work will pay off. Your website will grow and become a valuable asset. You’ve taken the first big step. Now, enjoy the journey of growing your online presence!