Done For You Course Creation is a big help for many. Making an online course can be tough.
You need to plan, write, design, and handle tech. Many courses don’t get finished by students. Studies show only about 12.6% of students complete online courses.
This means many courses might not be as good as they could be. But don’t worry!
This blog post will show you how Done For You Course Creation solves these problems.
You will learn how it saves time, helps you launch faster, makes your course look professional, improves what you teach, and even helps you sell more.
It’s about making your course journey easy and successful.
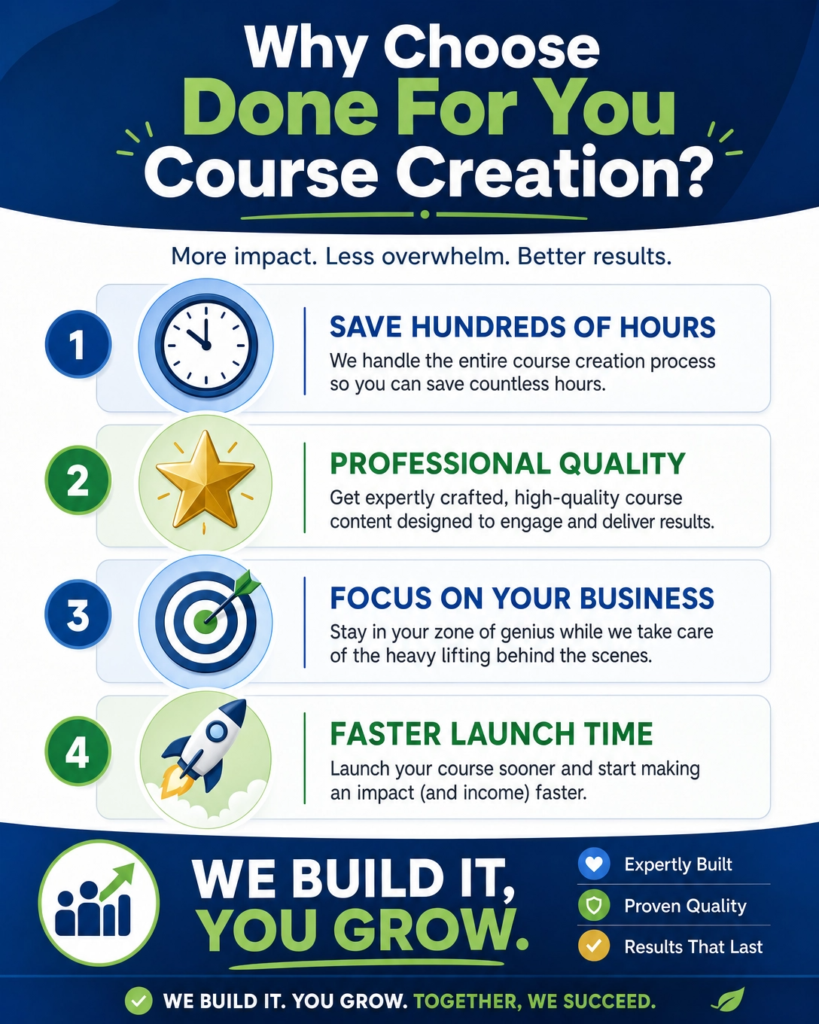
1. Save Time and Focus on Your Business
Creating an online course can be a huge project. It takes a lot of time and effort. You need to plan the lessons, write the content, record videos, and design everything.
For many business owners, this is too much. You already have a business to run. You have clients to serve. You have marketing to do.
Spending weeks or months building a course from scratch can pull you away from these important tasks.
This is where “Done For You Course Creation” services come in. Imagine having experts handle all the hard work for you.
They take your ideas and turn them into a polished, ready-to-sell online course. This means you don’t have to worry about the technical details. You don’t need to learn video editing.
You don’t need to spend hours on graphic design. The professionals do it all. This frees up your time.
You can then use that time to focus on what you do best. You can work on growing your business.
You can connect with more clients. You can improve your main services.
Think of it like this: if you need a new website, you hire a web designer.
You don’t try to build it yourself unless that’s your main business. Course creation is similar. It’s a specialized skill.
By outsourcing it, you get a high-quality product faster. You also avoid the learning curve. This saves you a lot of stress and potential mistakes. It means your course can launch sooner.
A faster launch means you can start earning money from your course sooner. It also means you can offer value to your audience without delay.
Ultimately, using done-for-you course creation helps you be more efficient. You leverage the skills of others to achieve your goals.
This allows you to keep your attention on your core business activities.
You can focus on sales, customer service, and innovation. This strategic choice helps your business grow stronger and faster. It ensures that your energy is spent where it matters most for your success.
2. Launch Your Course Faster
Launching an online course can feel like a race against time. You have a great idea, and you want to share it with your audience as soon as possible.
But the process of creating a course can be slow. Researching, writing, recording, editing, and setting up the platform all take time.
This delay can mean missed opportunities. Your audience might move on.
A competitor might launch a similar course before you do. Speed to market is very important in the fast-paced online world.
Done For You Course Creation services are designed to cut down this waiting period significantly.
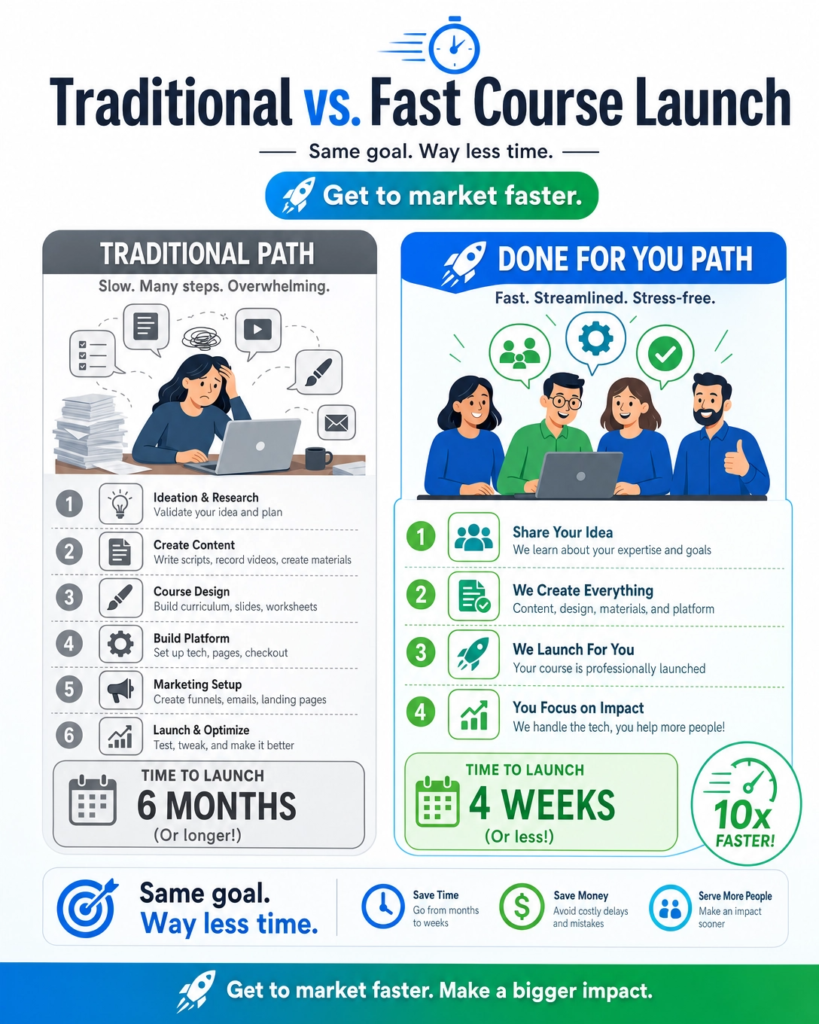
Instead of you juggling all the tasks, a team of experts works efficiently. They have systems and processes in place. They know how to create high-quality content quickly.
They can handle video production, graphic design, and technical setup much faster than a single person learning everything from scratch.
This means your course moves from idea to launch much more smoothly and rapidly.
Imagine having your course ready in weeks, not months. This accelerated timeline allows you to capitalize on current trends. You can respond to your audience’s immediate needs.
You can be the first to offer a solution in a new niche. This quick launch gives you a competitive edge.
It also means you can start generating income from your course sooner. Every day your course is not live is a day you are not earning from it.
By choosing a done-for-you service, you bypass many common delays. You avoid technical headaches. You don’t get stuck on design choices.
The experts ensure everything is done right the first time. This smooth process means you can announce your course with confidence.
You can focus on marketing and enrollment, knowing the product is ready.
Launching faster helps you make an impact sooner and build momentum for your business. It turns your course idea into a reality without unnecessary delays.
3. Get Professional Course Design
The look and feel of your online course matter a lot. A professional course design makes a big difference.
It helps your students stay engaged. It makes your content easier to understand. A poorly designed course can confuse students. It can make them lose interest.
Even if your content is amazing, bad design can hide its value. This is why getting professional course design is so important.
When you choose a “Done For You Course Creation” service, you get access to design experts. These people know how to make courses look good.
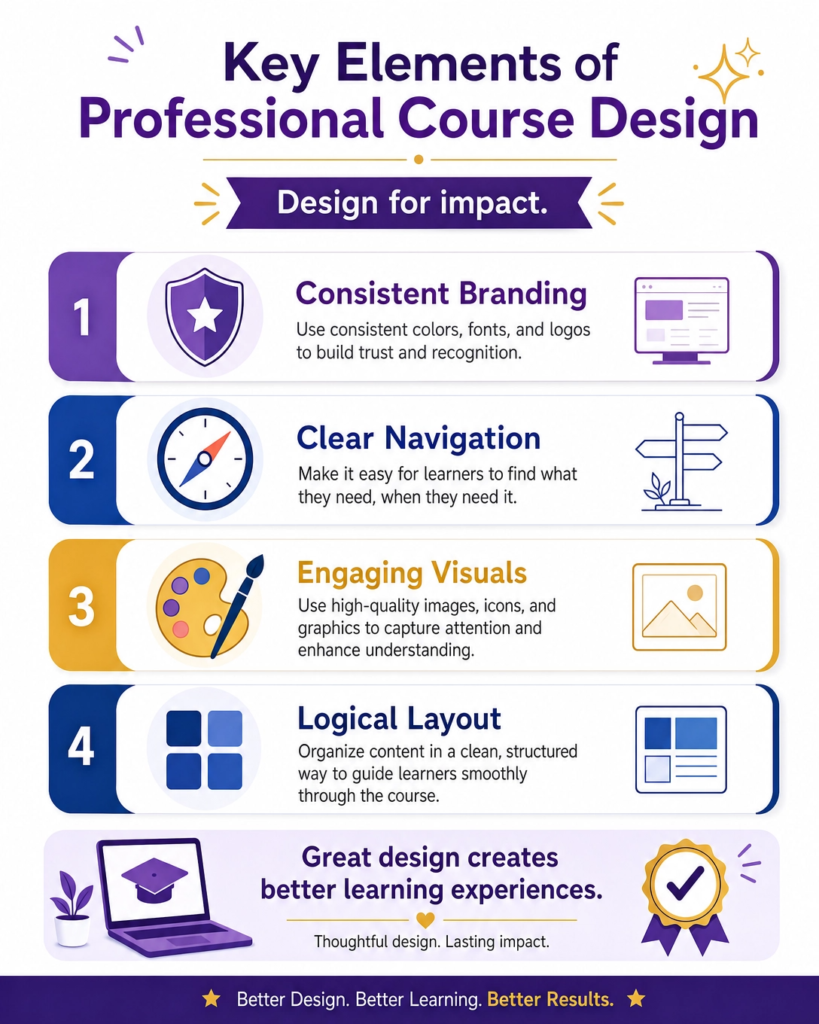
They understand how to arrange information clearly. They use colors, fonts, and layouts that are easy on the eyes.
They create visuals that help explain complex ideas. They make sure your course matches your brand. This means your course will look polished and trustworthy. It will feel like a high-quality product from start to finish.
Think about your favorite websites or apps. They are usually well-designed. They are easy to use. They guide you smoothly through the content.
Your online course should be the same. Professional designers make sure your course is not just informative, but also a joy to experience. They organize modules and lessons logically.
They create engaging slides and worksheets. They ensure videos are well-produced and visually appealing. This attention to detail keeps students motivated to learn.
A professionally designed course also builds trust with your audience. It shows that you care about quality.
It tells them that you are serious about their learning experience. This can lead to more positive reviews. It can encourage more people to sign up for your course.
In the competitive world of online education, a strong visual presentation can set you apart. It helps you stand out from others.
By investing in expert design, you are investing in your course’s success and your brand’s reputation.
4. Improve Content Quality
The quality of your course content is key to its success. High-quality content keeps students engaged. It helps them learn effectively. It also builds your reputation as an expert.
But creating truly great content is hard. It requires deep knowledge of your topic. It also needs strong writing and teaching skills. Many business owners are experts in their field.
However, they might not be experts in instructional design or content creation.
This is where “Done For You Course Creation” services shine.
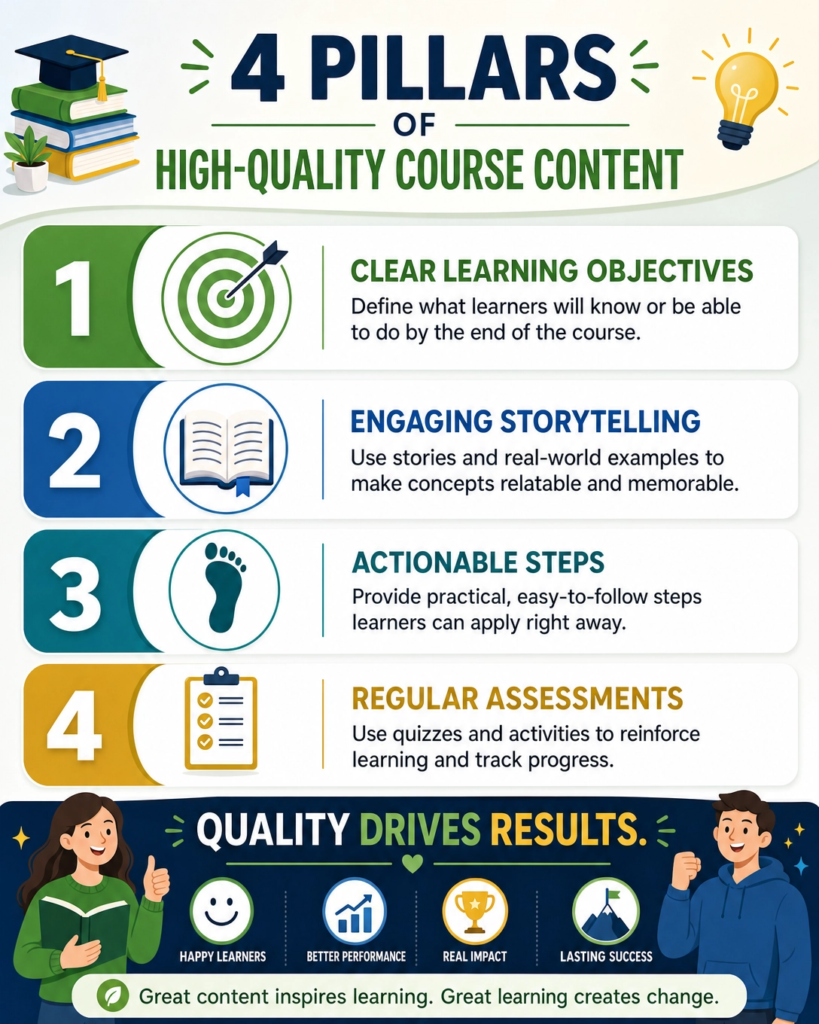
They bring in professionals who specialize in content development. These experts know how to structure lessons.
They understand how to present information clearly. They can take your raw knowledge and transform it into engaging learning materials. This includes writing clear scripts for videos.
It involves creating compelling text for modules. They also design interactive exercises and quizzes. The goal is to make your course not just informative, but also highly effective for learning.
Think about the difference between a good book and a great book. A great book is well-written, easy to follow, and keeps you hooked.
A great course is the same. It guides students step-by-step. It uses examples that make sense. It ensures that learners grasp new concepts easily.
Professional content creators focus on these details. They make sure every part of your course is top-notch. This means your students will have a better learning experience.
They will be more likely to finish the course. They will also be more likely to recommend it to others.
Improving content quality through done-for-you services also means your course will be more valuable. It will stand out in a crowded market.
Students are willing to pay more for courses that deliver real results.
By leveraging expert content creation, you ensure your course is a premium product. This boosts your credibility. It helps you attract more students.
Ultimately, it leads to greater success and impact for your business. You provide the expertise, and they provide the perfect way to share it.
5. Reduce Technical Stress
Creating an online course involves a lot of technical steps. You need to choose a platform. You have to set up payment systems.
You need to manage video hosting. You might even need to integrate different tools.
For many business owners, these technical tasks can be overwhelming.
They can cause a lot of stress. This stress can slow down your course launch. It can even stop it completely.
This is why reducing technical stress is a huge benefit of “Done For You Course Creation.”
When you use a done-for-you service, you don’t have to worry about the tech side. The experts handle it all.

They set up your course on the right platform. They make sure everything works smoothly.
This means you don’t need to learn complex software. You don’t have to troubleshoot technical issues.
You can focus on what you do best: sharing your knowledge. Imagine launching your course without a single technical headache. That’s the promise of done-for-you services.
Think about all the things that can go wrong. A video won’t upload. A payment gateway isn’t connecting.
Your website theme breaks. These problems can be frustrating. They can take hours or even days to fix. If you’re not a tech expert, it can feel impossible.
Done-for-you services have teams of technical specialists. They know how to prevent these issues.
If a problem does come up, they fix it quickly. This saves you time and keeps your project on track. It also gives you peace of mind.
Reducing technical stress also means you can launch a more professional course.
Experts ensure your course platform is secure. They make sure it’s easy for students to use.
They handle all the behind-the-scenes work. This results in a seamless experience for your learners.
A smooth technical setup reflects well on your brand. It shows you are organized and reliable.
By letting professionals handle the tech, you ensure your course is built on a strong, stable foundation.
This allows you to create a high-quality learning experience without the technical burden.
6. Create Better Student Experience
The ultimate goal of any online course is to provide a great learning experience for students.
A good student experience means learners stay engaged. They understand the material.
They achieve their learning goals. When students have a positive experience, they are more likely to complete the course.
They are also more likely to recommend it to others. This is why focusing on creating a better student experience is so important for your course’s success.
“Done For You Course Creation” services are designed with the student in mind. They bring in instructional designers.
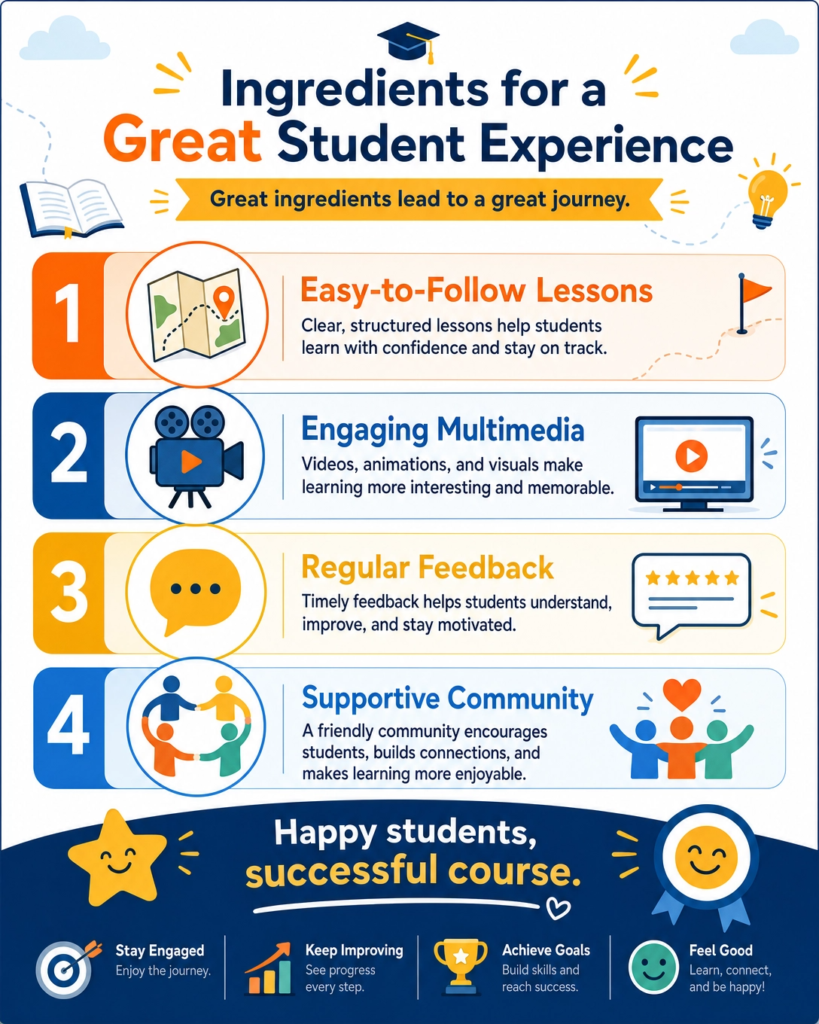
These experts know how people learn best. They structure your course content in a way that is easy to follow.
They use different teaching methods to keep things interesting. This might include videos, quizzes, interactive exercises, and downloadable resources.
They make sure the course flows logically from one topic to the next. This prevents students from feeling overwhelmed or lost.
Think about a time you tried to learn something new. Was it easy to understand? Did it keep your attention? Or did you quickly get bored or confused?
A well-designed course anticipates these challenges. It provides clear explanations. It offers support when needed. It makes learning enjoyable.
Done-for-you services ensure your course is built with these principles.
They create a learning environment that is supportive and effective. This leads to higher completion rates and happier students.
Beyond just the content, a better student experience also includes the technical side.
Experts ensure the course platform is user-friendly. It should be easy to navigate.
Students should be able to access materials without technical glitches. This seamless experience allows students to focus on learning, not on troubleshooting.
When you invest in done-for-you course creation, you are investing in your students’ success.
You are giving them the best possible tools and environment to learn. This not only benefits your students but also strengthens your brand and reputation as a provider of high-quality education.
7. Increase Sales Potential
The main goal for many businesses is to make more sales. Your online course is a product.
Like any product, its success depends on how well it sells. “Done For You Course Creation” can greatly increase your sales potential. It does this in several ways.

First, a professionally created course looks better. It feels more valuable. This makes people more willing to buy it. They see the quality and trust your brand more.
When your course is well-designed and high-quality, you can charge more for it. People are happy to pay for something that delivers real value.
A course that looks good and teaches well is seen as a premium product. This means more revenue for your business.
Also, a professional course attracts more students. Word-of-mouth marketing is powerful.
Happy students tell their friends. They share their positive experiences. This organic growth can lead to a steady stream of new customers without extra effort from you.
Think about how you decide to buy something. You look at its presentation. You read reviews. You want to know it’s worth your money.
A done-for-you course checks all these boxes. It comes with a polished look. It has engaging content. It offers a great student experience.
All these factors build confidence in potential buyers. They make the decision to purchase much easier. This directly translates into higher conversion rates for your course.
Furthermore, with a high-quality course, you can explore new marketing strategies. You can partner with affiliates.
You can offer it as a premium upsell. You can even use it to attract high-value clients to your other services. The possibilities expand when you have a top-tier product.
By investing in done-for-you course creation, you are not just building a course. You are building a powerful sales tool.
You are setting yourself up for increased income and long-term business growth. It’s about turning your knowledge into a profitable asset.
8. Get Marketing Support
Launching a great online course is only half the battle. You also need to tell people about it. This is where marketing comes in.
Many course creators struggle with marketing. They might have amazing content, but if no one knows about it, it won’t sell.
Marketing takes time, effort, and specific skills. It involves creating ads, writing emails, and using social media. For busy business owners, this can be another big challenge.
“Done For You Course Creation” services often include marketing support. This means you get help promoting your course.
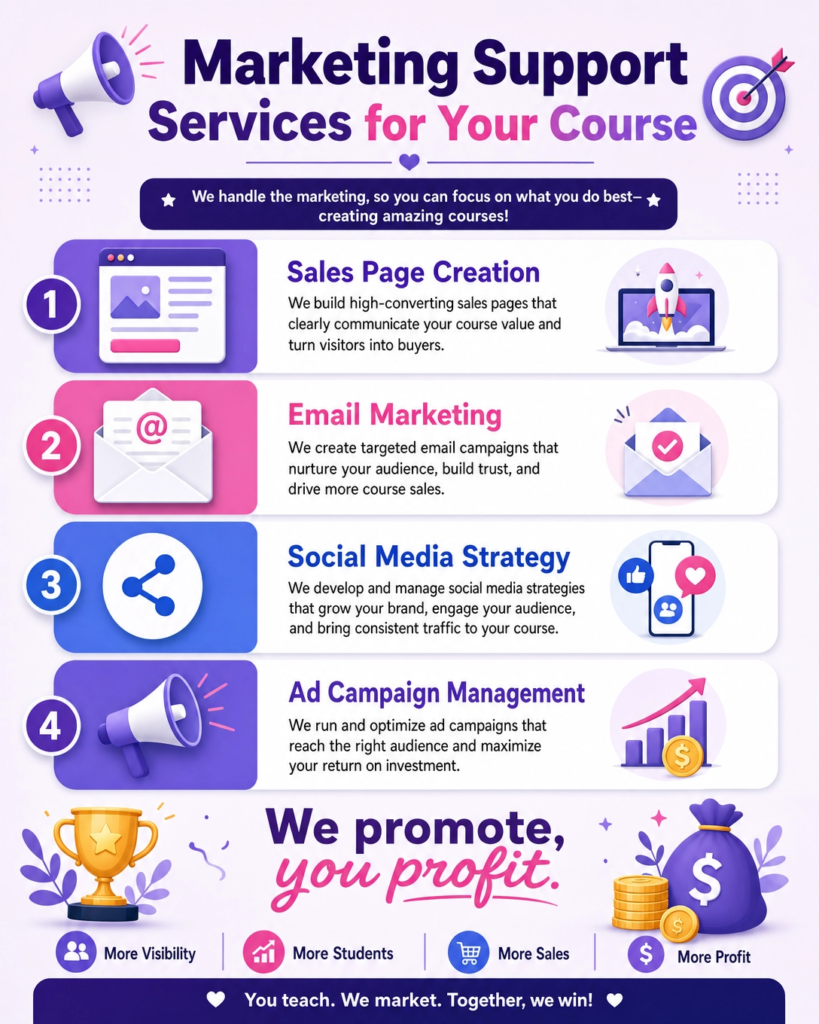
Experts can create compelling sales pages. They can write engaging email sequences.
They can even help you plan your social media campaigns. This support is invaluable. It ensures your course gets seen by the right people.
It helps you attract potential students who are genuinely interested in what you offer.
Think about how much time it takes to learn marketing. You need to understand different platforms.
You have to learn about copywriting. You need to track your results. This can be a full-time job on its own.
With marketing support, you don’t have to become a marketing guru overnight. You can rely on professionals who already know what works.
They have experience launching courses successfully. They can apply proven strategies to your course.
Getting marketing support also means your course launch will be more effective.
Professionals know how to craft messages that resonate. They can identify the best channels to reach your audience.
They can help you create a buzz around your course. This leads to more enrollments and higher sales.
It also frees you up to focus on other parts of your business. You can spend your time creating more content or serving your existing clients.
By leveraging expert marketing support, you ensure your course doesn’t just sit there. It gets out into the world.
It reaches the people who need it most. This maximizes your course’s impact and your business’s profitability.
9. Build Your Brand Authority
Building a strong brand is very important for any business. It helps people know who you are and what you stand for.
When you have a strong brand, people trust you more. They see you as an expert in your field.
This is called brand authority. “Done For You Course Creation” can help you build this authority faster and more effectively.
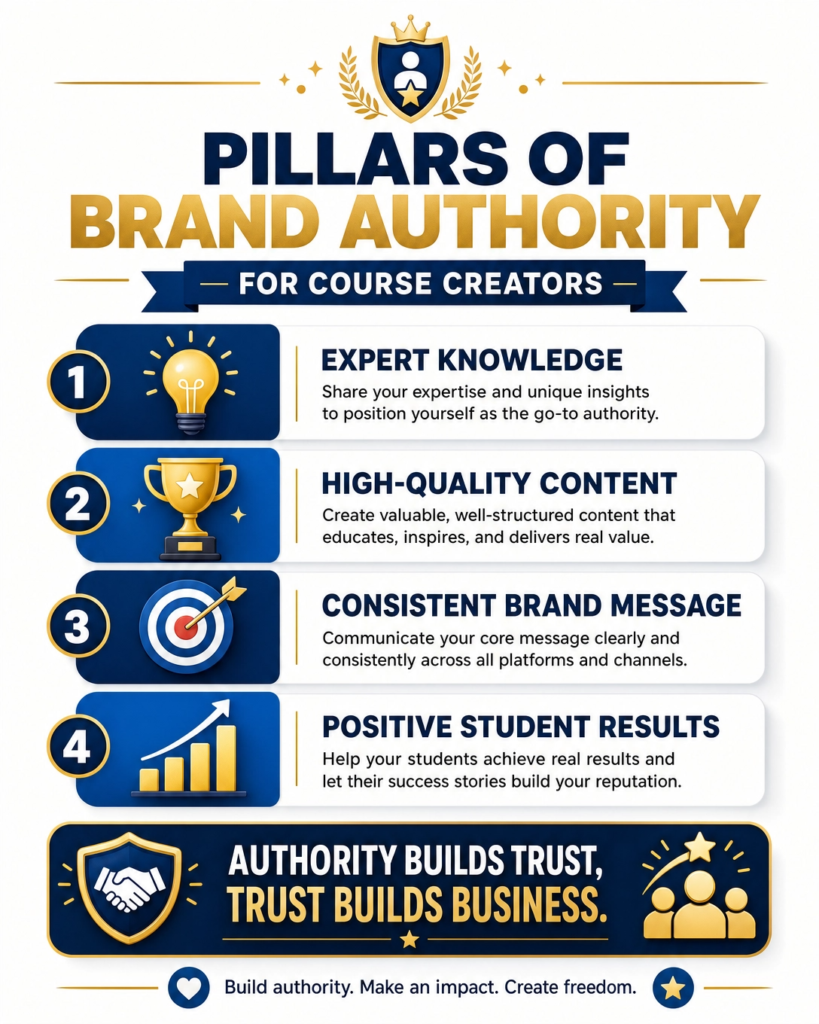
When you offer a high-quality online course, it shows you are knowledgeable. It proves you are an expert.
A professionally made course reflects well on your brand. It tells your audience that you are serious about education.
It shows you care about providing value. This builds your reputation. People will start to see you as a leader in your industry. This makes your brand stronger and more respected.
Think about famous brands you trust. They didn’t become famous overnight. They consistently delivered quality.
They built a strong image. Your online course is a key part of your brand. If it’s excellent, your brand looks excellent.
If it’s messy or unprofessional, your brand suffers. Done-for-you services ensure your course is top-notch.
They make sure it aligns with your brand message. This consistency helps to solidify your authority in the market.
Having a well-regarded course also opens new doors. You might get invited to speak at events.
You could be asked to write for other publications. These opportunities further boost your authority. They help you reach new audiences.
They reinforce your position as an expert. This creates a positive cycle.
A great course builds authority. Authority leads to more opportunities. More opportunities lead to more growth.
By investing in done-for-you course creation, you are investing in your brand’s future.
You are setting yourself up as a trusted voice in your niche. This is a powerful way to grow your business and impact.
10. Scale Your Business More Easily
Scaling a business means growing it bigger and reaching more people. It means making more money without having to work twice as hard.
Many business owners dream of scaling, but it can be very difficult. It often requires more time, more staff, and more resources.
This is where “Done For You Course Creation” can make a huge difference. It helps you grow your business in a smart, easy way.
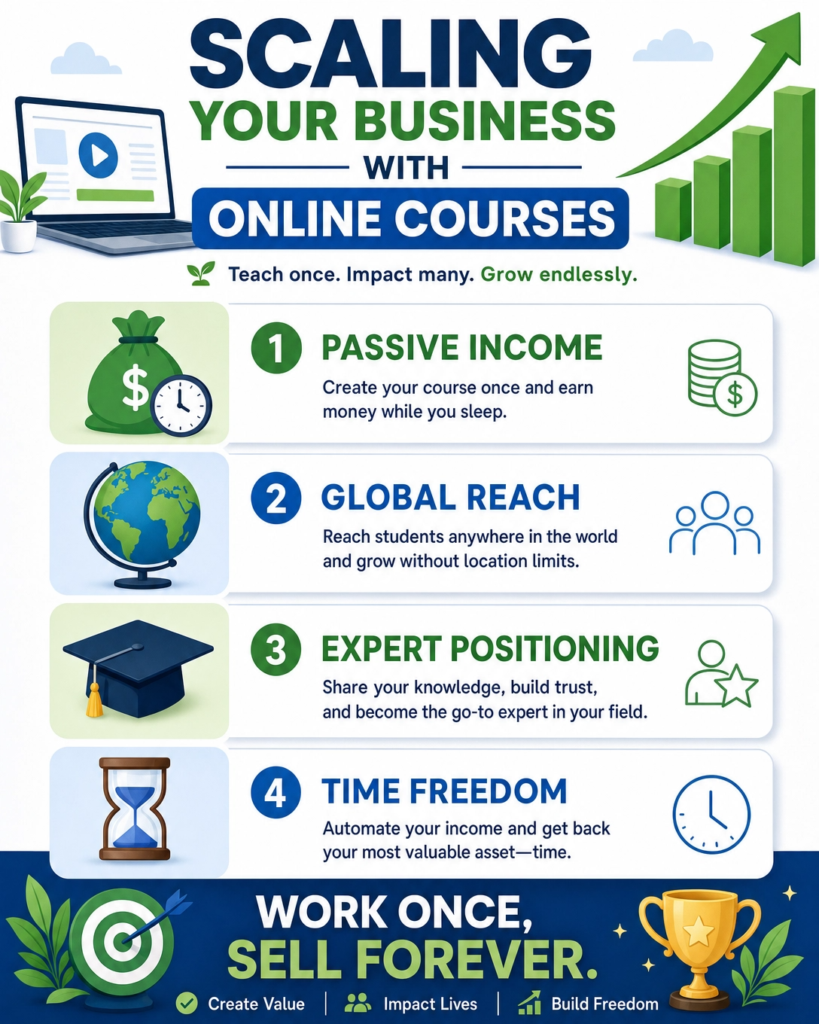
When you have a professionally created online course, it becomes an asset.
You can sell it to many students without needing to teach each one individually. This is a key part of scaling.
Instead of trading your time for money, you create a product that can generate income around the clock.
Done-for-you services ensure this product is high-quality and ready to sell. They handle the complex parts of course development, so you don’t have to.
Imagine trying to create a new course from scratch every time you want to expand. It would be exhausting!
With done-for-you services, you can quickly add new courses or update existing ones. This allows you to respond to market needs faster.
You can offer a wider range of topics. You can reach different audiences. This flexibility is crucial for easy scaling.
It means you can grow your business without getting bogged down in endless creation tasks.
Scaling also means reaching a global audience. Online courses have no geographical limits.
A well-designed course can be sold to anyone, anywhere. Done-for-you services help you create courses that are ready for this global market.
They ensure your content is clear, engaging, and accessible. This makes it easier to attract students from all over the world.
By leveraging done-for-you course creation, you are building a business that can grow far beyond your current reach.
You are setting yourself up for easier, faster, and more sustainable growth. This is how you truly scale your impact and your income.
Conclusion
We’ve explored ten powerful ways “Done For You Course Creation” can transform your business.
From saving precious time and launching faster to improving content quality and reducing technical stress, the benefits are clear.
You can create a better student experience, increase your sales potential, get expert marketing support, build stronger brand authority, and scale your business more easily.
This approach frees you from the complexities of course development. It allows you to focus on what you do best: serving your audience and growing your impact.
In today’s fast-paced world, time is your most valuable asset. Trying to do everything yourself can lead to burnout and missed opportunities.
By partnering with experts for your course creation, you leverage their skills and experience.
This ensures your online courses are professional, engaging, and effective. It’s about working smarter, not harder, to achieve your business goals and make a lasting impact.