How to Set Up Your First Website with Hostinger Web Hosting is one of the most searched topics for beginners looking to start their online journey. According to Internet Live Stats, as of 2025, there are over 1.1 billion websites globally, with new ones being created every second. The demand for web hosting services continues to skyrocket.
A report by Global Market Insights projects the global web hosting market to surpass $150 billion by 2030 (Global Market Insights, 2025). This massive growth is fueled by businesses of all sizes realizing the importance of having a strong online presence.
Among the many web hosting providers available, Hostinger has gained enormous popularity. With over 29 million users in 178 countries, Hostinger has positioned itself as one of the most affordable and reliable hosting platforms worldwide (Hostinger, 2025). Its blend of competitive pricing, fast performance, and user-friendly interface makes it an excellent choice for first-time website owners.
In this comprehensive guide, we’ll walk you through every step to launch your first website using Hostinger. From choosing the right hosting plan to publishing your site live on the internet, you’ll find everything you need to confidently build and manage your online presence.
Step 1: Choose the Right Hostinger Web Hosting Plan
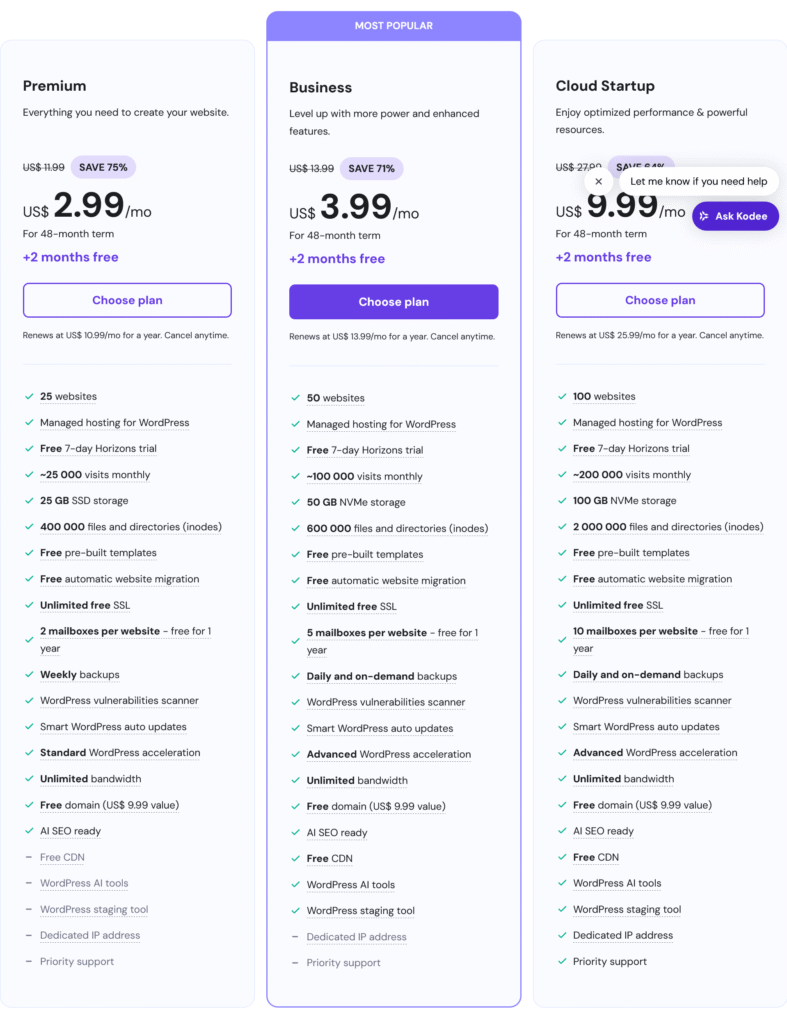
The journey begins with choosing your hosting plan. Hostinger offers multiple options, but for beginners, the Single Web Hosting or Premium Web Hosting plans are perfect. They’re budget-friendly and include everything you need: a free SSL certificate, fast SSD storage, and 24/7 support.
If you want to host more than one website or get a free domain name for the first year, go with the Premium plan. If you’re just testing the waters with one site, the Single plan will do the job.
Unlike many hosts that overload their dashboards with upsells, Hostinger makes this choice easy. Everything is laid out clearly, so you know exactly what you’re getting.
Step 2: Register or Connect a Domain Name
Once you’ve picked a plan, you’ll be prompted to choose a domain name. If you went with Premium or Business Hosting, you get a free domain for the first year. If not, you can still buy one at a low price through Hostinger or connect a domain you already own.
Your domain is your digital address—your “www.yoursite.com” identity. Choose one that’s short, memorable, and relevant to your content or business. Avoid numbers and dashes if possible, and go with a .com if you’re targeting a global audience.
Hostinger’s domain setup process is integrated and seamless, removing the need for complex DNS setups. They also include free WHOIS privacy protection, which hides your personal info from public domain databases.
Step 3: Access the Hostinger hPanel

After domain registration, you’ll be guided to Hostinger’s control panel—called hPanel. Unlike the traditional cPanel found in most hosts, hPanel is modern, user-friendly, and built with beginners in mind.
Everything is clearly labeled: email, SSL, databases, file manager, backups, and integrations. You don’t need to be a developer to navigate. Even if you’ve never built a website before, you’ll find this dashboard refreshingly simple.
This is where you’ll manage your site’s settings, install software, and make important updates as your website grows.
Step 4: Install WordPress with One Click
For most users, WordPress is the best platform to build your site. It powers over 43% of all websites globally (W3Techs, 2024) and gives you access to thousands of themes, plugins, and tools.
With Hostinger, you can install WordPress in literally one click. From your hPanel dashboard, just select “Auto Installer”, choose WordPress, enter your site details (like title and login info), and hit “Install”. That’s it.
In under a minute, WordPress will be installed on your domain, ready to customize. You won’t need to download anything or set up a database manually—Hostinger automates all of that behind the scenes.
Step 5: Secure Your Website with Free SSL
Security matters from day one. Google flags sites without SSL as “Not Secure”, which can scare away visitors and hurt your search rankings. Fortunately, Hostinger includes free SSL certificates on all hosting plans.
In your dashboard, you’ll find the “SSL” section. Activate it with a click, and your site will be secured with HTTPS. No coding. No configuration. Hostinger handles the technical side.
This not only keeps your visitors’ data safe but also boosts trust and professionalism from the first impression.
Step 6: Pick and Install a WordPress Theme
Your website’s design starts with a theme. WordPress offers thousands of free and premium themes to choose from. Whether you’re building a blog, portfolio, business site, or online store—there’s a theme for you.
To get started, go to your WordPress dashboard, navigate to Appearance > Themes > Add New, and browse by category or keyword. When you find one you like, click “Install” and then “Activate”.
Don’t worry if it doesn’t look perfect at first. Most themes allow customization through drag-and-drop builders like Elementor, which is also free and works beautifully with Hostinger-hosted sites.
Step 7: Customize Your Site’s Design and Content
Now the fun begins—making your website look and feel like your own.
Using the WordPress Customizer or a page builder like Elementor, you can easily change fonts, colors, layouts, and images. Upload your logo. Write your homepage message. Create your About page. Add a contact form or testimonials.
Hostinger’s speed and server optimization ensure that your changes load quickly and preview smoothly. You can experiment without lag or errors.
If you’re not sure what to include, start small. Focus on clarity, ease of navigation, and a simple structure that helps users find what they’re looking for.
Step 8: Install Essential Plugins for Functionality
Plugins are like apps for your website—they add extra functionality with a few clicks. Hostinger’s WordPress integration supports all major plugins, and you can install them directly from the WordPress dashboard.
Some must-haves include:
- Rank Math for optimizing your content for Google.
- WPForms to add contact forms.
- UpdraftPlus to set up automatic backups.
- LiteSpeed Cache, which works especially well on Hostinger, to boost performance.
- Wordfence for added security.
Hostinger doesn’t limit plugin usage like some managed hosts do, which gives you full flexibility to build the site you need.
Step 9: Optimize Your Website for Speed and SEO
Fast-loading sites don’t just rank better—they convert better. And Hostinger is already optimized with LiteSpeed servers, GZIP compression, and HTTP/3 to deliver excellent speed from the start.
Still, it helps to fine-tune a few things:
- Compress images using free plugins like Smush or ShortPixel.
- Enable caching with LiteSpeed Cache.
- Limit unnecessary plugins that slow down your site.
- Use an SEO plugin to write better meta titles and descriptions.
Hostinger also includes Cloudflare CDN integration for added global speed and security. You can activate it easily in the hPanel with a few clicks.
These small tweaks can significantly improve load time and help you rank higher in Google.
Step 10: Publish and Promote Your Website
Your site is designed, secured, optimized—and now it’s ready to go live.
From your WordPress dashboard, hit Publish on your homepage and blog. Test your site from a mobile phone and desktop. Check for broken links, and make sure your menus work correctly.
Now it’s time to tell the world.
- Share your site on social media.
- Set up Google Analytics and Google Search Console to track performance.
- Start a blog to bring in organic traffic.
- If you’re a business, consider running a Google Ad or Facebook campaign to reach new customers.
Because you used Hostinger, your site loads fast, looks professional, and is ready for traffic from day one. You’ve built a home on the internet—and it didn’t require coding, stress, or breaking the bank.
Final Thoughts: Hostinger Makes Website Building Simple
As you’ve seen, Hostinger web hosting made simple isn’t just a slogan. It’s a reality for beginners who want to build a fast, secure, and beautiful website without dealing with complex tech.
From affordable plans to one-click WordPress installs, SSL setup, performance tools, and outstanding customer support—Hostinger has created a platform where first-time site owners can thrive.
Following these 10 powerful steps, you’ve not only launched a website—you’ve created a foundation for your blog, business, portfolio, or online brand to grow.
Whether you’re building your first site or helping others get online, remember: it doesn’t have to be complicated. With the right tools and guidance, creating a website is easier—and more rewarding—than ever before.tunities. With your website live, you’re now part of the growing global online community that continues to shape the future of business, communication, and creativity.