How To Validate Digital Product Idea is something EVERY entrepreneur needs to know. Did you know that 90% of startups fail?
According to CB Insights, 35% of these failures happen because there’s no market need for their product. That’s a scary number!
Imagine spending months or even years building something nobody wants. The good news is that you can avoid this trap by learning how to validate your digital product idea BEFORE you build it.
This blog post will teach you simple steps to test your idea, find out if people actually want it, & save yourself from making expensive mistakes.
We’ll explore easy ways to talk to customers, test your concept, & make sure you’re building something people will actually buy.
Product validation is like testing the water before you jump into a swimming pool.
You wouldn’t jump into freezing cold water without checking first, right? The same goes for your digital product idea.
Smart entrepreneurs always validate their ideas first. This process helps you understand if real people have the problem you’re trying to solve & if they’re willing to pay for your solution.
Throughout this article, you’ll discover practical methods that successful companies use to validate their ideas.
Step 1: Clearly Define Your Digital Product Idea
Before you can validate any idea, you must first understand it completely. This means getting crystal clear on what your digital product is, who it’s for, and what problem it solves.
Think of this as laying the foundation for your entire project. A vague idea is hard to test and even harder to sell. A well-defined idea, however, gives you a solid starting point.
Start by asking yourself some fundamental questions.
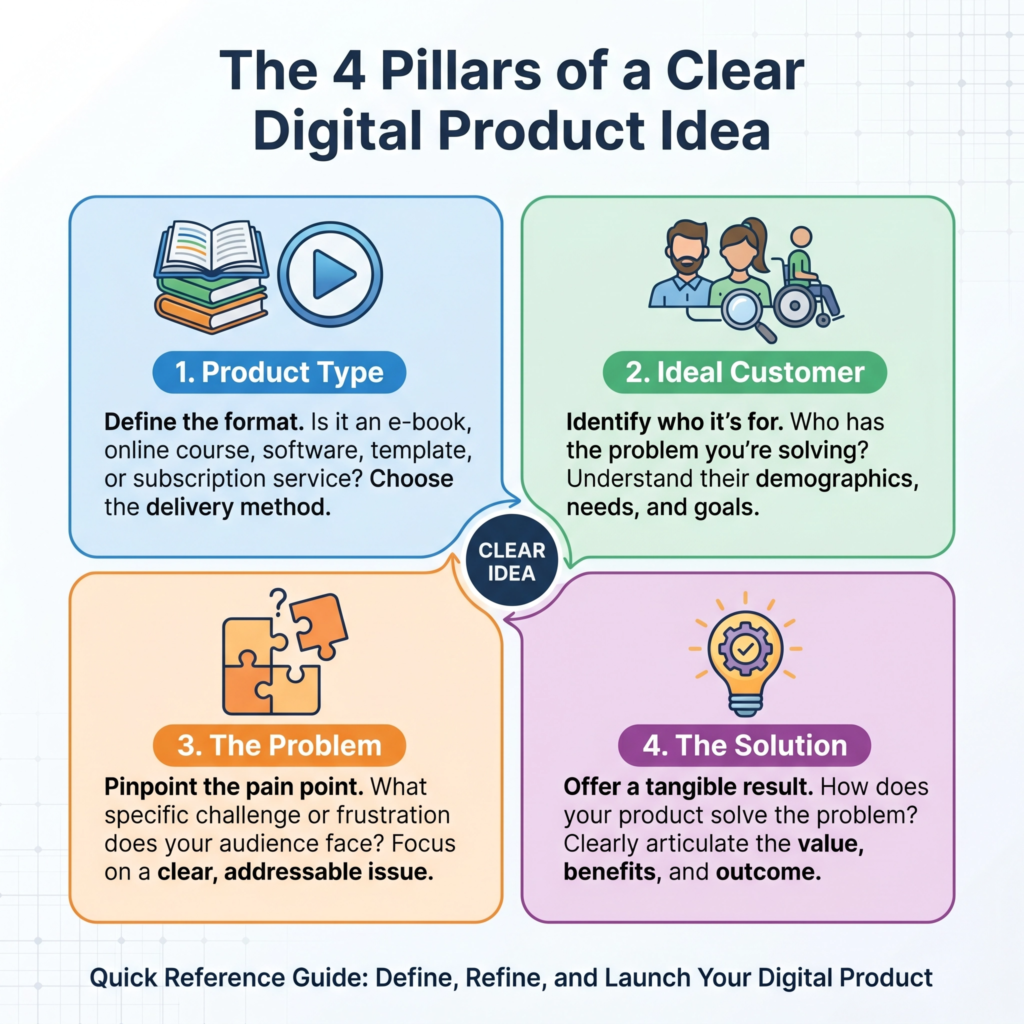
What exactly is your digital product?
Is it an e-book, an online course, a software tool, a template, or something else entirely?
Be specific. For example, instead of “a fitness guide”, think “a 30-day beginner’s yoga e-book for busy professionals”.
Who is your ideal customer? Try to paint a clear picture of this person.
What are their demographics, interests, and most importantly, their pain points?
What challenges do they face that your product can help solve?
Understanding your audience deeply is crucial.
It helps you tailor your product and your marketing message directly to their needs. This isn’t just about selling; it’s about serving.
For instance, if your product is the yoga e-book, your ideal customer might be a 30-45 year old professional who feels stressed and lacks time for traditional gym workouts.
What specific problem does your digital product solve? Every successful product addresses a need or fills a gap. If your product doesn’t solve a problem, it likely won’t attract buyers.
Be precise about the solution your product offers. How does it make your customer’s life easier, better, or more efficient? This is your unique selling proposition. It’s what makes your product valuable.
For our yoga e-book, the problem it solves is helping busy professionals reduce stress and improve flexibility without needing to leave their home or commit to rigid class schedules.
Finally, consider the core features and benefits of your product. What are the main components? What will the user gain from using it?
Distinguish between features (what it is) and benefits (what it does for the user). People buy benefits, not just features.
For example, a feature might be ’20 guided yoga sequences,’ but the benefit is ‘reduced stress and increased energy.’
Write down these details. This clear definition will be your compass as you move through the validation process.
This foundational step ensures you have a clear vision before investing time and resources into development.
Step 2: Identify a Real Problem
After clearly defining your digital product idea, the next crucial step is to ensure it addresses a real problem for a specific audience.
Many aspiring entrepreneurs fall in love with their idea without verifying if anyone actually needs or wants it. This can lead to wasted time, effort, and resources.
Your digital product must solve a genuine pain point, fulfill an unmet need, or significantly improve an existing solution.
How do you identify a real problem?
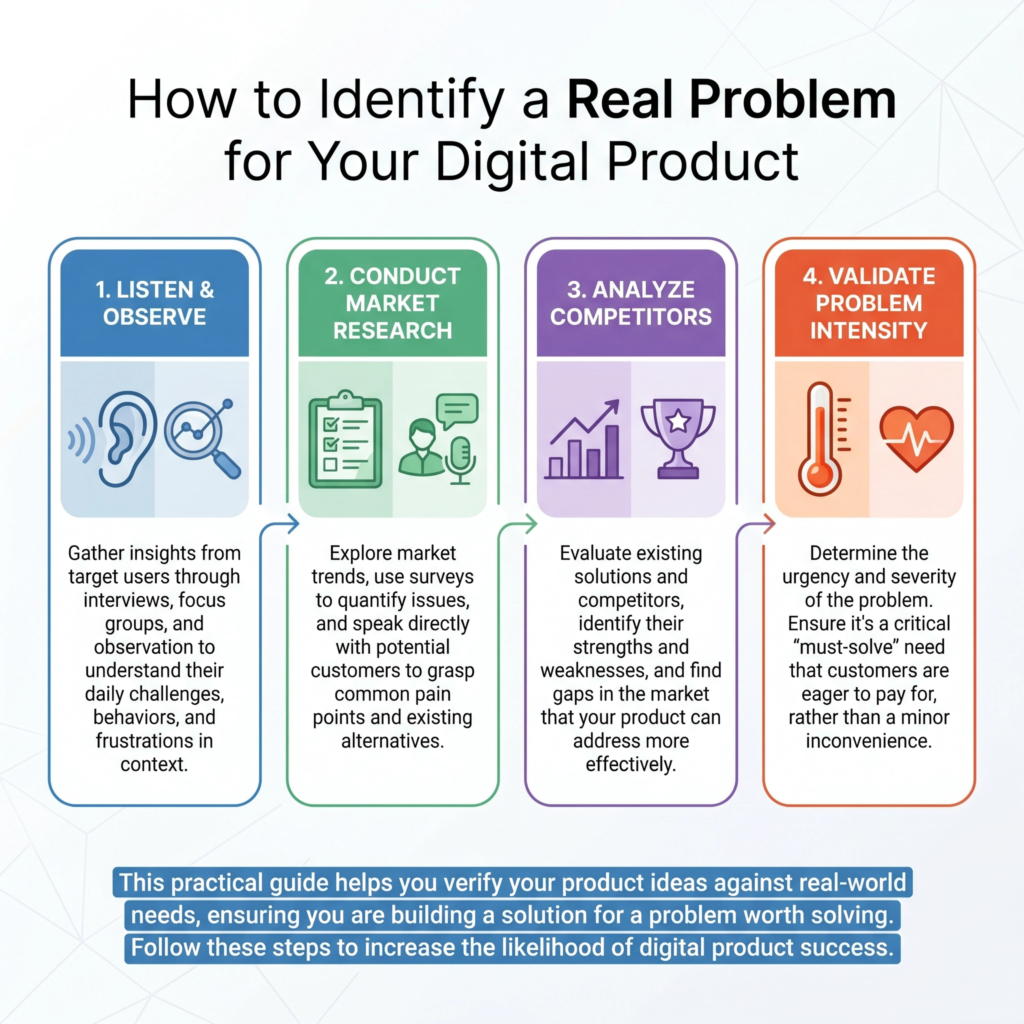
Start by listening. Pay attention to conversations in online communities, forums, and social media groups related to your niche.
What questions are people asking repeatedly? What frustrations do they express? Look for patterns in complaints or challenges. These are often strong indicators of problems that need solving.
Conduct market research. This doesn’t have to be complicated. Simple surveys, interviews, or even casual conversations with potential customers can provide invaluable insights.
Ask open-ended questions about their daily struggles, their goals, and how they currently try to solve problems related to your product idea.
For example, if you’re creating a productivity app, ask people about their biggest time-management challenges or what they dislike about existing tools.
Analyze your competitors. What are other digital products in your space doing well? Where are they falling short?
Identifying gaps in their offerings or common complaints from their users can reveal opportunities for your product to shine. Don’t just copy; innovate and improve.
Your goal is to find a unique angle or a better way to solve an existing problem.
Finally, validate the intensity of the problem. Is it a minor inconvenience or a significant headache? People are more willing to pay for solutions to urgent and impactful problems.
If your product solves a “nice-to-have” problem, it might struggle to gain traction. Focus on addressing a “must-have” need.
This deep understanding of the problem will be the bedrock of your product’s success and will guide your entire validation process.
Step 3: Research Your Market
Once you have a clear idea of the problem your digital product solves, the next crucial step is to research your market.
This means understanding who your potential customers are, what they need, and what solutions already exist.
Think of it like being a detective, gathering clues to build a complete picture.
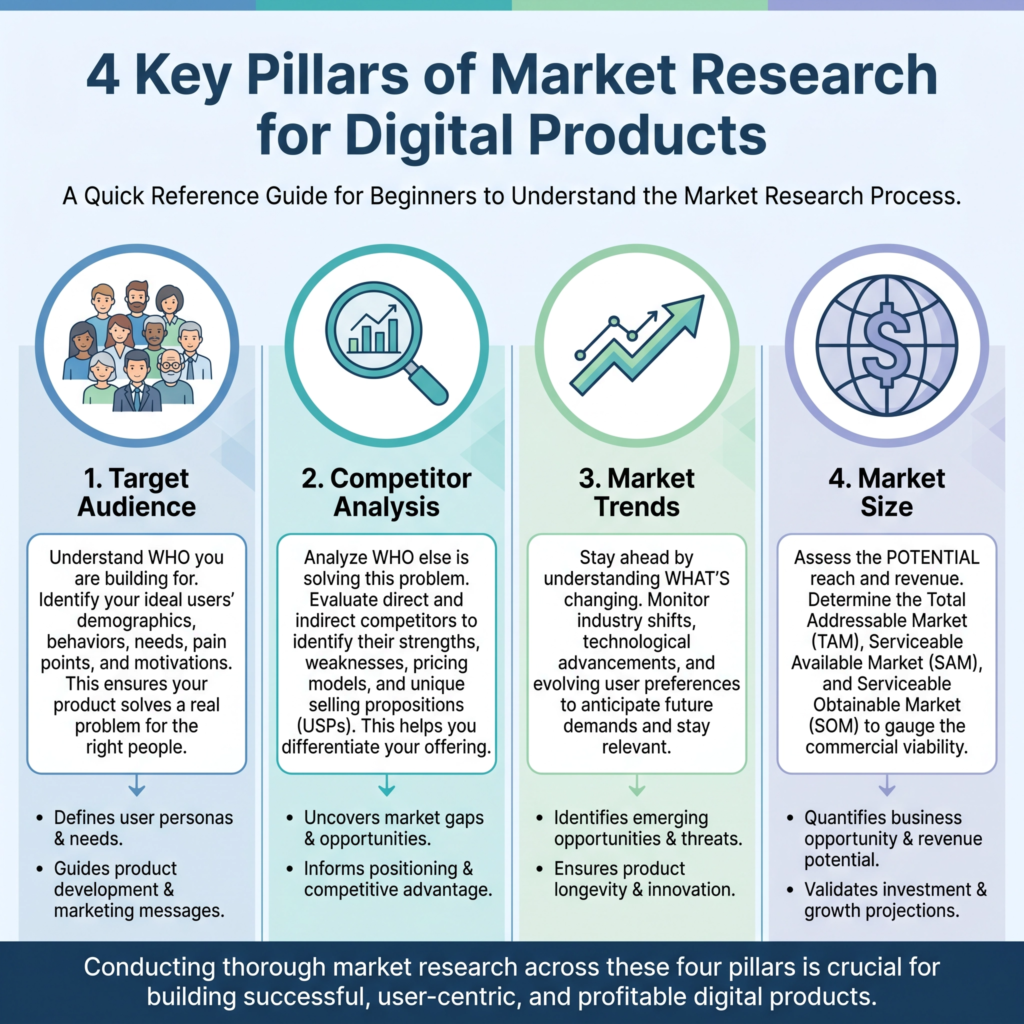
First, identify your target audience. Who will benefit most from your product? Consider their demographics, like age, location, and income.
Also, think about their psychographics, such as their interests, values, and lifestyle.
For example, if you’re creating a digital planner for students, your target audience might be college students aged 18-24 who are looking for better organization tools.
Next, dive into competitor analysis. This isn’t about copying others, but learning from them.
What digital products are already out there that try to solve a similar problem? Look at their strengths and weaknesses.
Read customer reviews to see what people love and what they complain about. This will help you find gaps in the market that your product can fill.
Maybe existing solutions are too expensive, too complicated, or lack a specific feature that your target audience desperately needs.
Then, explore market trends. Is the demand for your type of digital product growing or shrinking? Are there new technologies or platforms that could impact your product?
For instance, if you’re developing an AI-powered writing tool, you’d want to keep up with the latest advancements in AI.
Tools like Google Trends can show you how popular certain search terms are over time, giving you insights into public interest.
Finally, consider the size of your market. Is it large enough to support your business?
A niche market can be great because it means less competition, but it also needs to be big enough to generate sufficient sales. Don’t be afraid to adjust your product idea slightly based on your market research.
The goal is to create something that people truly want and are willing to pay for. This research will give you confidence that you’re building a product with a real chance of success.
Step 4: Study Your Competitors
After you’ve researched your market, it’s time to take a closer look at your competitors. This step is not about copying what they do.
Instead, it’s about understanding their strengths, weaknesses, and how you can make your digital product stand out.
Think of it as learning from others so you can do even better.

First, identify your direct and indirect competitors. Direct competitors offer similar products that solve the same problem.
For example, if you’re creating a digital journal, other digital journal apps are direct competitors.
Indirect competitors solve the same problem but with a different type of product. A physical notebook could be an indirect competitor to your digital journal.
Once you have a list, analyze their products. Visit their websites, download their free trials, or even purchase their products if it makes sense.
Pay attention to their features, pricing, and user experience. What do they do well? What could be improved?
Read customer reviews on their product pages, app stores, or social media. These reviews are goldmines of information, revealing what customers love and what frustrates them.
Next, look at their marketing and sales strategies. How do they reach their customers? What kind of language do they use? Are they active on social media, run ads, or have a strong email list?
Understanding their approach can give you ideas for your own marketing, and also help you spot opportunities where they might be missing out.
Finally, find your unique selling proposition (USP). Based on your competitor analysis, what can your digital product offer that is different or better?
Maybe your product is easier to use, more affordable, has a unique feature, or targets a very specific niche that your competitors overlook.
Your USP is what will attract customers to your product instead of someone else’s. This detailed study of your competitors will help you position your product effectively and increase its chances of success.
Step 5: Ask Your Audience
After you’ve defined your idea, identified a problem, researched the market, and studied your competitors, the next critical step is to ask your audience directly.
This is where you get real feedback from the people who will actually use and pay for your digital product.
Their insights are invaluable and can save you a lot of time and effort down the road.
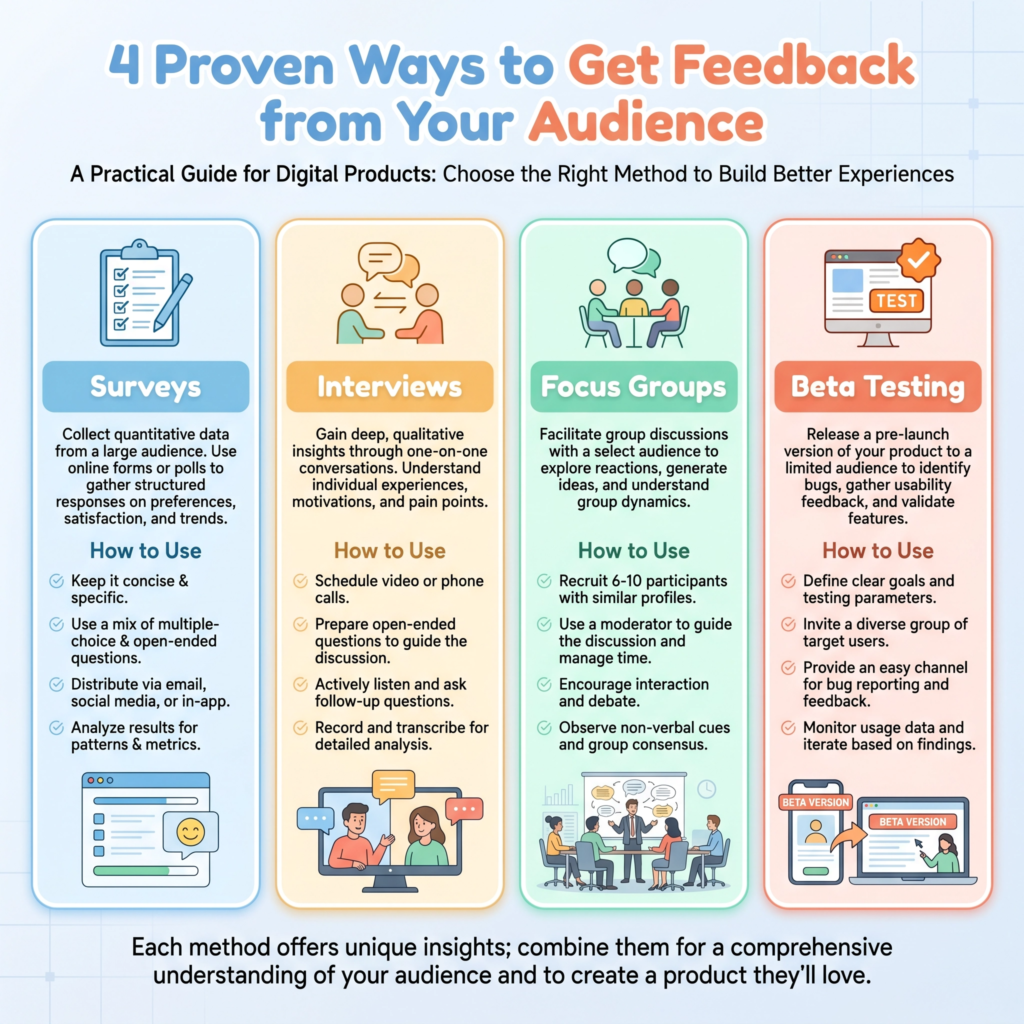
One of the best ways to do this is through surveys. Keep your surveys short, clear, and focused.
Ask questions about their pain points, what features they would find most useful, and what they currently use to solve their problems.
Tools like Google Forms or SurveyMonkey make it easy to create and distribute surveys. Share them on social media, in relevant online communities, or with your email list.
Another powerful method is interviews. Talking one-on-one with potential customers can provide deeper insights than surveys alone.
Ask open-ended questions that encourage them to share their experiences and feelings.
Listen carefully to their responses, paying attention to their tone and any frustrations they express. These conversations can uncover needs you hadn’t even considered.
Consider running focus groups if you want to gather feedback from a small group of people at once.
This allows for discussion and interaction among participants, which can spark new ideas and reveal different perspectives.
You can observe how they react to your product idea and what aspects resonate most with them.
Finally, don’t forget about beta testing or offering a small preview of your product. Even a simple mock-up or a landing page describing your product can help you gauge interest.
Ask people if they would sign up for a waiting list or pre-order your product. This shows a higher level of commitment than just answering a survey and is a strong indicator of demand.
Remember, the goal is not to get everyone to say yes. It’s about understanding if there’s a genuine need and desire for your product.
Use this feedback to refine your idea, make necessary adjustments, and build a digital product that truly solves a problem for your audience.
Step 6: Create a Simple Version (MVP)
After gathering feedback and refining your idea, the next step is to create a simple version of your digital product. This is often called a Minimum Viable Product, or MVP.
An MVP is the most basic form of your product that still delivers its core value. It has just enough features to satisfy early customers and provide feedback for future development.
The main goal of an MVP is to test your core assumptions quickly and with minimal resources.
Instead of spending months building a perfect product, you build something small that you can get into the hands of real users.
This allows you to learn what works and what doesn’t before investing too much time and money.
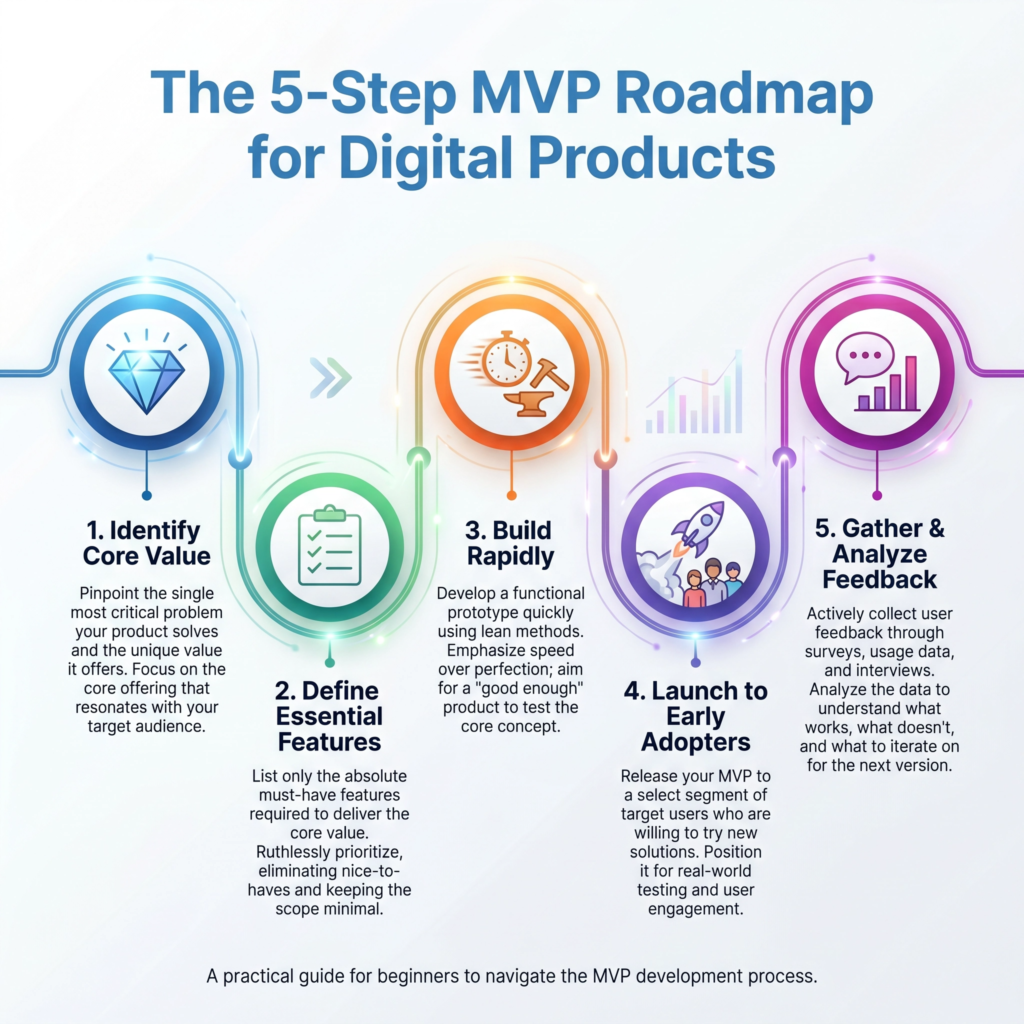
To create your MVP, first, identify the absolute essential features. What is the one main problem your product solves? What is the simplest way to solve it?
For example, if your digital product is a complex project management tool, your MVP might just be a simple task list with basic sharing capabilities. Don’t add extra bells and whistles at this stage.
Next, build it quickly and efficiently. You don’t need to be a coding expert to create an MVP for many digital products. For a digital planner, this could be a well-designed PDF.
For an online course, it might be a few core video lessons. Use tools that allow for rapid development, even if they are not the final solution you envision.
Once your MVP is ready, launch it to a small group of early adopters. These are the people who gave you feedback in the previous step.
Ask them to use your MVP and provide honest opinions. Pay close attention to how they interact with it. What do they like? What confuses them? What features do they wish it had?
Finally, collect and analyze their feedback. Use this information to decide what to do next.
Should you add more features? Change existing ones? Or perhaps even pivot your idea if the feedback suggests a different direction?
The MVP process is all about learning and adapting. It’s a cycle of build, measure, and learn that helps you create a digital product that truly meets market needs.
Step 7: Test With a Landing Page
After you’ve created a simple version of your digital product (MVP) or even before you build anything, a powerful way to validate your idea is to test with a landing page.
A landing page is a single webpage designed to capture interest and gather information from potential customers. It’s like a digital storefront for your product, even if the product isn’t fully built yet.
The main goal of a landing page test is to gauge real market interest and collect leads.
You’re not selling a product yet; you’re selling the idea of a product. This helps you understand if people are genuinely interested enough to provide their email address or even pre-order, which is a strong indicator of demand.
To create an effective landing page, focus on a few key elements.
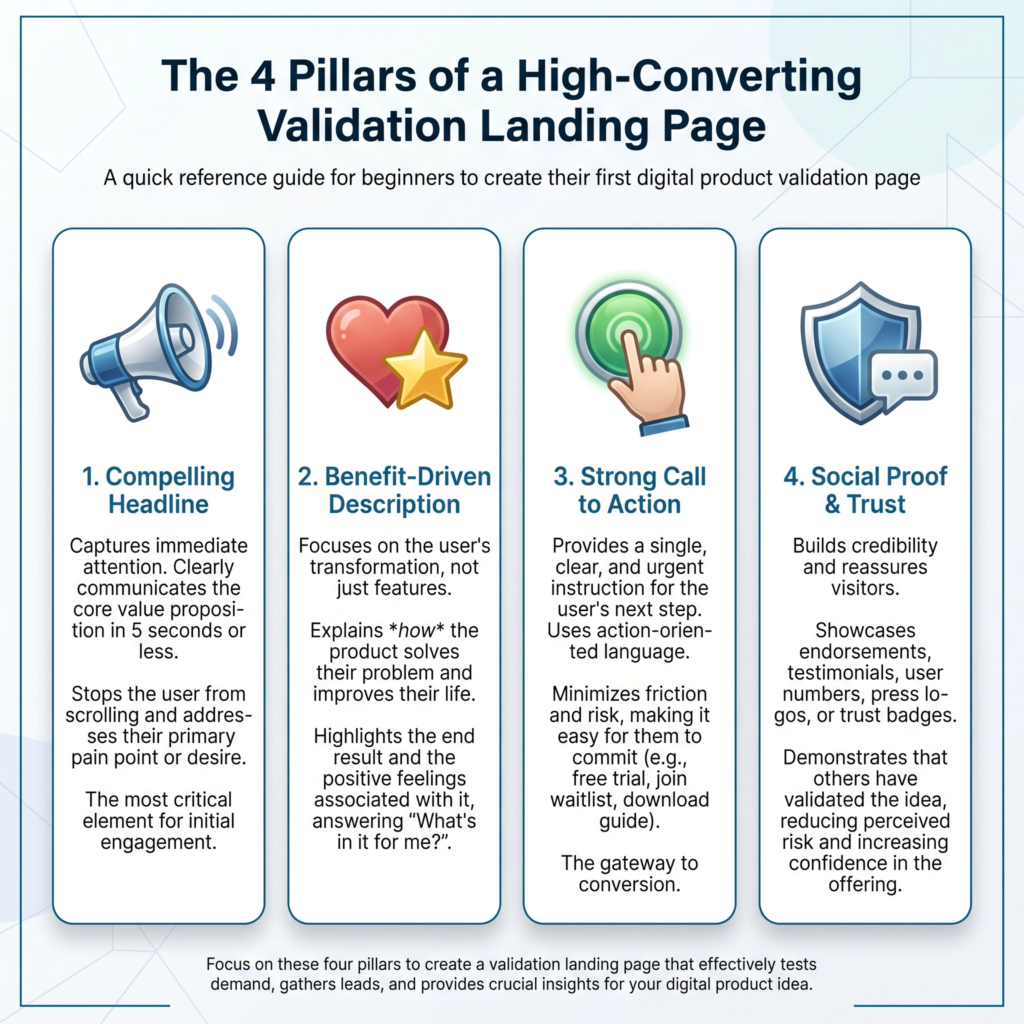
First, a clear and compelling headline that immediately tells visitors what your product is about and the problem it solves.
Second, a brief description of your product’s benefits, highlighting how it will make their lives better. Use simple, benefit-driven language.
Third, include a strong call to action (CTA). This could be a button that says “Sign Up for Early Access,” “Join the Waitlist,” or “Pre-Order Now.” The CTA should be prominent and easy to understand.
Fourth, consider adding social proof, like testimonials or logos of companies if you have them, to build trust.
Even a simple mock-up or a short video explaining your product can be very effective.
Once your landing page is ready, you need to drive traffic to it. You can use social media, run small ad campaigns (e.g., Facebook Ads, Google Ads), or share it with your existing network.
The key is to get enough visitors to see if your message resonates. Track how many people visit the page and, more importantly, how many convert by signing up or clicking your CTA.
Analyze the data you collect. If many people are signing up, it’s a good sign that your idea has potential.
If not, you might need to adjust your messaging, target audience, or even the product idea itself.
A landing page test is a low-cost, low-risk way to get concrete validation before you commit significant resources to full development.
Step 8: Pre-Sell Your Product
After testing your idea with a landing page and gathering initial interest, the ultimate validation comes from pre-selling your product.
This means asking people to pay for your digital product before it’s fully developed or even finished.
It’s the strongest signal that your idea has real market demand, because people are willing to put their money where their mouth is.
Pre-selling offers several key benefits.
First, it provides proof of concept. If people are willing to pay, you know you’re building something truly valuable.
Second, it can help fund your development. The money you collect from pre-sales can be used to cover costs, hire help, or invest in better tools.
Third, it creates a built-in audience of early supporters who are invested in your success and eager to provide feedback.
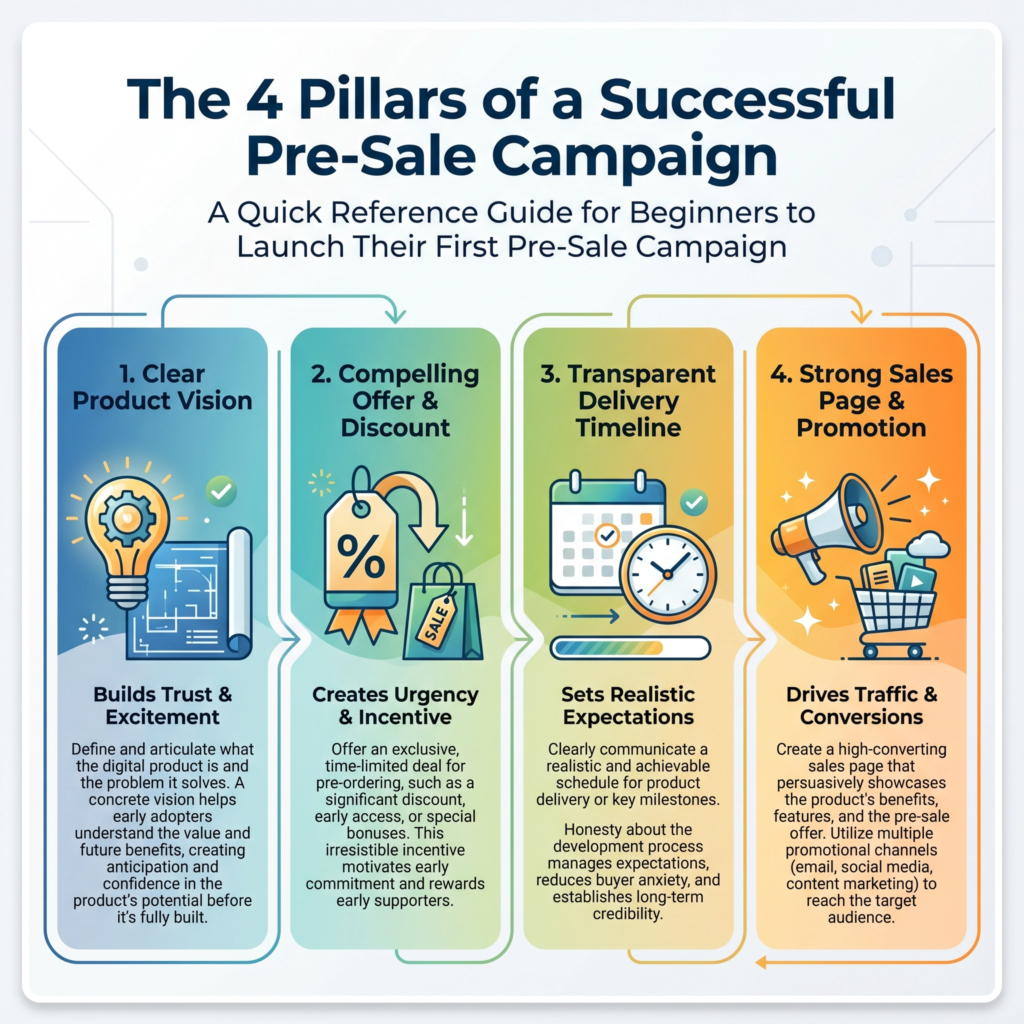
To effectively pre-sell, you need to clearly communicate what your product will be and when it will be delivered.
Be honest about the development stage. You can offer a discount for early birds to incentivize purchases.
For example, “Pre-order now and get 30% off the launch price!” This creates a sense of urgency and rewards your most enthusiastic customers.
Choose a platform that makes pre-selling easy. Many e-commerce platforms like Gumroad or Shopify allow you to set up pre-orders.
You can also use a dedicated pre-sale platform or even just a simple payment link if your product is straightforward.
Make sure your sales page clearly outlines the benefits, features, and what customers can expect.
Promote your pre-sale through the same channels you used for your landing page test: social media, email lists, and relevant online communities.
Engage with your audience, answer their questions, and build excitement.
Remember, the goal isn’t just to get sales, but to validate that people are willing to invest in your solution.
If you get a good number of pre-sales, it’s a strong indicator that you have a viable product idea. If sales are slow, it might be a sign to re-evaluate your offer, pricing, or messaging.
Pre-selling is a powerful validation tool that turns interest into commitment, giving you the confidence to move forward with full development.
Step 9: Analyze Feedback
After you’ve collected feedback from surveys, interviews, focus groups, or even pre-sales, the next crucial step is to analyze that feedback.
This isn’t just about reading comments; it’s about finding patterns, understanding what your audience truly needs, and using that information to improve your digital product idea.
Think of yourself as a data scientist, sifting through information to uncover valuable insights.
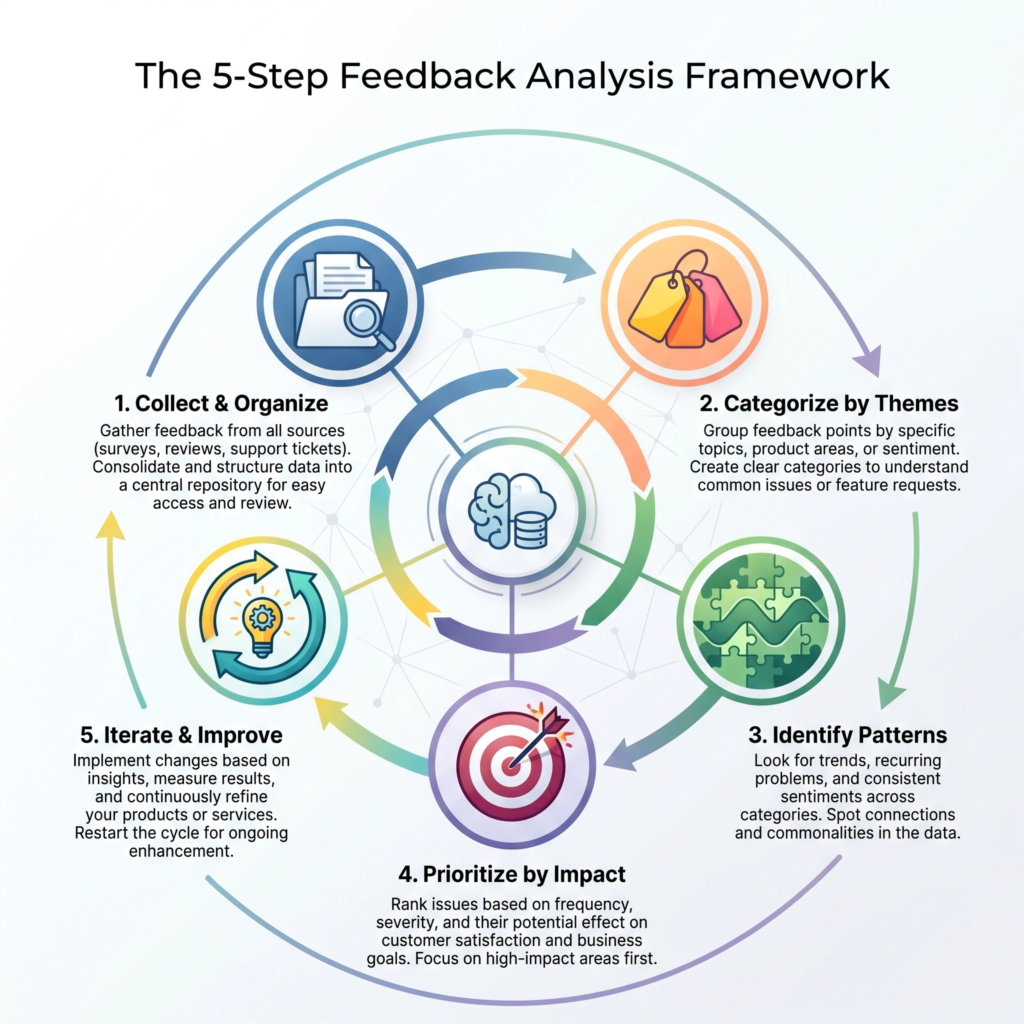
First, organize your feedback. If you used surveys, the data might already be structured. For interviews and focus groups, you’ll need to transcribe notes or recordings.
Categorize the feedback into themes.
For example, you might have categories like “feature requests,” “usability issues,” “pricing concerns,” or “positive comments.” This makes it easier to see common trends.
Next, look for patterns and recurring themes.
Are multiple people asking for the same feature?
Are several users experiencing the same difficulty?
These recurring points are strong indicators of what’s important to your audience.
Don’t get sidetracked by one-off comments; focus on the feedback that comes up repeatedly.
Then, prioritize the feedback. Not all feedback is equally important. Some issues might be critical for your product’s success, while others are minor improvements.
Consider the impact of addressing each piece of feedback versus the effort it would take.
Which changes will provide the most value to your users? Which ones align with your product’s core vision?
It’s also important to distinguish between wants and needs. Sometimes users express a desire for a specific solution, but the underlying problem is what truly matters.
For instance, a user might say they want a “red button,” but their real need is to “easily find the save option.” Focus on solving the underlying need, not just fulfilling every single request.
Finally, use the analyzed feedback to iterate on your product idea. This might mean adding a new feature, simplifying an existing one, adjusting your pricing, or even refining your target audience.
The validation process is not a one-time event; it’s a continuous loop of learning and improvement.
By carefully analyzing feedback, you ensure your digital product evolves into something that truly resonates with your market and solves a real problem.
Step 10: Improve Your Idea
After carefully analyzing all the feedback you’ve gathered, the final and most important step in validating your digital product idea is to improve your idea.
This isn’t about giving up on your original vision; it’s about making it stronger, more relevant, and more likely to succeed based on real-world insights.
Think of it as polishing a rough diamond into a brilliant gem.
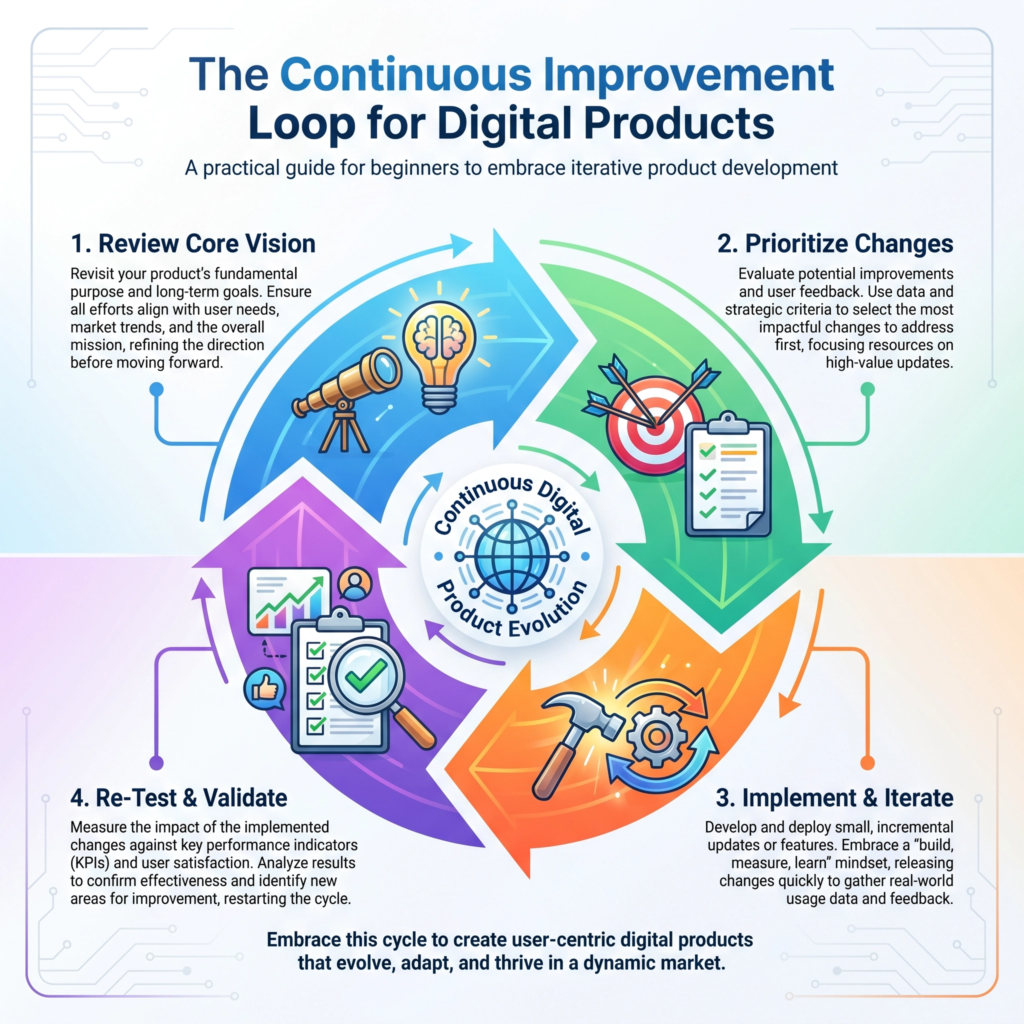
First, review your core problem and solution.
Does the feedback confirm that the problem you identified is still a significant pain point for your target audience?
Does your proposed digital product still offer the best solution?
Sometimes, feedback might reveal that the problem is slightly different than you initially thought, or that your solution needs a tweak to be truly effective. Be open to these discoveries.
Next, prioritize changes based on impact and effort. You’ll likely have a long list of suggestions and issues. Not all of them can be addressed at once.
Focus on changes that will have the biggest positive impact on your users and your product’s success, especially those that address critical pain points or significantly improve the user experience.
Balance this with the effort required to implement each change.
Consider iterating on your Minimum Viable Product (MVP).
If you built an MVP, use the feedback to make improvements. This could mean adding a highly requested feature, simplifying a confusing part of the user interface, or clarifying your product’s messaging.
The MVP process is designed for this continuous cycle of improvement.
Don’t be afraid to pivot if necessary. A pivot means making a significant change to your product idea, target audience, or business model based on what you’ve learned.
For example, you might realize your digital planner is more suited for small business owners than students, or that a subscription model makes more sense than a one-time purchase.
Pivoting isn’t failure; it’s smart adaptation.
Finally, re-test your improved idea. Once you’ve made significant changes, it’s a good practice to go back and get more feedback.
This could involve another round of surveys, interviews, or even an updated landing page.
This continuous loop of feedback and improvement is what leads to a truly validated and successful digital product.
By embracing this iterative process, you increase your chances of creating something that your audience will love and pay for.
Conclusion
You’ve now walked through the essential steps to validate your digital product idea.
From understanding your audience and studying competitors to building an MVP, pre-selling, and continuously improving based on feedback, each step is a crucial building block.
This journey isn’t always linear, but by embracing these validation techniques, you significantly increase your chances of creating a digital product that truly resonates with your market and achieves lasting success.
Validation is about minimizing risk and maximizing impact. It’s about building smarter, not just harder.
It empowers you to create something that people genuinely need and are excited to pay for.
Don’t let fear of failure hold you back; instead, let the validation process guide you toward a product that thrives.